How to Record YouTube Live Stream

You need to screen record your ASUS laptop for some reason, but feel confused about what to do exactly. Here we'll break down how to do it in 4 incredible ways.


Choose a proper recording tool to capture your ASUS laptop screen.
Odds are that you'll need to record the screen on your ASUS laptop for the purpose of recording a YouTube video, capturing gameplay to share with others, making a demonstrational tutorial to show the usage of a program, or recording a zoom meeting, etc.
Every user of an ASUS laptop deserves to know how to create a screen recording on the device. And there are diverse ways through which you can do it easily. Here we'll discuss some of the practical screen recorders that you can use to capture screen on your ASUS laptop. Keep on reading if you are interested.
Table of contents
Xbox Game Bar is an inbuilt and handy screen recorder on an ASUS laptop that is dedicated to recording gameplay. Aside from that, it lets you record any window like a browser or an application easily. You may first have a look at the pros and cons of using this tool:
Pros:
Cons:
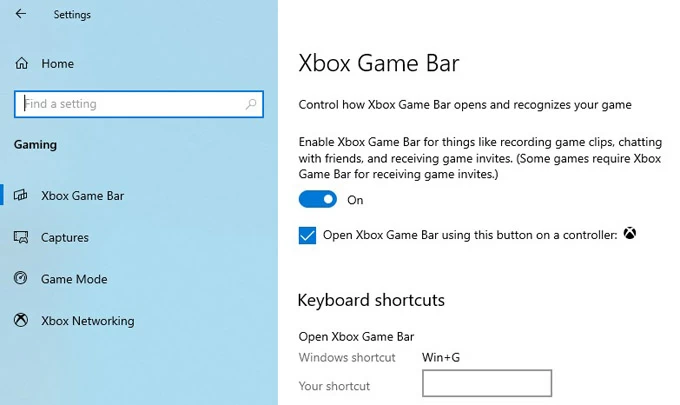
Before recording your ASUS laptop screen via Xbox Game Bar, you should first enable it in Start menu > Settings > Gaming > Xbox Game Bar, where you need to turn on the switch and select the option of Open Xbox Game Bar using this button as a controller.
Then you can follow the steps below to record screen on the laptop with this tool.
Step 1: Open the application you want to record.
Step 2: Press the Windows logo key + G to bring up the Xbox Game Bar controls. You may make some adjustments on the settings if needed.
Step 3: Use the Windows logo key + Alt + R to start the screen recording.
Tip: You may press the Windows logo key + Alt + M to turn on and off the audio from microphone during the recording.
Step 4: Hit the Stop button to end the recording. Alternatively, you can use the shortcuts Windows logo key + Alt + R.
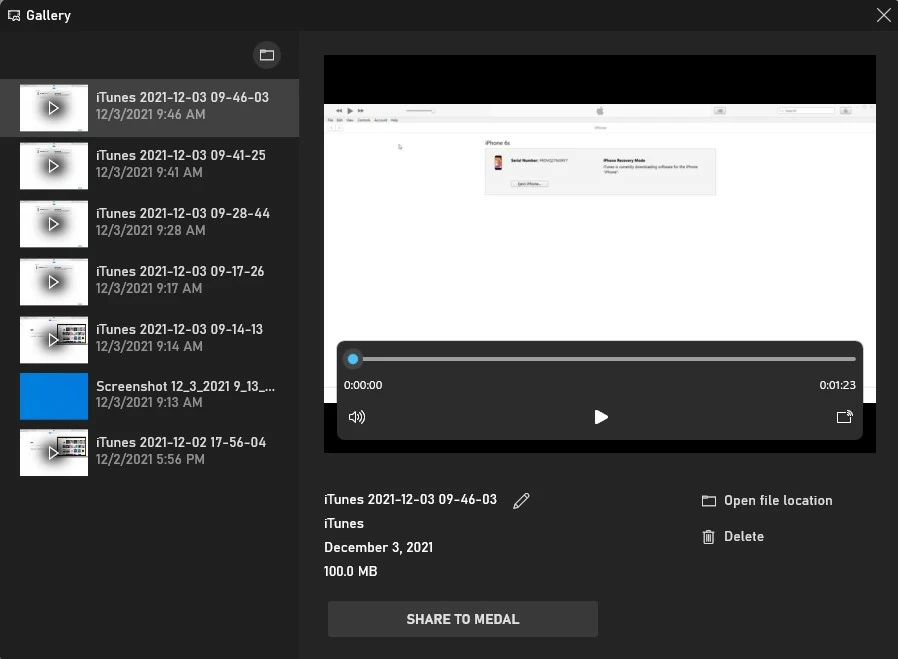
The recording will be then automatically saved and you can check it in the Gallery. You may also hit the Open file location to reach the video file if you need to send it to others.
Xbox Game Bar meets the basic needs to record screen. But if you tend to record the entire desktop on your ASUS laptop, or convert videos in a different format, you'll need to turn to other recording tools for help.
An ideal tool used by a great many users worldwide for screen recording is the AppGeeker Screen Recorder. This tool is recognized as a comprehensive tool to capture screen videos on PC or laptop, containing all the features required to record the screen professionally.
Reasons for choosing this application to capture your laptop screen:
Steps to use the AppGeeker Screen Recorder to screen record your ASUS laptop:
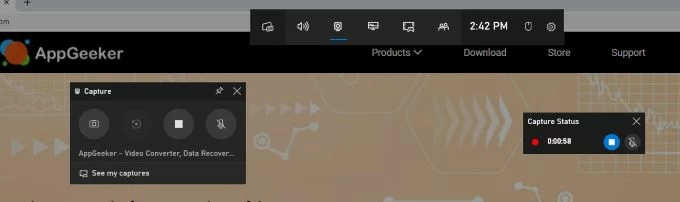
1. Launch the tool. Hit Video Recorder on the main interface.

2. Select a desired area for screen recording in the left, and enable the audio you want to record on your desktop, either System Sound or Microphone audio.

3. Hit the REC button to begin the recording, and perform as needed.
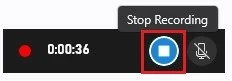
4. Press the Stop button once you complete the recording.

5. Preview your screen recording and add changes to it by using the editing features.
After you edit the recorder video, you can export the file in a preferred format.
Now you can see how easy it is to capture laptop screen by the AppGeeker Screen Recorder. For its practicability and simplicity, we consider it to be of great help and convenience for you to record screen on your ASUS laptop.
Compatible with Windows, macOS, and Linux, OBS is an open-source and advanced screen recorder that allows you to capture high-quality videos in various formats. Its multiple features of recording video and audio, webcam, managing configurations, and customizing the recording make it a professional tool for screen recording.
Note:
You may be interested in: How to record desktop audio with OBS on Windows computer
Here's how to use OBS to record screen on ASUS laptop.
Step 1. Go to OBS official website to download and install the software. Once done, launch it.
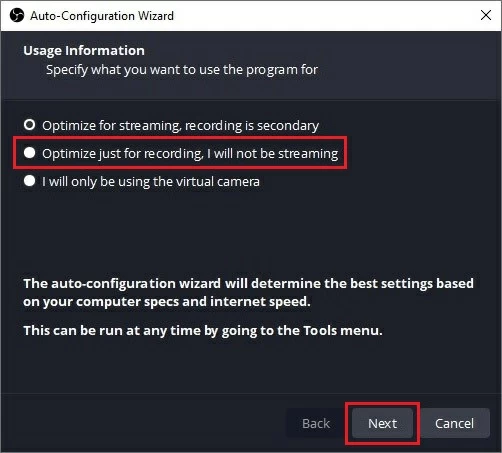
Step 2. With a window of Auto-Configuration Wizard presented, select "Optimize just for recording, I will not be streaming" for screen recording your laptop and hit "Next."
Step 3. When it comes to the main interface, you need to hit the + icon in the Scenes section to add a new scene. Enter the name of the scene and click on the OK option.
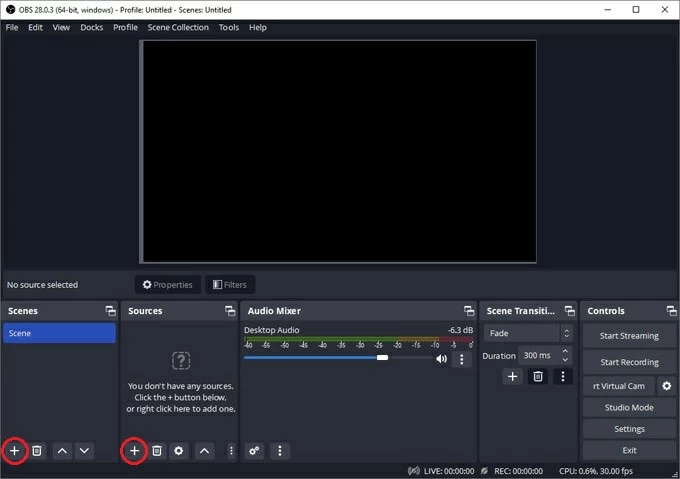
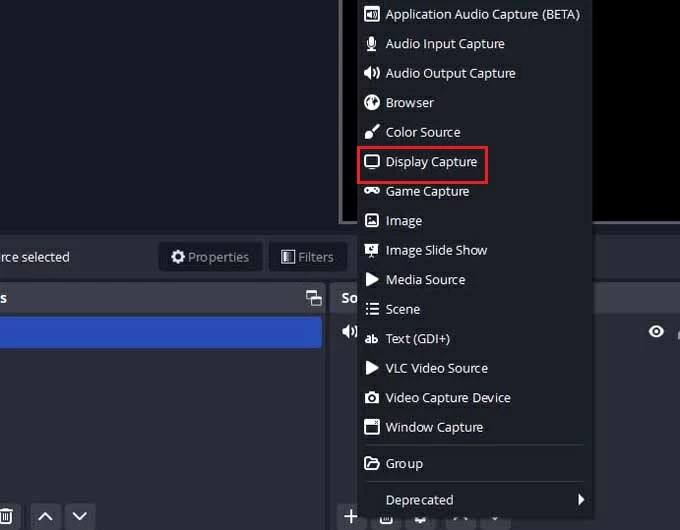
Step 4. Also hit the + icon in the Sources box and then select Display Capture.
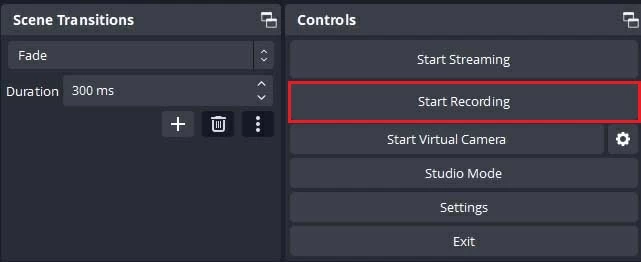
Step 5. Click on Start Recording and open the window you want to record.
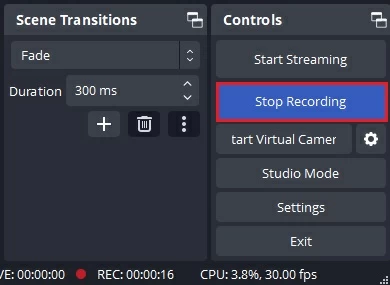
Step 6. Later press the Stop Recording option when you finish it. You can then check the video on File > Show Recording.
It may surprise you that VLC, one of the most popular media players, can also record screen on PC or laptop. However, it will take you some time to adjust relative settings before starting to record your ASUS screen by this tool. Below we'll walk you through the steps in detail.
Follow these steps to screen recording on ASUS laptop.
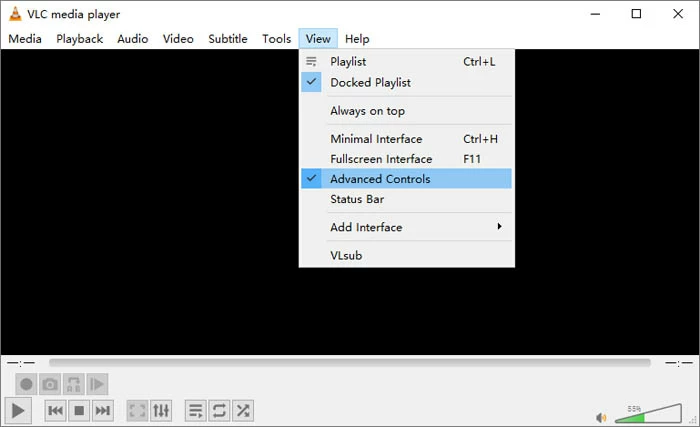
1. Launch VLC and enable the Record button. Select View at the top bar, and click on Advanced Controls to enable it. With this option ticked, you will see a toolbar with the Record button appear on the lower left.
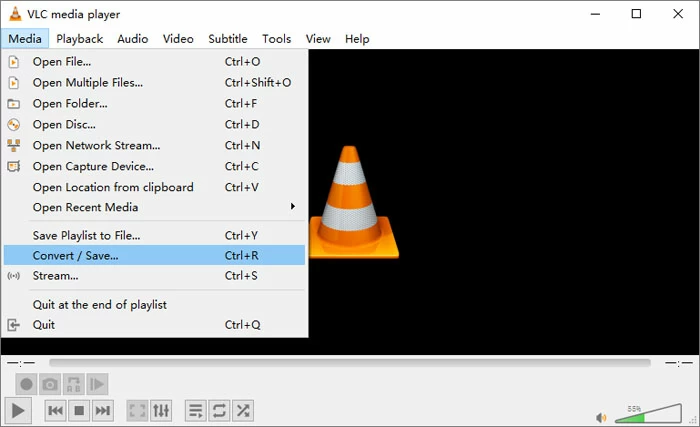
2. Hit Media on the menu and select Convert / Save from the pull-down list.
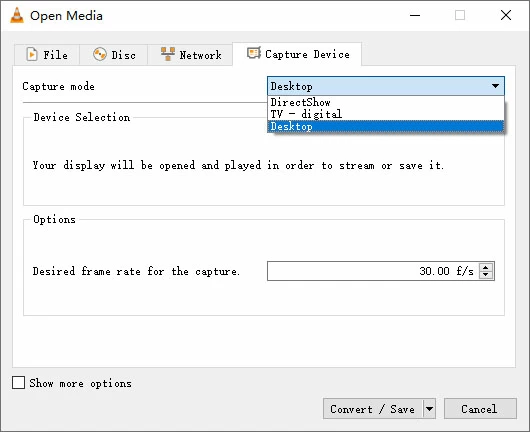
3. In the pop-up Open Media window, hit Capture Device to change Capture mode to Desktop. Then click on Convert / Save to confirm.
4. You will be directed to a new window where you can set a video format based on your needs in the Profile menu.
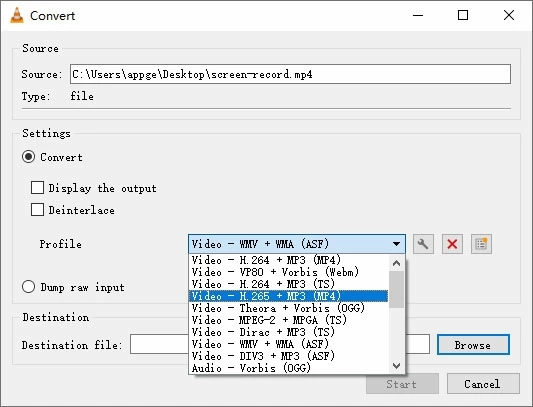
Here you can also choose a file to save your recorded video by hitting Browse next to the field of Destination file. After the selection, you may click on Start to go on.

5. To start the laptop screen recording, you need to press the red round button in the down left of the VLC window. Then play whatever needs capturing.

6. If you want to stop the recording, hit the grey square icon and the video will then be saved in the destination file.
Note:
If you think it bothersome to use VLC for screen recording, you may resort to the efficient recording tool, AppGeeker Screen Recorder.
Screenshot makes it simple and quick to visualize something you cannot explain in words. There're times when you might need to take a screenshot on your ASUS laptop to make yourself understood. Let's see how to do it then.
Tip: Before taking screenshot on your ASUS laptop in this way, you need to make sure that you have turned on the PrtSc feature in Start menu > Settings > Ease of Access > Keyboard > Print Screen shortcut.