
How to Screen Record on Any Laptop [Windows 10 & Windows 11]

If you want to know how to record your screen on a PC running Windows 10, then read this step-by-step tutorial to master the art of recording full screen on your computer.

What to do if you want to record a screen on a Windows 10 PC:
Using Windows 10's built-in video recording tool or screen recorder will allow you to record your screen on PC.
It might be frustrating and time-consuming to show someone everything with pictures. But you can make things easier by screen recording whatever you want on your Windows 10 PC. And, if you're going to record your game or anything else, you can actually do that pretty quickly.
In this guide, we will tell you how to record your screen on Windows 10. So, if you want to figure out how to screen record on a PC running Windows 10, then keep reading. There are three ways to record your screen: Xbox Game Bar, AppGeeker Screen Recorder, and OBS.
Table of Contents
Even if you wish to record your activities in a non-gaming application, using the screen recording feature embedded in Windows 10 is simple. However, Game Bar has several restrictions, such as the fact that you can only record one application at a time rather than the entire screen. Thus, if your task involves more than simply capturing one application at a time, you can use other screen recorder software.
As there are limitations to screen recording on PC with Windows 10 via Xbox Game Bar, you can use AppGeeker or OBS to record in such scenarios. By reading this guide to the end, you will be able to record full screen on your Windows 10 PC.
Read Later: How to record a screen on Mac
Windows 10 and windows 11 both have a built-in Xbox Game Bar, a customized game overlay tool that one can be used to record not only videos of games in progress, but also other non-game app actions on the screen. Xbox Game Bar has many widget features, including screen recording, screenshots, Xbox social, etc. Read More: How to record screen on Win 11
First, go to the app you want to make a screen record on Windows 10.
Then to begin screen recording, press Windows Key + Alt + R. On the screen, most commonly in a corner, a little recording widget displays the amount of time you have been recording. And you can turn on the microphone option to record the audio or mute it if you do not want to capture the sound.

Note:
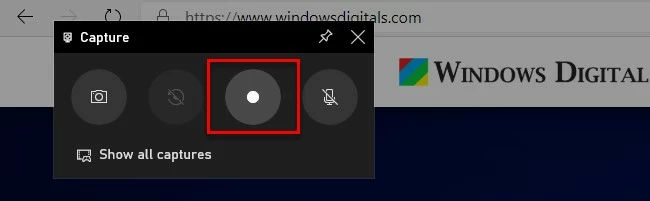
You can also record your screen on a Windows 10 or Windows 11 PC by pressing the Windows key + G to open the Xbox Game Bar dialog. Then find the Capture widget, click the Record button, and choose whether to record the audio from the microphone.
Tip: If you want to take a screenshot during screen recording, you can press Windows Key + Alt + Prtscrn, or use Windows Key + G to open the widget bar and click on the camera icon to take a screenshot.
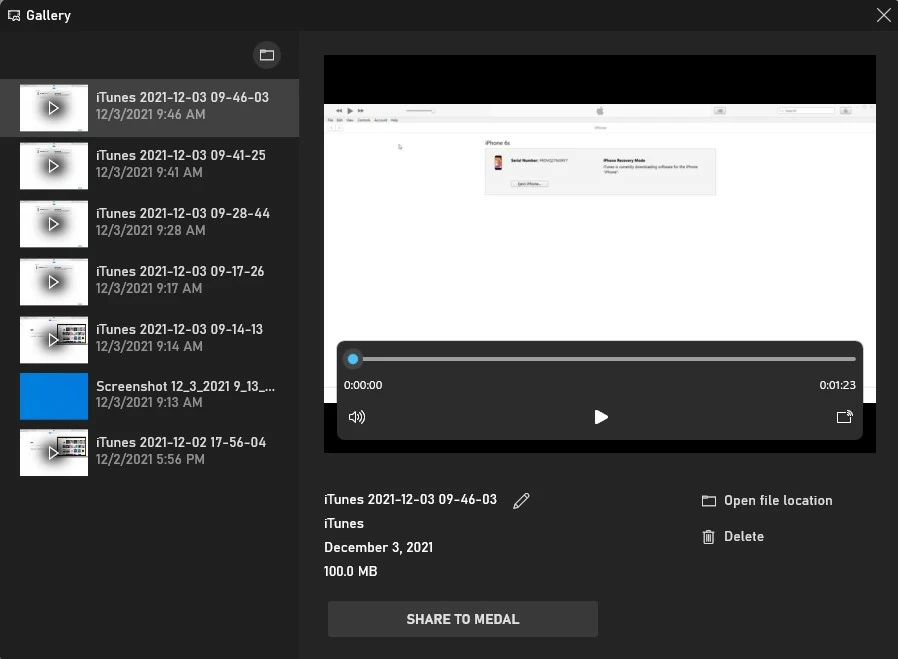
When you are done recording, then press Windows Key + Alt + R to stop the recording. Or you can use the Stop button of the widget. And then you will get a notification saying "Game clip recorded." If you click on it, the gallery section of the Xbox Game Bar will open, showing a preview of the video you captured. And the screen you recorded will be saved as an MP4 file in your PC's Videos Folder.
However, X box Game Bar is not a panacea, it has the obvious limitation that it can only record the activities of one app. If you have multiple activities running on your Windows 10 PC at the same time, you can only select one of them for screen recording. Besides, X box Game Bar can't record desktop and File Manager, so it can't record full screen either.
If you are looking for more perfect screen recording or more video editing features on PC, then you can try AppGeeker Screen Recorder as it is a better alternative.
You cannot screen record on a PC running Windows 10 whole desktop & File Explorer, and more than one application at the same time. If you want to record full screen on your Windows 10 PC without any limitations, then the best choice you have is AppGeeker Screen Recorder.
AppGeeker Screen Recorder is more than just a random recording tool. It is an all-in-one recording and editing software with a great reputation, dedicated to giving users high-quality screen recording effects along with internal/external audio. And your recording activities will become easy thanks to its incredibly appealing UI.
Additionally, AppGeeker Screen Recorder has many settings to improve your recording experience. You will be able to select to record the complete screen or only a part of the screen; activate or disable the camera, system sound, and microphone voice; show the mouse pointer; output in several formats; and more. One of the best things about this screen recorder is that it is available for both Windows and Mac.
So, to record screen on a PC with Windows 10, you have to follow these steps:
Firstly, download and launch the software on your PC. Then simply click on the Video Recorder if you want to just record a screen. But if you're going to record a video while playing games, you can choose Game Recorder.

The next thing you will need to do is to change the settings according to your preferences. For example, you can choose to record the entire screen by clicking the Full button or select Custom and only record a part of the screen. After that, you can use a webcam to create a picture-in-picture video and record audio using the microphone or system sound.

Tip: You can also click on the gear icon in the upper-right corner to adjust the more advanced settings in accordance with your needs, such as output format, save location, etc.
There are also various customizing options, including Hotkeys, Recording, Output, Sound, and the Camera. If necessary, you can use them to make some changes.

Then just click on the REC button to begin the screen recording. A recording widget will be displayed somewhere on the screen, allowing you to see the duration of the recording or pause it. In addition, you can draw and add annotations to the recording process by clicking on the built-in handy editing tools: text, shapes, arrows and markers are supported.
![]()
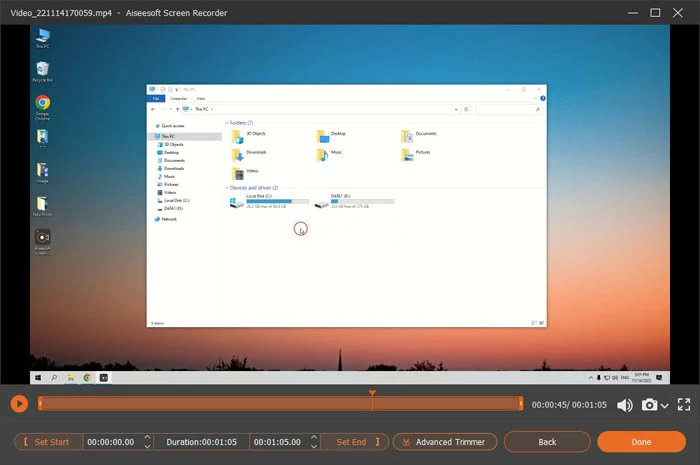
When done recording, stop it by clicking on the red button. By doing so, a new window will open where you will be able to cut and trim your video accordingly.
AppGeeker Screen Recorder includes many features to edit your video, and you can trim, merge, and compress your recorded screen. After you've finished editing the video, you can export it and save it by clicking Done. (By default, the video will be in MP4 format.)
As you can see, it is extremely easy to screen record on your PC Windows 10 via AppGeeker Screen Recorder. Not only is the app extremely user-friendly, but it also provides a ton of options for the users. Therefore, with this software, no matter what you want to capture or in what form you want to record it, you will be able to do it perfectly and quickly.
Open Broadcaster Software (OBS) is also excellent for video recording and live streaming. OBS is a viable choice to consider if you're seeking a substitute for Xbox Game Bar on Win 10 or Win 11 for recording the whole desktop screen, capturing File Explorer and several windows of running applications.
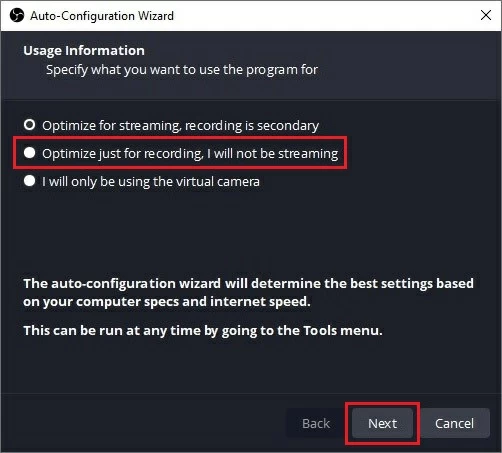
Download the program on your computer and then run it. Then, click on "Optimize just for recording, I will not be streaming" option if you want to just record videos, as this option will automatically test your computer and set up the best parameters for your screen recording on Windows 10 PC.
Then you need to select the video resolution, we recommend that you select the same resolution as the screen you need to record.
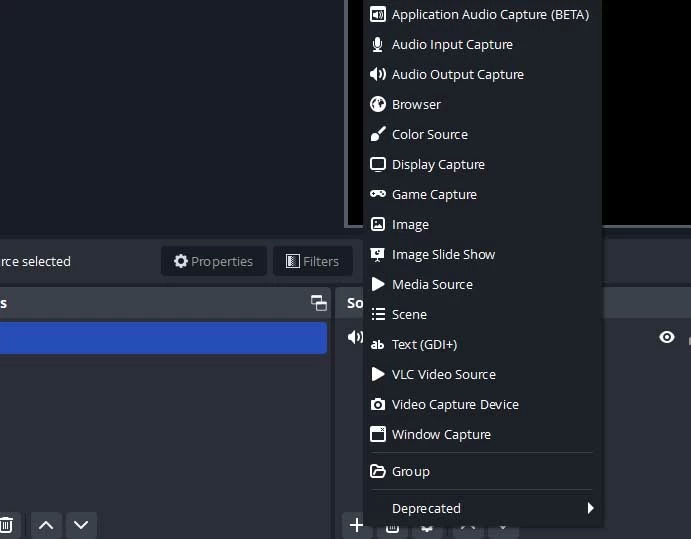
Next, in the Sources section, click on the plus icon and select the Display Capture option to capture the entire screen. After that, change the file name and click OK. If you have more than one monitor, choose one, and then click OK.
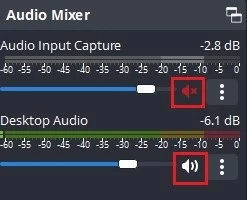
Set up sound recording in the Audio Mixer section. OBS will by default record any sounds coming from your computer system as well as sounds coming from the microphone. If you don't need these sounds, you can click on the speak icon to silence them.
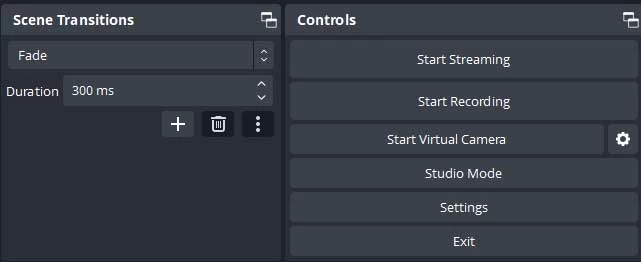
Once you are satisfied with the settings, start by clicking on the Start Recording button in the Controls area, which you will find on the lower right. When done, simply tap the Stop Recording button to end the screen recording on your PC.
Note:
Conclusion
There you have the answers to how to record a screen on Windows 10. You will be able to do it easily if you follow the guide carefully, as not a single step is complex, and anyone can do it with ease. It doesn't matter if you are a gamer, streamer, YouTuber, or vlogger; you can use these tools and record screen on your Windows 10 PC.
1.How do I record my screen on Windows 10 for free?
You can screen record on your Windows 10 for free via the Xbox Game Bar (built-in app in Windows 10 and Windows 11). But if you think Xbox Game Bar can't meet your screen recording requirements, you can try AppGeeker Screen Recorder (the best choice without limitations).
2.Where are screen recordings stored on the PC?
Screen recordings will be saved in Video files in your hard drive. And you can look them up from your File Manager and find them.
3. How long can the longest screen recording be?
The maximum recording time for Xbox Game Bar is four hours, while AppGeeker Screen Recorder and OBS have no time limit. However, you should note that the longer the recording time is, the more space it will take up on your PC. So, make sure you have plenty of storage space on your computer!
4. Can I record the screen with audio on PC?
This is no problem at all. If you want to record screen and audio at the same time, Xbox Game Bar, AppGeeker Screen Recorder, and OBS as described in this article can do that.


