How to Record Gameplay on Mac

It's possible and easy to record your desktop audio or computer audio with QuickTime Player and other feature-packed audio recorders for Mac users.

The most common way to record desktop audio with Mac is to use QuickTime Player with a built-in audio recorder under File > New Audio Recording. You will need a virtual audio driver output - rather than your microphone, to get the desktop sound into QuickTime and record while the audio track is being played in macOS.
If you're more interested in the screencast with the audial and visual parts, check our guide on capturing audio for a Mac screen recording. But this article is for those, who need only internal audio, aka desktop audio recorded from Mac.
It's pretty easy to make an audio-only recording on Mac's desktop using QuickTime Player and other dedicated recording services.
Recording audio from desktop on Mac machine is needed for various purposes. Primarily, picking up your favorite YouTube audio (royalty-free) from the video facilitates an offline playback at leisure. Clean audio recordings from a video of tutorial, human speech, meeting or interview may help you easily recreate analyses or whatever. If you need to record desktop audio playing onto Mac, this guide will help learn how to create the recording, accompanying with several Mac desktop audio recorder tools.
Tip: The quick walkthrough of desktop audio recording for Mac users is applying for all models of Mac and MacBook with M1 or M2 on macOS Mojave, Catalina, Big Sur, Monterey, Ventura and newer, as well as the earlier versions of macOS.
In this article we're going to tell you 4 ways of recording for Mac desktop-audio:
Let's begin with QuickTime Player. Despite its functioning as a media player and screen recorder, it can even record the audio on Mac by the means of New Audio Recording under File.
You're able to capture your own voice and noises you make from microphone; and as long as you have had the plugin like Soundflower set to macOS sound output, the desktop audio from Mac computer can be picked up in the audio recording.
To follow this tutorial, you must have:
macOS provides no direct way of desktop audio capture, and even the preinstalled audio recording software QuickTime has no in-built ability to record the desktop audio coming from Mac.
To make QuickTime record the Mac's internal or desktop sound, you need a virtual audio driver, like Soundflower. It reroutes audio that is playing from the system within an app, a game, or a browser, to QuickTime's built-in audio recorder that you can then use to record desktop audio effectively.
After you download and install Soundflower, go to change the computer output device in an attempt to route the desktop audio to be captured while recording with QuickTime in Mac. Click Apple menu > System Preferences, then choose Sound. Under the Output section, select Soundflower (2ch) for the purpose. You can then adjust the audio volume to a comfortable level at the bottom of the screen.
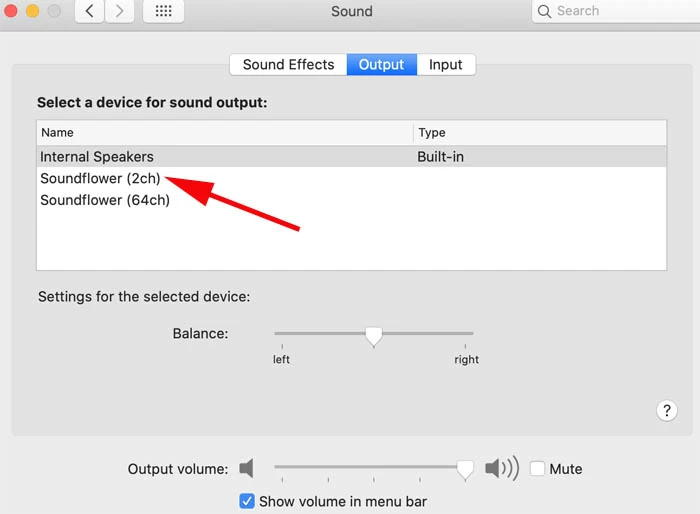
Set up Soundflower audio routing plugin for audio recording on a Mac using QuickTime.
This is the easy part, as macOS desktop audio is configured to route to QuickTime Player, you click the red Record button away and any and all sound from the speakers including sound from music and video apps and system sounds that are played via a website should be recorded away!
1. Once QuickTime opens, click File > New Audio Recording for starting a desktop-audio-only recording with Mac (not microphone).
If you would rather screen record along your computer's audio captured with, click on File > New Screen Recording.
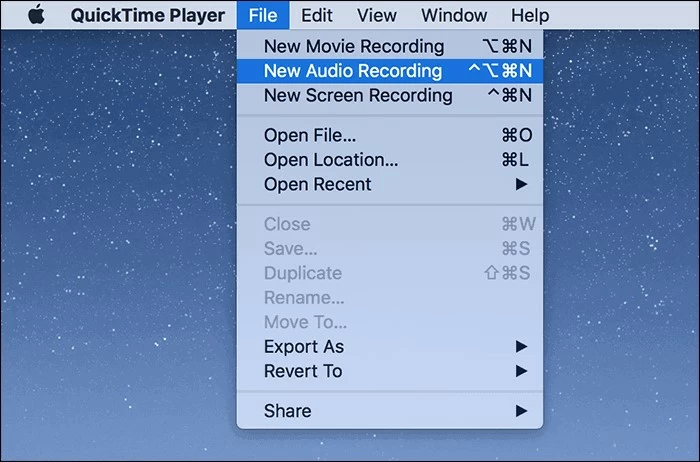
Select "New Audio Recording" if you need to capture just the internal audio coming from the Mac.
2. Click the little arrow Options next to the red Record button to expand the recording options, then under Microphone section, choose Soundflower (2ch). This captures the computer audio instead of the mic. The only downside is that you will not able to hear any sound through the speaker so long as the Soundflower is selected.
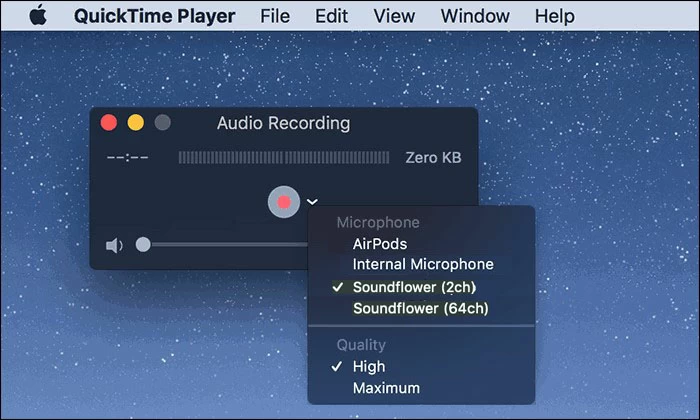
To get your internal sound recorded, make sure "Soundflower (2ch)" from audio recording options is selected.
3. Drag the volume control to adjust how loud the audio recording is that you can hear from.
4. Hit the Record button to start recording your desktop's sound.
5. Play the media (video or audio file) on your Mac with the audio you wish to record.
6. When finished, click the Stop button on the menu bar. You will end up with an audio file with system sound from Mac's desktop at AAC format. Play the soundtrack and do a test recording to see if QuickTime picks up any audio that your Mac was playing.
7. To save the audio track recording to your computer, click File > Save. Name the recording and pick your desired location for it. You now have a recording of your desktop audio!
After you complete all steps above, remember to go back Apple menu > System Preferences > Sound, and switch the output to your internal speakers.
Note: QuickTime can only make a simple one-track recording for Mac, which means that while you're recording the desktop audio in QuickTime, the tool does not record the noises from your microphone.
Audio Recorder is an awesome, easy-to-use desktop audio recorder for Mac that you can choose in the case of you're looking for a no-fuss solution to capture audio on macOS desktop without relying on third-party plugins like Soundflower. If offers flexible capabilities for recording of audio, granting users to record Mac's internal audio including sound from apps and system, audio from a built-in microphone, and even an external audio device. You can also record all sounds that you could hear from the system and mic, and mix them into one audio track.
The software provides high-quality audio recordings with a range of sound formats like AAC, MP3, M4A, and more, as well as a useful sound check feature to keep your audios volume consistent. Once you finish audio capture on Mac, you can edit the recorded audio file ensuring you get the best possible results.
Now, download and install Audio Recorder on your Mac machine, then open it. The intuitive user interface is supposed to make capturing desktop or internal audio on a macOS desktop simple and fast. Just follow three easy steps:
Step 1: In the main screen of Audio Recorder for macOS, choose Audio Recorder tab.

A press on the "Audio Recorder" will let you capture any desktop audio from a Mac.
Step 2: Turn On the switch for "System Sound" to record your Mac's audio. Tip: You can record your mic simultaneously while recording the internal sound, only if you enable "Microphone."
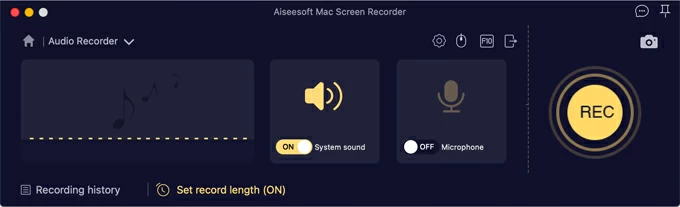
You can configure to record internal and external audio at the same time, or record just the sound from desktop or apps.
Step 3: To make configurations on audio, click the gear icon right above the "Microphone" switch to open Preferences window. From there, you can change the recording options, audio recording output format, quality, location. Confirm your decision by clicking OK button and return to the recorder.
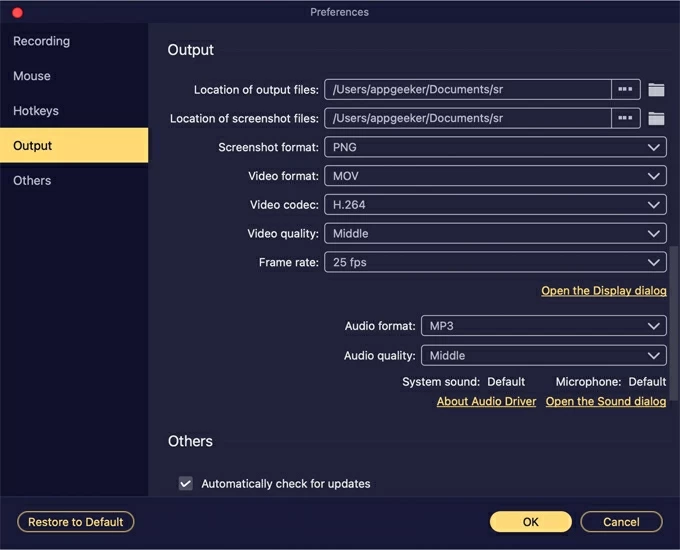
The default format for an audio recording it MP3, but you can change to AAC or any format that fits your computer or player.
Step 4: When everything is ready, click on REC button and let the tool do the recording. You'll get a float bar indicating how long the audio file has been recorded for.
![]()
The Audio Recorder in macOS is recording whatever audio coming out of your Mac.
Step 5: Play the media file on your Mac so the program captures the audio.
Step 6: When you are ready to end the sound recording session, click on the Stop button.
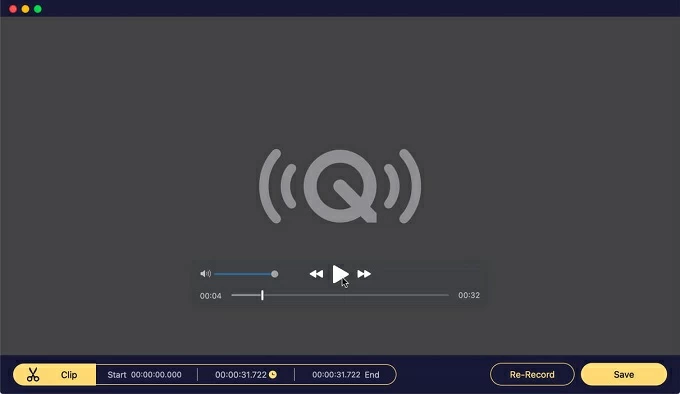
Listen to your recorded audio, trim it, and save it to your Mac.
Play the finished audio recording and test the sound that was just captured. You can edit the file in Mac Audio Recorder right away without downloading any other editor. If you're happy with the recording, save it in a location of your choice on the Mac computer. The recording audio file should be accessible at AAC, MP3 or whatever format you set in the previous step.
Don't Miss: How Can I Record YouTube Videos on Mac
Audacity for Macs is a free-to-use, open-source audio recorder & editor & mixer that you can record sounds, as well as play recorded sounds and edit recordings of sounds after recording from Mac.
To get Audacity to record desktop audio, you have first set Soundflower (2ch) as the audio source in Mac through Sound > Output within System Preferences. Then open Audacity, click Audio Setup, choose Recording Device and then select Soundflower (2ch) as the recording device. This is the same process if you prefer to use Mac's QuickTime Player to record the internal sound.
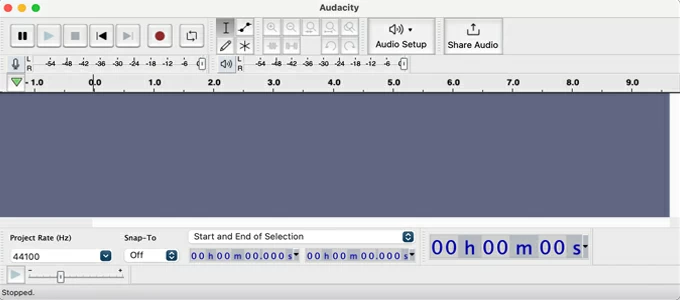
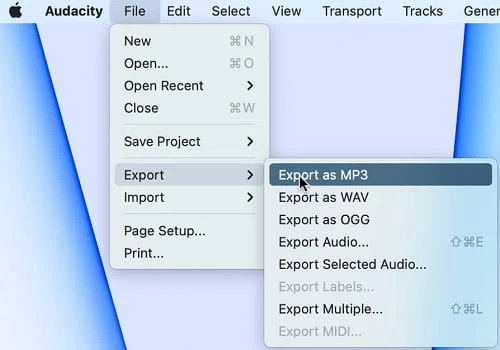
After that, click the red Record button to begin recording from Mac. Play the audio within any app or browser to be captured in the recording. To finalize the internal sound recording, hit the Stop button. Your recording won't save immediately on the Mac when finished, but you can export it to different formats by pressing File > Export to MP3, Export to WAV or whatever.
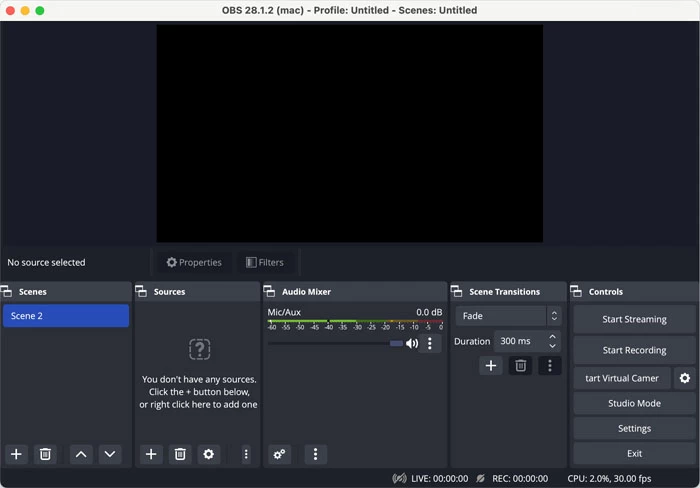
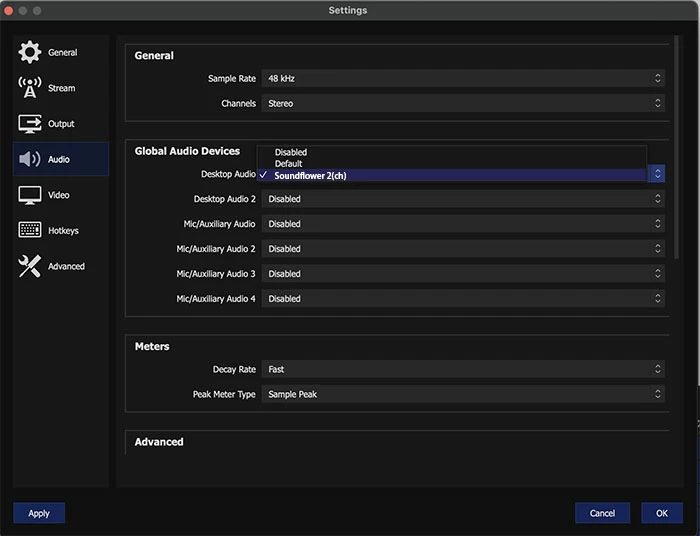
The free and open-source OBS Studio recording software offers a Desktop Audio Capture mode that allows you to record the audio from the desktop on Mac computers. This is especially useful if you need to capture sound from a game, music program, movie, or other applications running on the system. Also read: How to use OBS to capture desktop audio with Windows PC
One note:
Since macOS 13 Ventura, OBS has introduced a direct audio capture solution so users can capture all desktop audio, and audio from macOS applications. If you're running an earlier version of macOS, you need an extra software or plugin like Soundflower that supports audio routing from applications or system to OBS recording tool, so that any or all desktop sounds playing within Mac's internal can be captured effectively.