How to screen record on Windows 10

Trying to figure out how to record a video on your MacBook? Apple has built-in tools to get it done. There are other MacBook video recorders that do the trick as well.

MacBook Video Recording:

There are a variety of ways to record a video with your MacBook webcam.
Apple makes it easy to record videos with iPhone camera: simply open Camera, select Video mode, tap the Record button to start a recording. But what about recording a video on MacBook?
Whether it's to make a video demo for your teaching, an online business presentation, or just a happy birthday video, it's important to know how to record video on MacBook, Pro or Air.
Thankfully, there are several pre-installed video recorders on MacBook. You can take a video with your MacBook's webcam using either the Photo Booth, QuickTime Player, or iMovie. There are also many popular third-party utilities that can help you record video on MacBook using your default FaceTime HD camera or an external webcam. Here are your options:
Tip: The following steps work the same for MacBook, MacBook Pro, MacBook Air, iMac, Mac Mini, and Mac Studio. And there's also a bonus section that shows you how to screen record on MacBook through the Screenshot Toolbar if you're using macOS Mojave or later.
It's important to ensure the built-in webcam on your machine works well before recording yourself on your MacBook. You can head to Finder > Applications, then double-click to run Photo Booth app. The live webcam window will open automatically.
If, for some reason, the macOS webcam doesn't work, you may employ an external camera from Amazon or other online retainers to record your videos on MacBook. Make sure it's compatible with your computer. When you're ready, move to the following and learn how to record video on MacBook Pro and MacBook Air.
The QuickTime Player is a MacBook video recorder that comes pre-installed with all new macOS versions. Primarily crafted for digital media playback and standard video editing tasks, QuickTime also serves as a versatile screen recorder, enabling you to effortlessly capture webcam footage, videos, audio, or computer screen from your MacBook.
Here's how to record video on MacBook with QuickTime Player for free:
1. Go to Finder > Applications, find QuickTime Player from the list and open it.
2. In the menu bar at the top of your MacBook screen, select File > New Movie Recording.
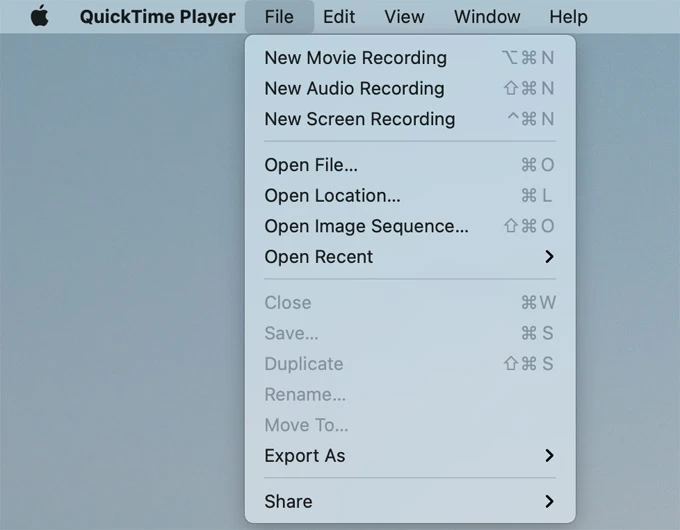
Choose New Movie Recording option in the File menu to record video with QuickTime.
3. You will now see yourself in the live recording window. If the screen doesn't show the camera view, check whether the webcam is turned on.
4. Click the tiny down arrow next to the record button to choose which camera, microphone, and quality you want to use.
Tip: The default settings in QuickTime will let your MacBook record video with FaceTime HD Camera and Internal Microphone in high quality. If you're using external video recording devices, make sure to tick the appropriate ones.
5. Click the red Record button to begin video recording. It will indicate how long the video goes and the file size during the process.
6. When you're done, click the Record button again. The recorded video will open in QuickTime Player automatically for preview, editing and sharing
7. Hit File > Save. In the opening dialog box, rename the new webcam video and locate it where you want it to be saved. By hitting the Save button, the MacBook video recording will be saved as a .mov file under QuickTime Player folder in iCloud Library.
That's it! You've successfully recorded a video of yourself on your MacBook using QuickTime.
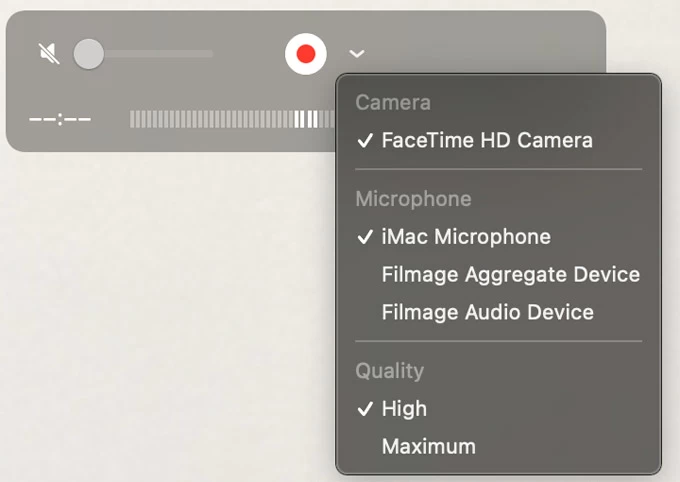
Photo Booth is another effective option for webcam video recording on MacBook. Once you've switched into its video mode, you can record video with your MacBook's built-in camera or an external webcam connected to the machine with a few clicks.
If you intend to use an external webcam, make sure that you have selected it as the video input source in the Camera settings from Photo Booth screen before you record yourself with your MacBook. To video record on a MacBook using Photo Booth:
1. Open Photo Booth from Finder > Applications. All MacBooks come with it pre-installed.
2. Click Camera in the menu bar to select the webcam you want to use with Photo Booth, if you have multiple webcams installed.
3. Select the video mode by clicking on the video camera button in the lower left corner.
4. To record a video, click on the red Record button to start. During the recording, you may hit the Effects button to add different video effects.
5. Click the red Stop button to end recording.
The newly recorded video will appear as a thumbnail at the bottom. Click on it to view your video, then right-click and choose Export to save the video capture on your MacBook.
Apple's iMovie is not usually the video recording tool for MacBook users. But if you're looking to record a video of yourself and embed it into a movie you created, then iMovie is an easy-to-use MacBook video recorder and editor that you can't miss. Follow these steps to record videos on MacBook by capturing yourself into iMovie with a webcam:
Tip: If it's the first time to record a video with your MacBook's camera, you'll get a message asking for permission to use the camera and microphone. Click OK to proceed.
1. Open iMovie app on your MacBook.
2. Click the Import button in the toolbar from the Projects browser. You may need to close Photos, Image Capture, or any other photo app on your MacBook.
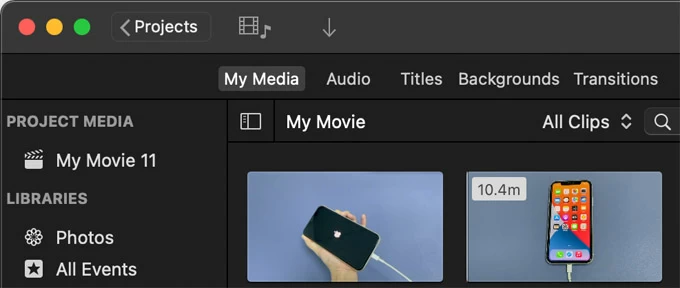
You can also click the Media tab in the tool bar and then click the Import button.
3. Move to the Cameras section in the iMovie sidebar, select the built-in FaceTime HD Camera or an external webcam. A live video image will show up with a record button below.
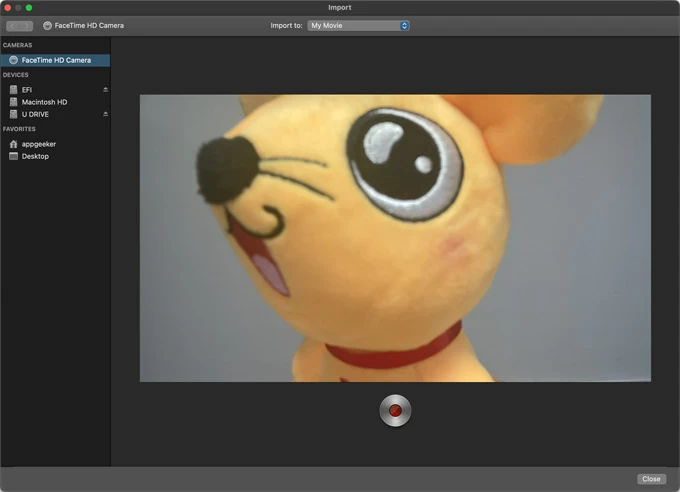
4. Check the Import to drop-down box and choose where to add the video capture. It can be imported to an existing event or a new one.
5. Click the Record button to begin video recording, and hit it again to stop. Your new video clip has been created for your recording. You can repeat clicking Record button to record videos as many times as you want.
7. When you're finished recording, click Close on the bottom right to return to the iMovie window.
While macOS comes with built-in tools for basic webcam recordings, some advanced video recorder for MacBook can accomplish the task better. One of the popular 3rd-party tools that gets more flexibility and multi-source recording features is Screen Recorder by AppGeeker.
In addition to core webcam recording capabilities, this program empowers you to preview, trim, and save video clips in different formats, ensuring you retain only desired portions. Furthermore, this full-featured Mac Screen Recorder enhances your recording experience by enabling screen activity capture, creating picture-in-picture videos, taking screenshots, and simultaneously recording system sounds and microphone voice while taking a video on your MacBook.
Here're steps on how to record a video on MacBook Pro & Air:
Step 1: Launch Screen Recorder
Open the Screen Recorder software on your MacBook desktop after it's installed successfully. To record a video with your MacBook webcam, select Webcam Recorder tab to proceed.

Step 2: Choose webcam and voice source
Once you see yourself in the live preview window, use the drop-down menu on the lower left side to select a webcam device if there's more than one camera connected, and enable the microphone button to record your voice. If you want to take a screenshot, click the camera icon.
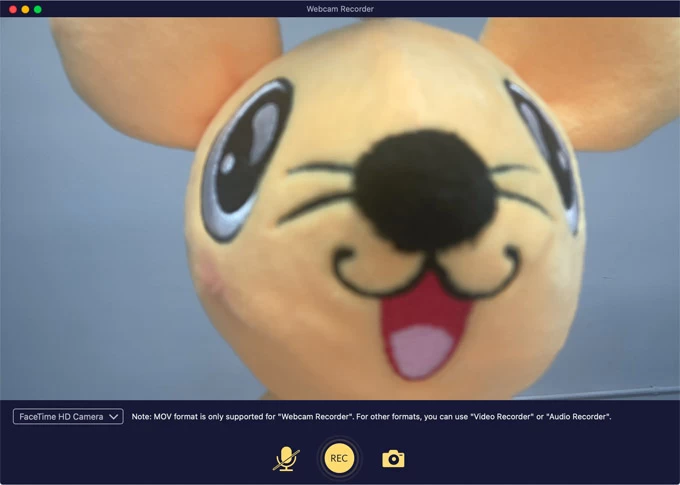
Step 3: Begin a MacBook video recording
When everything looks good, click the REC button to record yourself with your MacBook webcam.
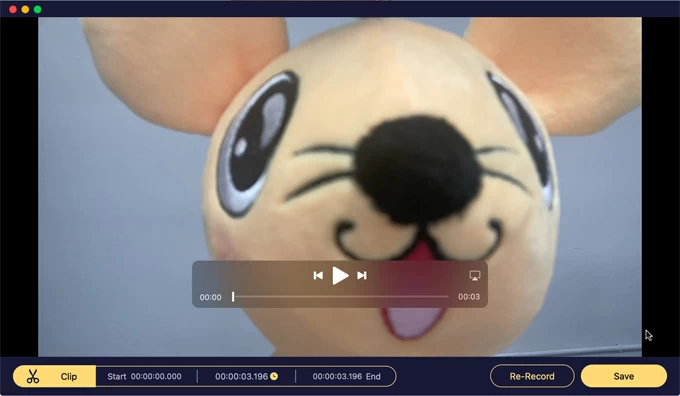
Step 4: Stop recording and save the video locally
When you're done, hit the record button again and it will display a thumbnail of the video on your MacBook screen where you can preview and edit the recording result and save it locally. Else, check Re-record tab if you want to record a video on your MacBook again.
This MacBook video recording software also enables you to record everything happening on your screen. Simply switch to another recording mode from its main interface at any time you wish to capture your MacBook screen content or record computer audio on your Mac.
1. Press Shift-Command-5 on your keyboard to open the Screenshot Toolbar.
2. A controller with icons and options will appear on your MacBook screen.

The Screenshot Toolbar can record a video of MacBook screen.
3. Select which area you'd like to record. If you're looking to record a video of the whole screen on MacBook, choose Record the entire screen button; if you just need a part of the screen to record, click the Record a portion of the screen button to go on.
4. Click Record tab on the far right side of the bar. This will capture everything on your MacBook.
5. To stop you will need to press the Stop button. The screen recording of video will end in .mov file extension and be auto-saved to your MacBook desktop.
Tips:
Screenshot Toolbar is available for macOS Mojave or newer in MacBook. If you have an older version of macOS, you will need to launch QuickTime Player to perform the same tasks.