The Best iTunes Alternatives on Mac

See iPhone unavailable message? Learn what it is and how to bypass your disabled iPhone. You can fix and unlock the disabled device even when you forgot the passcode.

Getting an "iPhone is disabled" message when unlocking iPhone is puzzling. If you're anyone like me, you might have taken some actions to bypass a disabled iPhone. You may turn off the disabled iPhone then power it back on, force it to restart or attempt anything else, but your iOS device still goes back to the "iPhone is disabled" screen and you can't bypass it.
Don't let the failed iPhone disabled solution get you down, though.
The iPhone disabled error often pops up after the wrong passcodes have been entered more than six times continuously. An iPhone in disabled mode means that the device is passcode locked instead of indicating something wrong with the phone.
The truth is that, along with the message "iPhone is disabled", it does give you the clue of how to bypass disabled iPhone. You can enter the correct lock screen passcode after the limited lockout period is over, or connect to iTunes if you've forgotten the passcode or locked out of your device completely.
Aside from bypassing your passcode disabled device with these two official tricks, you're also allowed to use an all-in-one tool, Appgeeker iPhone Unlocker, for iPhone disabled bypass, or rely on iCloud. Read on to see the detailed instructions to unlock and fix your disabled iPhone.

If you still remember the proper passcode, the most painless way to bypass your disabled device is to wait the amount of time showing on the screen and then enter the passcode to re-enable iPhone.
Depending on how many times in a row you have entered the code wrong to disable iPhone, you may need to wait for 1, 5, 15, or 60 minutes to get a chance to bypass iPhone disabled message with a right lock passcode.
If, unfortunately, you forgot the passcode and your iPhone keeps saying it's disabled, or you've guessed the passcodes too many times ending up with receiving a "connect to iTunes" alert, your last resort to get your iPhone out of disabled mode is to erase your iPhone and restore it to factory settings. For this, you get a few options.
What you need to know:
Bypassing the waiting time with the message "iPhone is disabled" is easy if your iPhone has been recently hooked up, trusted or synced to a computer before it became disabled and you can access the machine.
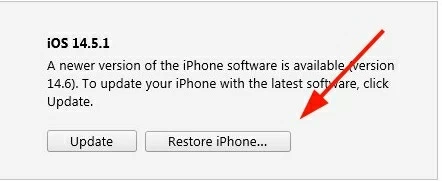
In a PC or a Mac with macOS Mojave 10.14 or earlier, connect your iPhone to the machine and launch iTunes. Then, hit your iPhone icon from the top left corner of iTunes window. Go to Summary section and choose Restore iPhone to bypass passcode disabled iPhone.
In a Mac with macOS Catalina 10.15 or later, attach your iPhone to it and open Finder. Click your iPhone in the left sidebar of Finder screen and head to General tab. Next, press the Restore iPhone option to bypass the lock screen and unlock your disabled iPhone.
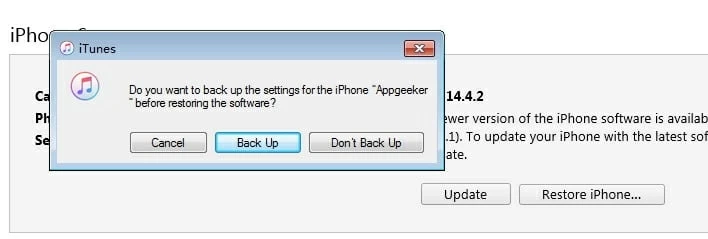
If you're asked to if you'd like to back up the device before restore, choose Back Up option so that you can do the iPhone disabled bypass without losing data.
Notice that neither iTunes nor Finder will detect an iPhone that asks to connect to iTunes. To fix it up, keep moving on to see how to bypass iPhone is disabled connect to iTunes.
Do a recovery mode restore through iTunes or Finder can help bypass iPhone passcode to let iTunes or Finder reset your disabled iPhone to its factory settings then unlock the device.
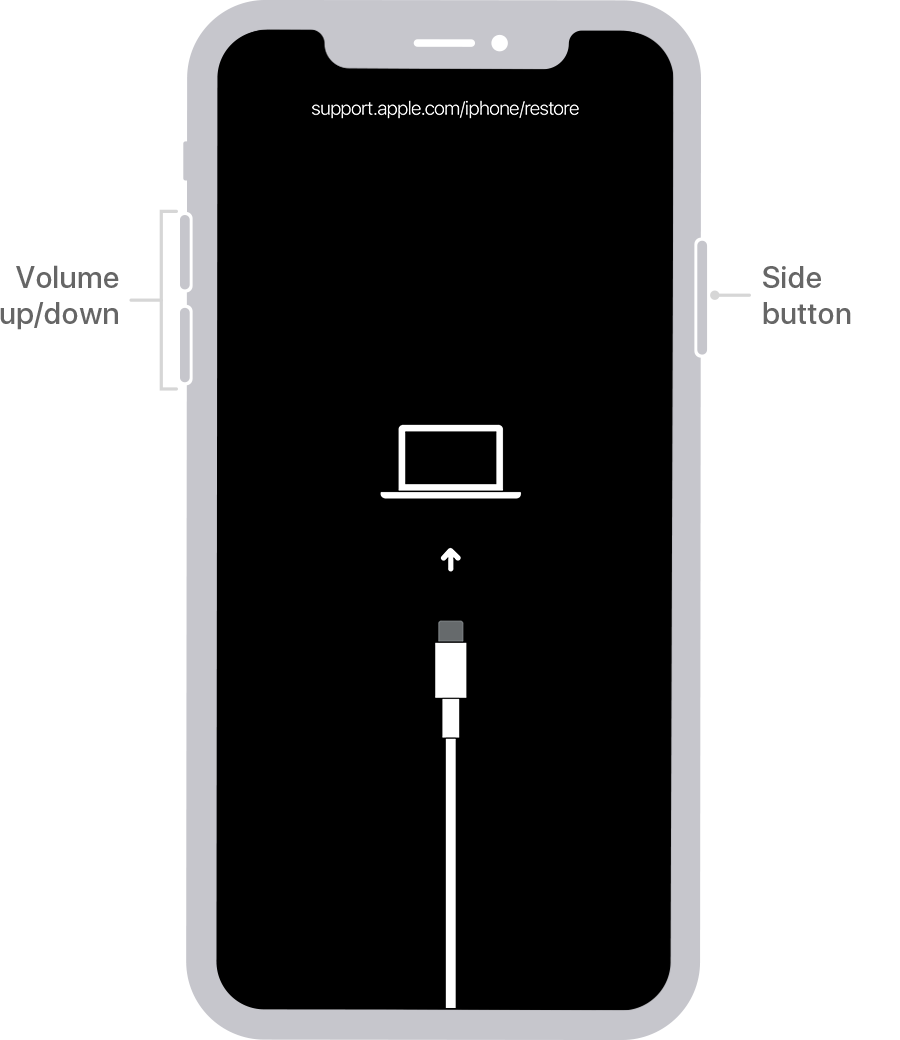
First, disconnect your iPhone from the computer. Then, you're need to press a series of buttons to put the disabled iPhone into recovery mode.
If you own an iPhone 8 or newer model, hold either Volume buttons and Power button until you see the power off slider. Move it to turn off your device. Then connect your iPhone to the computer while keep holding the Power button. When you see the recovery mode screen, release the button.
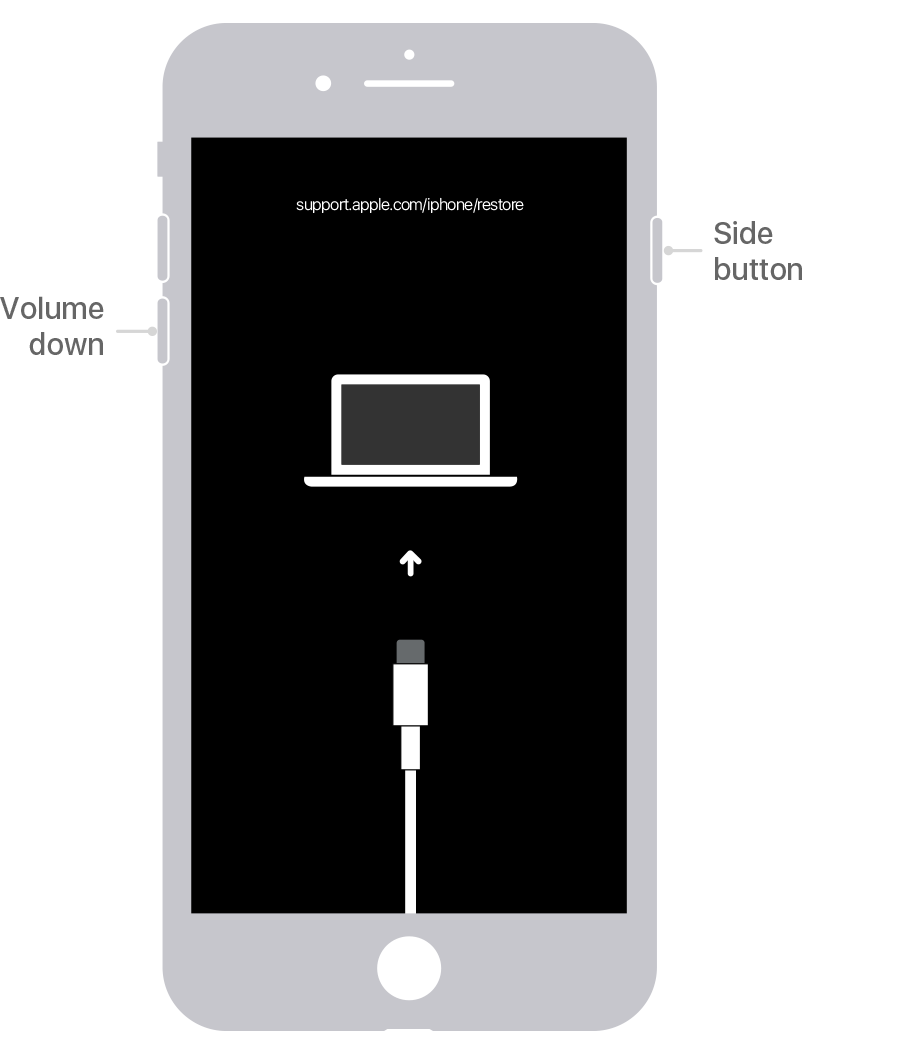
If you use an iPhone 7 (Plus), hold the Power button and when the power off slider shows up, drag it to power off the iPhone. Then, keep holding the Volume down button and hook up the device to the computer. Let go of the button when it's in recovery mode.
If you're holding an iPhone 6 or older model, press and hold the Power (or Top) button and move the appearing power off slider to shut down the iOS device. Next, attach the device to your computer and simultaneously, hold the Home button until you see the recovery mode screen.
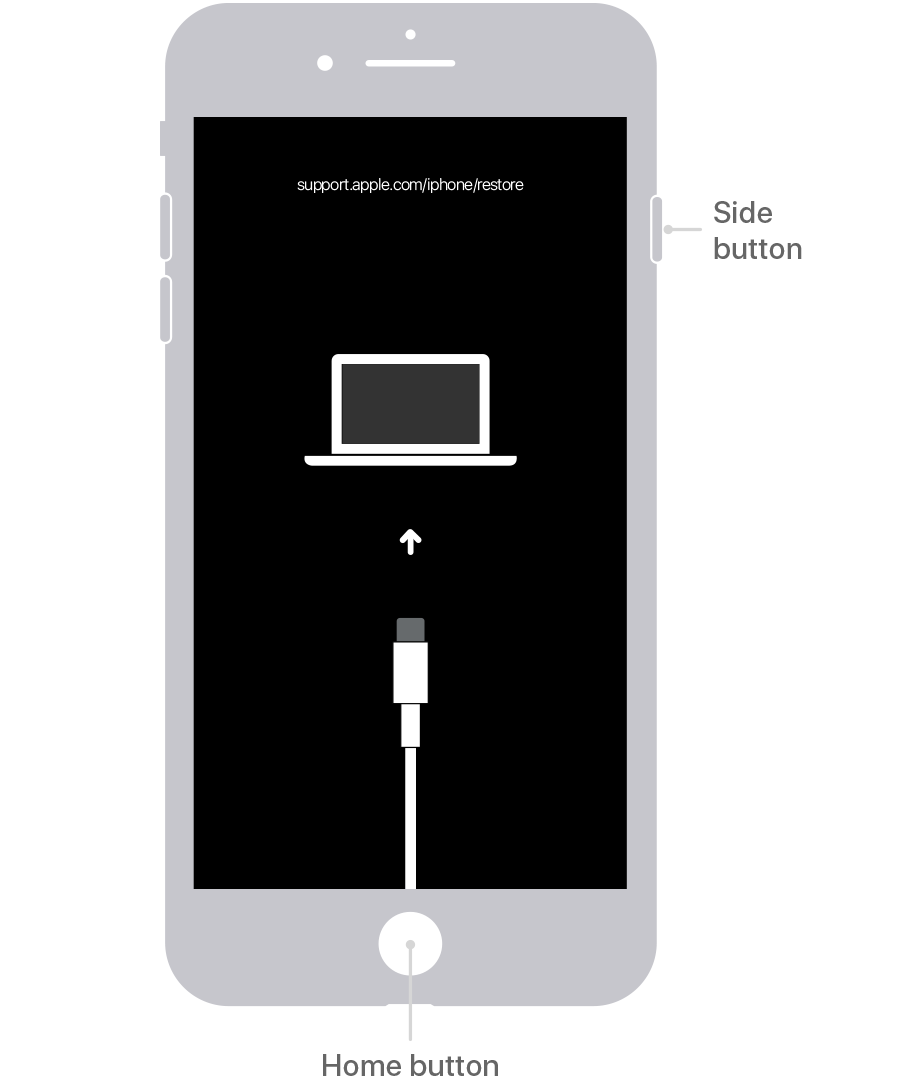
Keep the iPhone connected to your computer and the following steps to get past the iPhone disabled message will be done using iTunes or Finder in your computer.
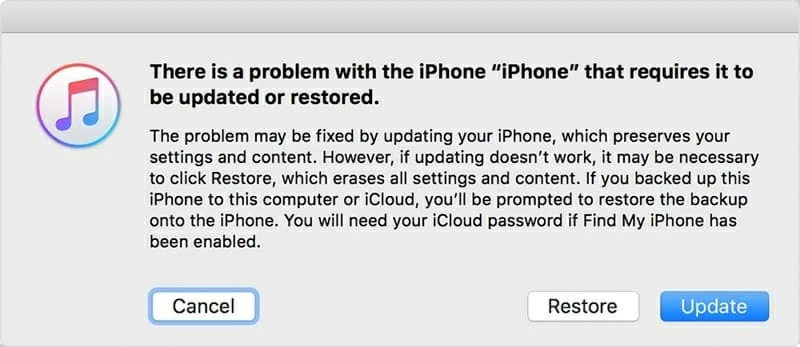
If iTunes or Finder doesn't open automatically, just double click its icon to run it. Next, locate your iPhone and you'll get a dialog box asking you to Update or Restore. To bypass iPhone disabled screen, choose Restore option.
Keep going through the on-screen instructions until iTunes or Finder starts downloading the latest iOS firmware and wiping your iPhone by reinstalling the firmware.
If you find that your iPhone exits recovery mode automatically - the screen turns black then boot up back to the iPhone disabled screen that you need to bypass, just repeat the steps above to enter into recovery mode again.
Once done, your iPhone will reboot as a new phone, bypassing any disabled messages on the screen.
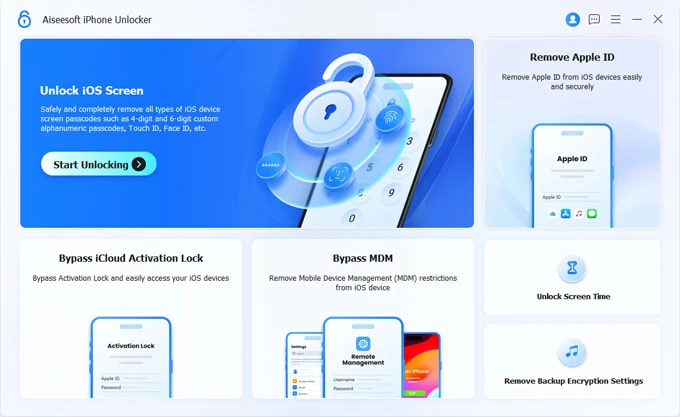
Is there any other tool to bypass the disabled iPhone error without a passcode? As you'd expected, there're multiple choices, but Appgeeker iPhone Unlocker defeats all its rivals in terms of its efficiency and comprehensive iOS unlocking functions.
You can utilize iPhone Unlocker to:
In a word, with this tool, you don't have to put up with any forgotten passcode or wrong password attempts anymore and get into a locked iPhone, as well as iPad and iPod touch, with ease. Once you've downloaded and installed it on your computer, the following step-by-step guide will walk you through the iPhone is disabled bypass procedure.
Here is a related video that offers clear instructions to bypass disabled iPhone:
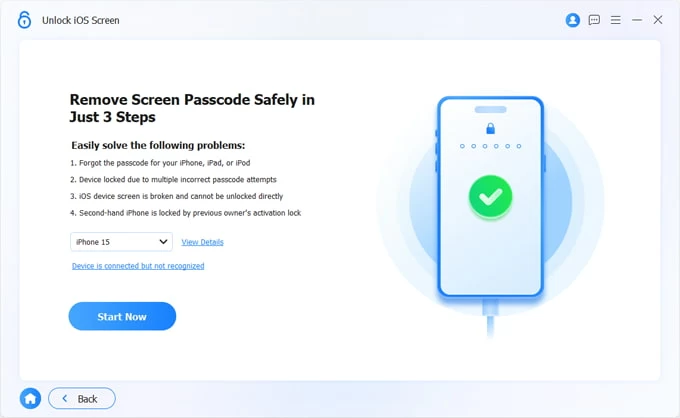
Step 1: Launch iPhone Unlocker on your computer, and choose Unlock iOS Screen module.
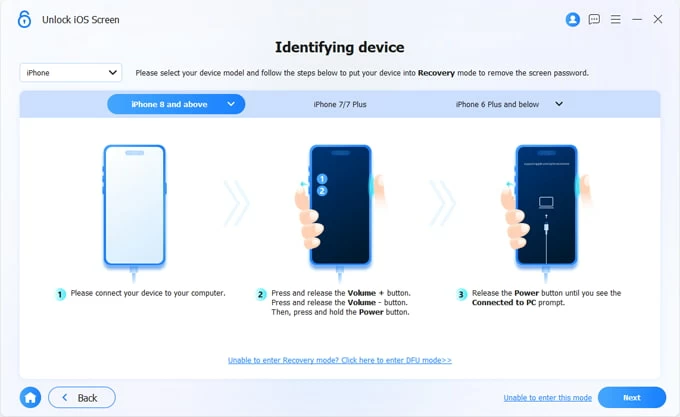
Step 2: Plug your iPhone into the computer. If your iPhone is connected but not recognized, put it into recovery mode first.
Then, before bypassing your locked or disabled iPhone, confirm your device information and click Start Now button.
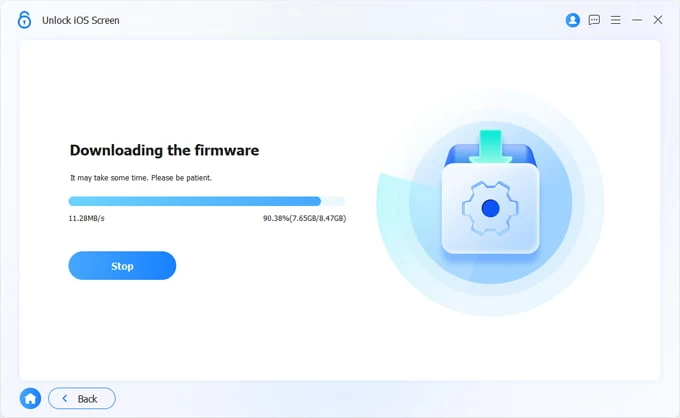
Step 3: Now, it's downloading the iOS firmware for iPhone disabled passcode bypass. Take around 15 minutes to let it finish.
Step 4: After download, a pop-up window appears asking for disabled screen wiping confirmation. Click OK button followed by Confirm Again button to start unlocking your iPhone with the disabled screen.
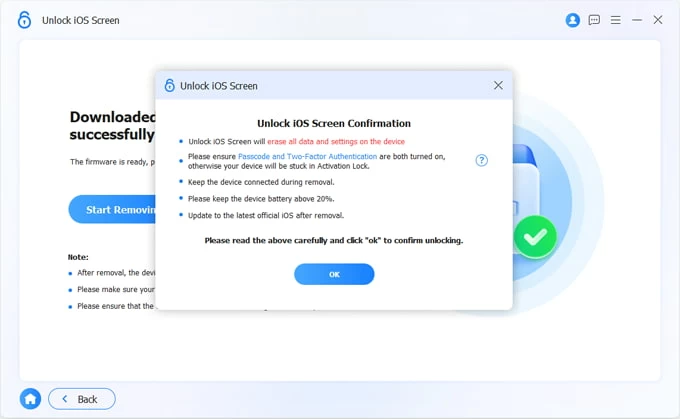
Wait for the software to verify the firmware package, and then remove the disabled lock screen.
Done! Your iPhone has been restored as new and it won't be back to the disabled screen any more.
Your final option for bypassing a disabled Apple device is to use iCloud.
You might haven't heard about this approach, but as long as the Find My iPhone option is enabled your iPhone, iCloud does offer you a bonus function to erase everything on iPhone remotely after you signed in it with the same Apple ID that's used in your disabled iPhone.
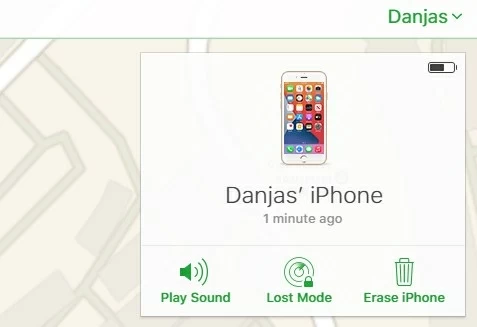
Open any browser and head to Find My iPhone in iCloud. Then, log into it using your Apple ID and password. In the opening page, locate and click All Devices and then select the disabled device you need to bypass.

From the given options under your iPhone icon, choose Erase iPhone.
Then, everything will be erased on your iPhone that's running with a workable internet connection and the disabled lock on your device should be bypassed and fixed.