How to Rip a Blu-ray to MOV Video Files on Mac


The streaming era in video has arrived in full force, but many of us still have pretty hefty physical disc collections. If you're a fan of NAS (network attached storage) for watching movies, you may be wondering how you can rip your DVDs and Blu-ray discs into NAS to be able to stream the ripped movies to PS4 or Xbox One using DLNA or on a big TV.
While none of QNAP & Synology NAS devices come with BD drives, if you happen to have one and want to rip Blu-ray for streaming on NAS, we'll show you how to do just that with right solution.
It's Time: Storing All Blu-rays Movies To NAS
It makes a lot of sense to rip and copy the contents of the Blu-ray disc into NAS drive and protect the disc from scratched or damaged – or clear them out for good. The easiest way to complete the task is by making use of a Blu-ray to NAS converter software application. We recommend the popular Blu-ray Converter, It's a great cross-platform tool that works on both Windows and Mac computer, allowing you to converting Blu-ray, DVD, video and audio all in one place. It includes its own set of decryption algorithms to remove protection on disc.
The other useful features are that it enables you to choose from various preset options, which are tailored for specific devices such as iPhone, iPad, Android phones, tablets, PS4, Xbox One. You can also do some editing on the video to enhance the export result.
Here's how you can effortlessly convert Blu-ray collection to a NAS drive using Blu-ray Converter. The instructions apply for process of ripping DVDs to NAS.
Note: You obviously need a Blu-ray drive on your computer to read the disc.
Rip and Convert Blu-ray Discs
Step 1: Load Blu-ray contents
Start by opening Blu-ray Converter on the computer and, insert the disc you want to transfer the files from to the NAS.
Click the "Load Disc" button in the upper left corner of the window. In the Open Files dialog locate the Blu-ray you wish to rip, select it.
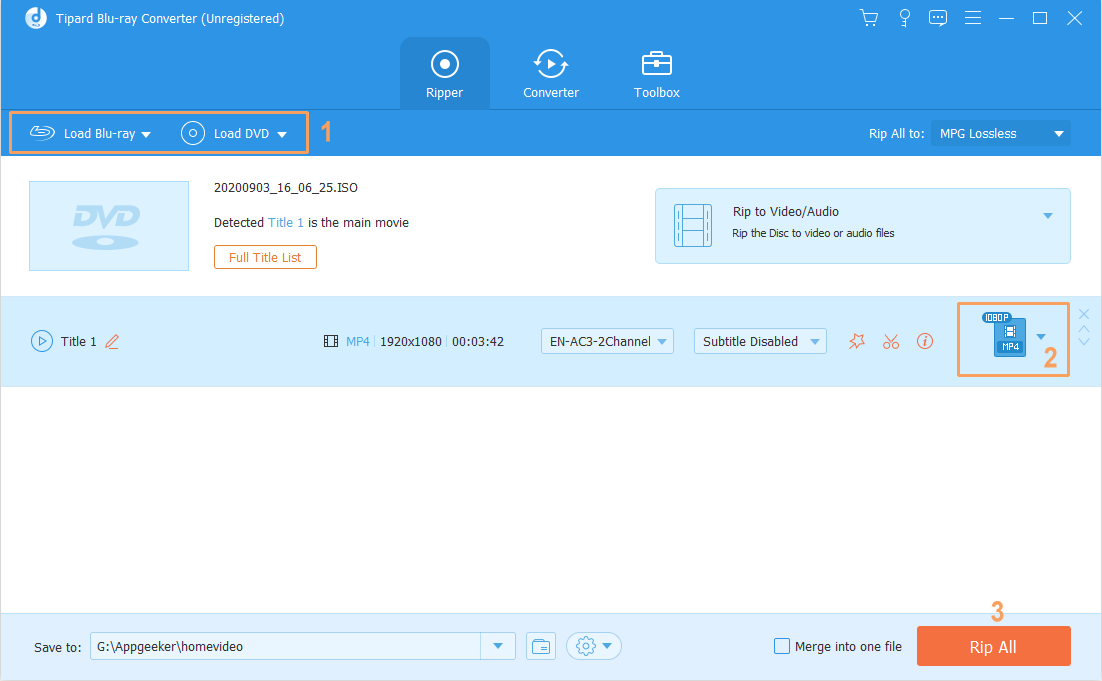
Step 2: Choose an output format
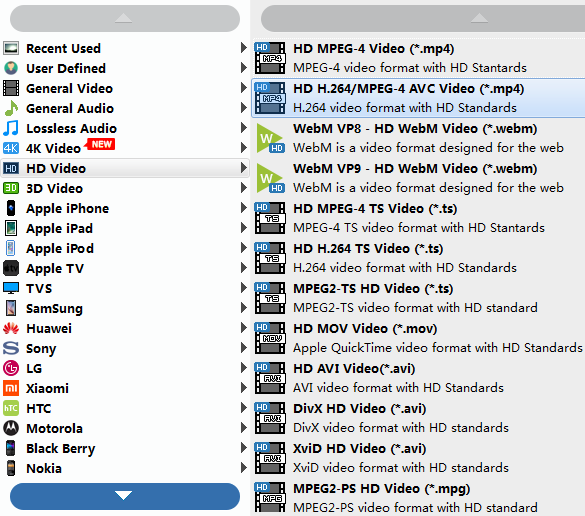
In this stage you'll need to choose an output format. Click the "Profile" menu in the bottom left corner of the screen, a panel should open, just like the image shown below.
Different formats have different compatibility — MP4 is the most used file type for the widest variety of devices. Here we suggest choosing HD H.264/MPEG-4 AVC Video (*.mp4) under HD Video column, but you can go with other formats you like, MKV and MOV are popular, too.
There's also a "Settings" feature next to "Profile" menu available for you to configure settings to get control over quality level of resulting file, if you know what you're doing. This part of the decision is up to you.

Next, hit "Browse" option in the bottom to choose a location for all the ripped Blu-ray movies.
Step 3: Rip and convert Blu-ray movie files
Go ahead and click the "Convert" button at the bottom right corner of the screen. The software will now rip (copy) movies from your Blu-ray to your computer's hard drive and into format you chosen in Step 2.
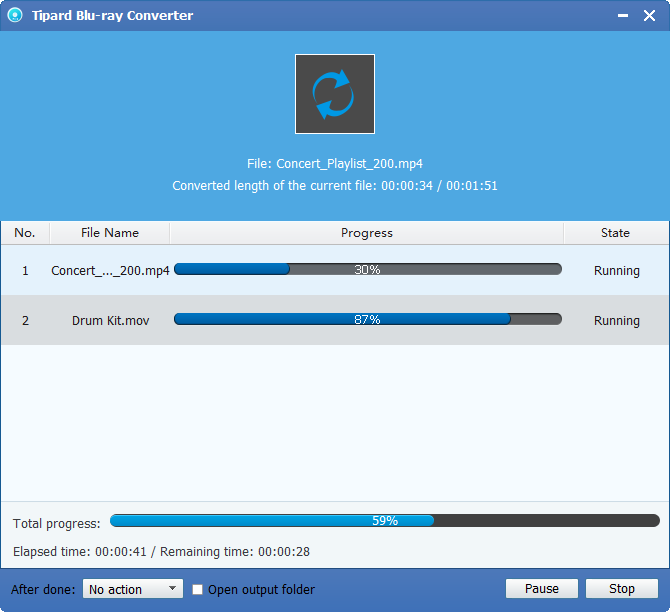
Once the process is finished, you can play the ripped movie files on a desktop player like VLC to see if everything goes well before copying them to NAS.
Transfer the Ripped Blu-ray files to NAS
Now, the rest work is simple. You just transfer the new minted movie files to your NAS drive. You're ready to stream the movie to either Apple TV, PS4 or Xbox One via wireless network or play on big TV. Enjoy!
Network Attached Storage brands: QNAP, Synology, WD, NETGEAR, FreeNAS Mini, FreeNAS Mini, TerraMaster, Drobo, Linkstation, Buffalo, and more.