How to Recover Deleted Contacts on an iPhone

This guide will show you how to recover lost or deleted data on your iPhone, whether due to a broken screen, an accidental reset, or a mistaken tap that deletes a vital file.

For complex data loss scenarios, leveraging professional Appgeeker iPhone Data Recovery tools can be highly effective, enabling deep scans of your device to recover lost or deleted iPhone data without a backup.

From deleted data and erased files to a damaged or reset iPhone, you still can recover data you thought was lost on an iPhone.
Many of your crucial data files are saved on your iPhone, including music, photos, videos, text messages, documents, etc. And most of these data are of great significance to your life or work. Whether your iPhone slips from your pocket and shatters, gets reset to fix a bug, or you accidentally delete important data, losing data on your iPhone can feel heartbreaking. But here's the good news: lost data doesn't always mean gone forever.
This guide is your lifeline to recovering data on your iPhone. Whether your iPhone is broken or slipped into the sink, factory reset, or has critical files deleted, we offer tailored strategies to guide you through the iPhone data recovery process, ensuring your data is restored intact.
Table of Contents
Files saved locally or synced to iCloud, as well as data from most apps and the Internet, can be found in the Files app. Files that you've deleted from your iCloud Drive or On My iPhone are moved to a folder called Recently Deleted, which holds your deleted data until it's permanently deleted after 30 days on iPhone.
If your data have been deleted recently, you can get them back from Recently Deleted folder.
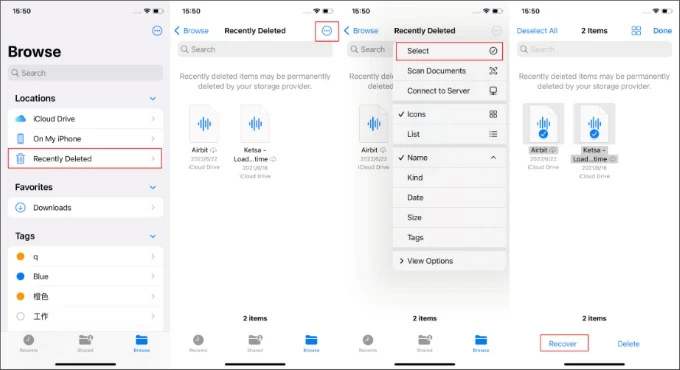
1. Open the Files app on your iPhone.
2. Tap the "Browse" and locate "Recently Deleted" under the Locations tab.
3. Tap the "More" icon in the upper right corner and choose the "Select" option.
4. Check the data items you want to restore.
5. Tap the "Recover" button in the lower left corner to restore these deleted data to their original folders. You can also long press on a specific file and then select "Recover."
Tip: But there are some data that you cannot find and recover in the Files app. For example, if the data you delete is photos, notes, and messages, you need to retrieve them from the Recently Deleted folder in the corresponding Photos app, Notes app, and Messages app. See how to recover disappeared notes on iPhone here.
If your data have been deleted for more than 30 days, or you have not backed up iPhone data in advance, don't worry, a powerful Appgeeker iPhone Data Recovery tool can deeply scan the device's storage space and help you recover up to 18 types of file data, including photos, videos, messages, contacts, call logs, notes, and more, to your iPhone 11/12/13/14/15/16, without needing a backup.
Not only can it restore deleted data, but it can also retrieve data that mysteriously disappeared from your iPhone or lost due to system bugs. As long as you can access your iPhone, the software can detect recoverable data files and provide a preview. Moreover, it can also extract specific data from your iTunes backup for recovery without erasing your iPhone's existing data.
Here's how to recover deleted data on iPhone without a backup:
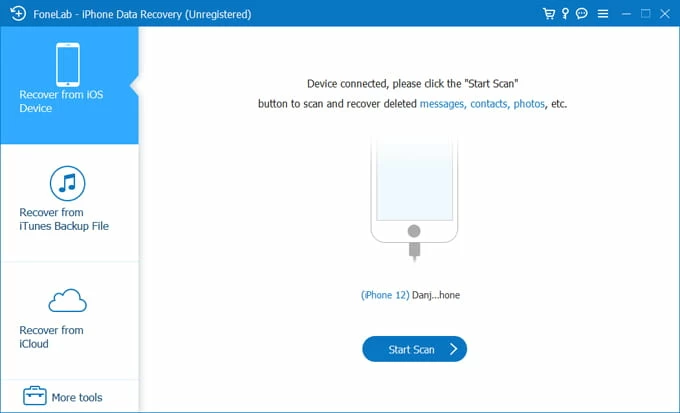
Step 1: Scan the iPhone to find the deleted data
First you'll need to plug your iPhone into the computer and launch iPhone Data Recovery tool. Then select "Recover from iOS Device" and click "Start Scan" to analyze your iPhone's memory.
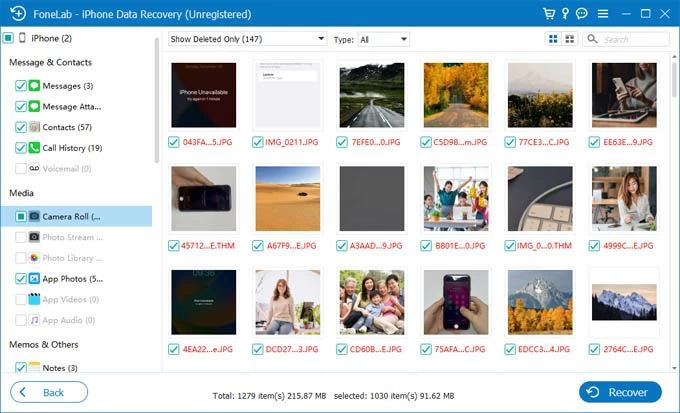
Step 2: Choose deleted data files from results window
After the software has fully scanned your iPhone's internal storage, it will classify your files and data into the three categories: Message & Contacts, Media, Memos & Others. You can click on the specific subdirectories to view the recoverable files. Now, navigate to the list of items you want and select the data to recover.
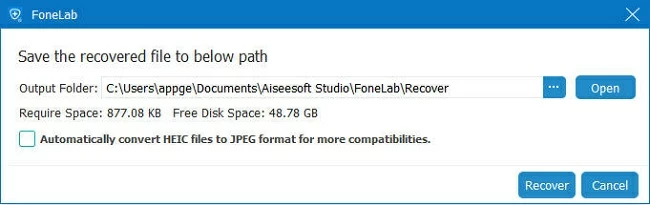
Step 3: Recover iPhone data
When you are done selecting, click the "Recover" button and customize the location where you want to store the recovered iPhone files in the pop-up dialog box, then hit "Recover" to start the recovery process.
With backups created before the data were deleted, the deleted data can be recovered, and even your permanently deleted data can be restored to iPhone. If your iPhone has the iCloud automatic backup function enabled, you can recover lost data through iCloud backup; or, with a computer backup available, you can restore lost or deleted files to your iOS device through iTunes or Finder.
However, it should be noted that recovering your permanently deleted data on iPhone using backup will factory reset your iPhone, and the backup data will completely replace the existing data on your iPhone.
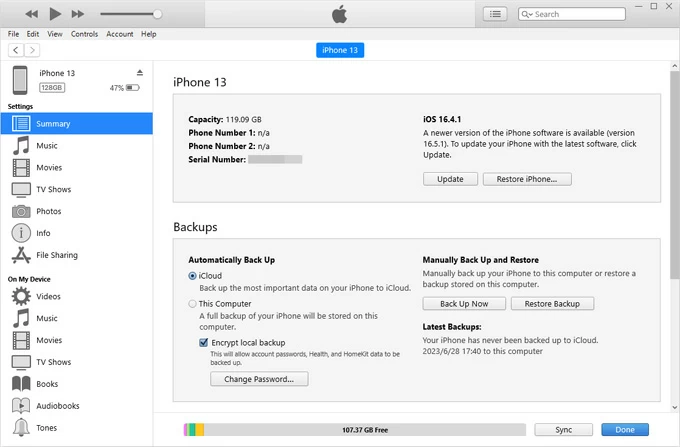
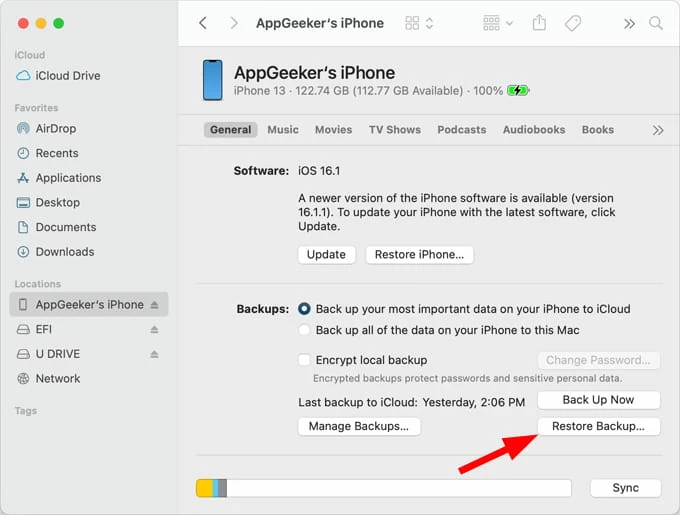
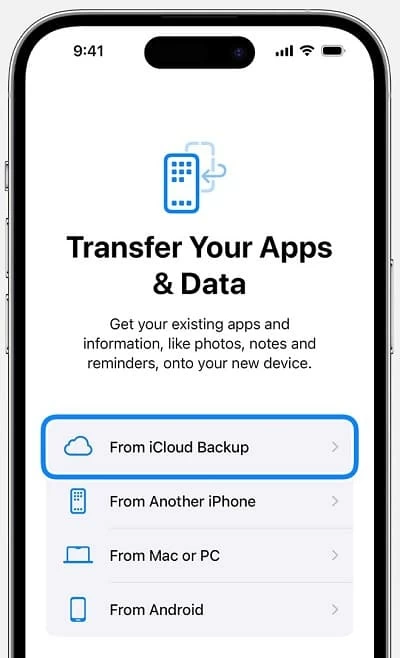
Unlike iTunes or Finder backup, recovering iPhone deleted files with iCloud backup requires resetting your iPhone first.
Tip: Routinely backing up your iPhone data will help you recover data when your iPhone is lost or after you reset iPhone.
For a broken or unresponsive iPhone, such as one with a cracked screen, water damage, or stuck on the Apple logo, your data may still be hidden within its circuits, but accessing it can be challenging. In most cases, you can only recover data from a broken iPhone using a previously created backup, whether stored in iCloud or iTunes/Finder.
Depending on the extent of your iPhone's physical damage, here are the scenarios:
Your iPhone's display is broken but still partially functional:
If you can still enter the lock screen password, attach the broken iPhone to the computer containing your previous data, then restore your lost data using the computer's backup.
Alternatively, you can first back up the broken iPhone's data to iCloud or iTunes/Finder, then restore that data from iCloud or iTunes backup to a new iOS device, this way, you can retrieve your broken iPhone's data.
Your iPhone is completely dead or the touchscreen no longer works:
You'll need to send it for repair to replace the screen or even the motherboard to make the iPhone bootable and accessible. Then, choose "Restore from iCloud Backup" during the setup process or connect the computer to recover your data with an iTunes/Finder backup.
Your broken iPhone is still recognized by a computer:
If you plan to upgrade to a new iPhone, data transfer is the best option. You can use Appgeeker iPhone Data Transfer to move the data from your broken iPhone to the new one, ensuring your important data is preserved.
Related: How to get contacts from broken iPhone with / without backup
If your iPhone is lost or stolen, you won't be able to access the device directly to recover data, but you can still access what was synced or backed up, provided you enabled iCloud sync features such as iCloud Drive, iCloud Photos, or iCloud for Messages.
When your lost iPhone is linked to iCloud, your data is uploaded to the cloud and kept updated, allowing you to access it on any device logged into the same Apple account.
1. Access iCloud.com on any browser and sign in with your Apple account.
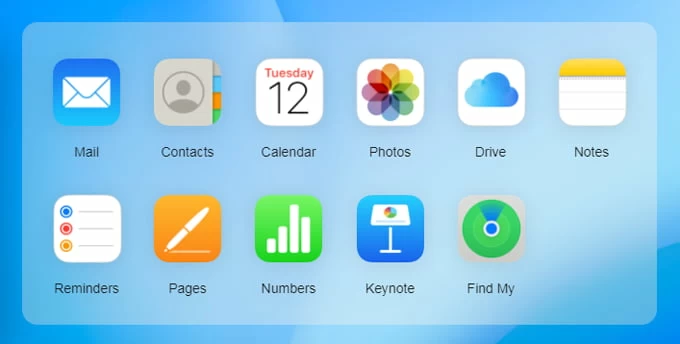
2. From the home menu, check the data synced to iCloud from your lost iPhone, including contacts, photos, notes, and Drive.
3. On another iPhone or iPad, sign in with the same Apple credentials as the lost iPhone.
4. Go to Settings > [Your Name] > iCloud.
5. Tap the corresponding app or feature and enable "Sync this [device]" or "Use on this [device]" to sync iCloud data to your device.
Tip: Use Find My iPhone to mark your lost device as "Lost" or remotely erase it to protect your data.
Performing a factory reset will restore your iPhone to its original settings, erasing all user data, applications, and settings, leaving the iPhone in a brand-new state. In this case, if you backed up your data via iCloud or iTunes/Finder before the reset, you have a chance to get your data back on your iPhone. However, your iPhone will only be restored to the point in time when the backup was created, meaning any new data generated after the backup will still be lost.
Besides, if you used iCloud's sync feature or other cloud services like Google Photos or Google Drive, these services can store your data in the cloud in real-time, as long as you have enough storage space. You can then recover your data by re-syncing it to your iPhone after the reset.
The Bottom Line
Whether you're recovering deleted data to your iPhone, restoring files without a backup, or retrieving data to a lost, damaged, or reset iPhone, the methods provided in this article can help you address these issues. An available backup can restore your data to your iPhone in most cases. Therefore, we recommend building a habit of regularly backing up your iPhone data to prevent permanent data loss.