
How to Send Videos between Two iPhones

If you want to transfer photos from your Windows 10 PC to your iPhone, here's how. You can transfer the pictures via iCloud, a third-party tool or iTunes.

Finding a bridge between Windows and Apple Worlds seems a difficult feat. If you have a pile of photos on your PC that you want to put onto your iPhone, then this article is for you. You'll learn how to transfer photos from Windows 10 to iPhone.
We will introduce several methods to transfer photos from Windows 10 to iPhone / iPad. These methods work for any Windows 10 desktops and laptops. Among them, Appgeeker iPhone Data Transfer lets you get photos from Windows to iPhone quickly and vise versa.
![]()
iTunes is not the only option of transferring photos from a Windows 10 computer to an iPhone or iPad.
4 Ways to transfer your photos to iPhone from Windows 10 PC:
iTunes is an obvious option developed by Apple, which can transfer photos from Windows 10 to iPhone. iTunes' built-in sync feature makes it easy to sync your photo library to your iPhone on Windows 10.
However, this method also has a major drawback, which is that it will overwrite your iPhone's photo gallery, which means that you may lose the images that originally existed on the iPhone. If you insist on transferring photos from Windows 10 to your iPhone via iTunes, make sure iTunes is updated to the latest version.
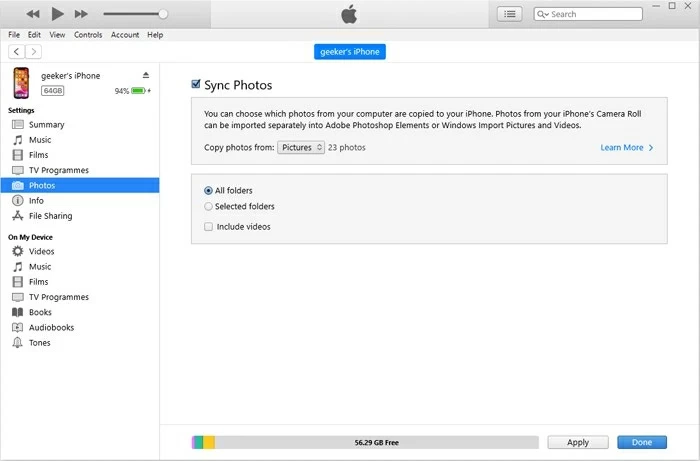
1. Connect iPhone to your Windows 10 using data cable and trust the computer.
2. Open iTunes on and click the "device" icon on the upper left corner.
3. Locate "Photos" tab and check "Sync Photos."
Tip: If Sync Photos doesn't appear, you have iCloud Photos enabled to sync photos. Go to Settings > [your name] > iCloud > Photos and turn off iCloud Photos / Sync this iPhone.
4. In the "Copy photos from" field, click to select a folder which is storing your photos on the PC. You can neither preview your pictures nor choose individual photos to sync.
5. Hit "Apply" when you are ready to sync the photos from Windows 10 to your iPhone.
Also see: How to sync music from iTunes to iPhone
If you want an effective and easy way to transfer photos from your Windows 10 to iPhone that doesn't restrict file size and doesn't involve iTunes sync, you can go with Appgeeker iPhone Data Transfer - a tool that integrates data management and transfer into a single solution.
This software offers great flexibility in photo transfer. You can choose to copy any photos from your computer to your iPhone, or even an entire photo album. Besides, there's no worry about data loss as the software won't delete or overwrite any phone data during the process.
With iPhone Data Transfer, you can easily export a large number of photos from Windows 10 to iPhone or add photos from iPhone to PC.
1. Download and install iPhone Data Transfer utility software on your Windows 10 PC.
2. Plug your iPhone into your computer using the USB cable. Your iPhone appears in the program windows soon as shown below.

3. Navigate to the "Photos" tab to open your iPhone's photos library. You can edit or delete your photos here, or export your photos to your computer for backup purpose.

4. Now get ready to transfer photos from PC to iPhone. Click the "plus" icon at the top center to browse the photo folder in your computer. You can select a single photo or multiple photos in a row. Then click "Open" and the transfer process will begin. Wait for all the selected photos to be transferred to your iPhone Photos app.

In addition to transferring photos to your iPhone, with this software you will also be able to transfer photos from your iPhone to an external hard drive!
There is a video tutorial for you to transfer photos from Windows 10 to iPhone:
If you prefer to use iCloud, then Apple enables you to wirelessly transfer photos between your iPhone and computer. With the iCloud Photo Library enabled on iCloud for Windows, and photos will be automatically synced between devices using the same Apple ID.
But using iCloud to transfer photos from Windows 10 to an iPhone need to note that iCloud only provides 5GB of free storage space. So, make sure your iCloud has enough space to avoid the photos transferred from Windows 10 can't be synced to iPhone.
1. Download and install iCloud for Windows on your Windows 10 PC.
2. Launch the application and log into your Apple ID you used on your iPhone.
3. Tick the checkbox near Photos. When Photos Options window pops up, choose "iCloud Photo Library" to enable syncing for photos. Click on "Apply."
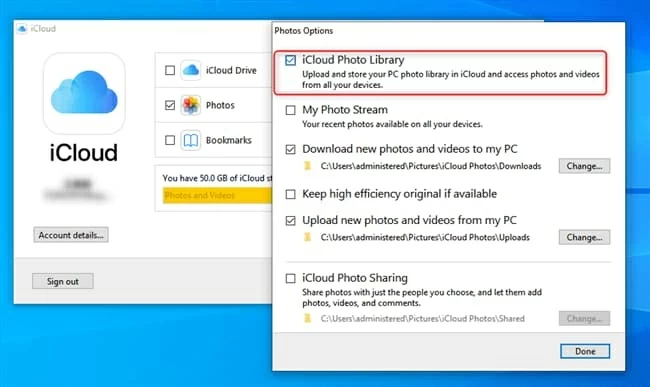
Turn on iCloud Photo Library on the PC.
4. Open This PC. Locate iCloud Photos, and double-click to open it.
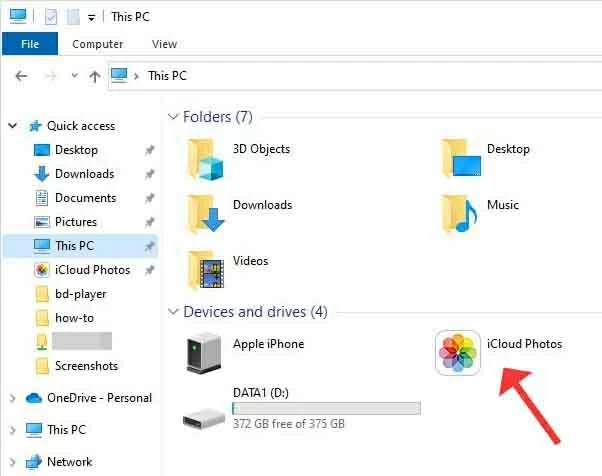
You'll find iCloud Photos in your computer once it's installed.
5. On the window that shows, right-click on "Uploads" and click "Add photos."
6. Choose the photos stored on your computer that you want to sync via iCloud. Now that you've set up iCloud to sync your photos on your PC.

It's easy to drag and drop photos taken on your computer to iCloud server.
7. Now on your iPhone, navigate to Settings app, tap [your name], choose iCloud and then turn on the toggle for "iCloud Photos" / "Sync this iPhone."
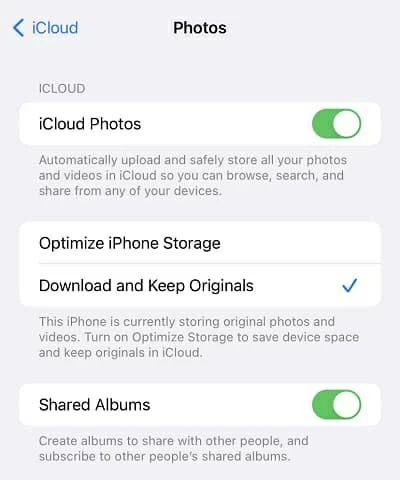
Make sure iCloud Photos on your device is ON.
Once the photos have been uploaded and synced to your iCloud Photo Library, you'll find that they'll automatically appear in the Photos app on your iPhone.
Tip: If this process is a bit complicated for you, you can also copy photos from your computer to your iPhone via icloud.com.
With other cloud-based storage services like Google Drive, Dropbox and OneDrive, you can also add your entire photo library from Windows 10 to your iPhone. The only requirement is that you have to download the app on both your PC and iPhone. It also applies to your need to transfer photos to a new iPhone.
First, upload your computer's photos to the cloud storage, then download the added photos to your iPhone on the app. But like iCloud, the downside of cloud services is that they offer limited free available space.