
iPod is Disabled Connect to iTunes

Apple's iTunes offers a feature to transfer music to iPod, but you have other options to transfer music to your iPod with ease and relish your day with some good music.

Music is the best way to unwind yourself and feel relaxed. A long time ago, people chose to listen to music on their computers. Later, Apple invented a little machine—iPod for music lovers. You may want to transfer the songs you have on your computer to your iPod so you can indulge in the world of music anytime, anywhere.
Apple wants you to use iTunes to transfer music from computer to iPod. However, iTunes has its limitations when transferring music from your computer to iPad: it syncs your iPod and entire music library when you connect, and all the music you currently have stored on your iPod is deleted.

Enjoy music on your iPod.
You may wonder if you can transfer music without iTunes. Well, the answer is definitely yes. There are various methods to add music to iPod without iTunes. For your convenience, we've gathered these methods together. Click and jump to choose the one that's right for you to start transferring.
Part 1: Add music to iPod without iTunes
Part 2: Add music to iPod with iTunes
When it comes to transferring music to iPod, the first thing you think of is iTunes. But as mentioned above, iTunes has limitations. You may want to seek an alternative option. Third-party software is worth a try, among which Appgeeker iPhone Data Transfer is an excellent software to help you transfer music to iPod without going through iTunes.
iPhone Data Transfer is a tool that manages data and transfers it all in one. In addition to doing everything that iTunes does, iPhone Data Transfer offers many other services to its users. It can automatically convert your music files to a format that your device can read during the transfer. With this powerful tool, transferring music to your iPod couldn't be easier.
Using the iPhone Data Transfer to transfer music to iPod without iTunes is pretty straightforward. Here's how:
1. The first and main step you have to do is download the software: click on the green Download button above to do that.
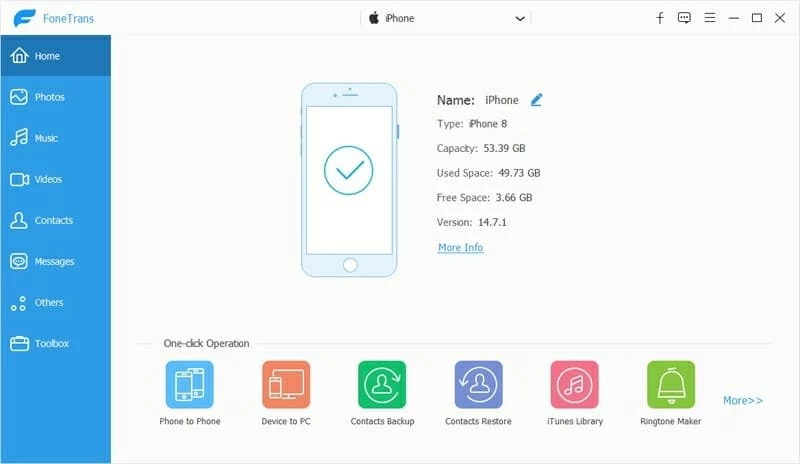
2. Next, you need to connect your iPod with the computer. Now you can see the detailed information about your iPod.
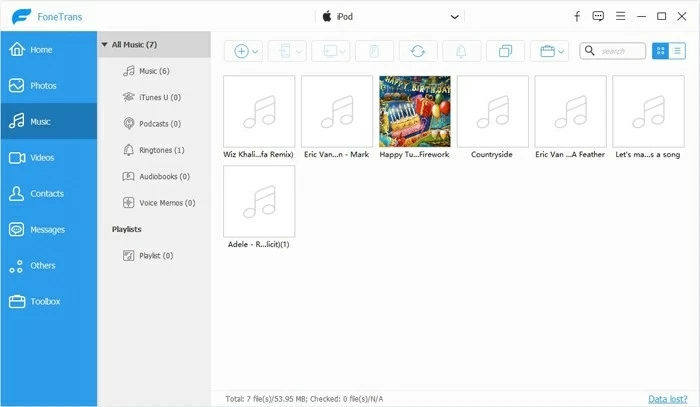
3. From the left sidebar, click on the Music button. Once clicked, iPhone Data Transfer should show you all the music from your iPod like the screenshot below.
4. Now it's time to transfer music to iPod without iTunes.
Option 1: You can open the file where you store your music. Drag and drop the music files you want to transfer to your iPod into the iPhone Data Transfer window.
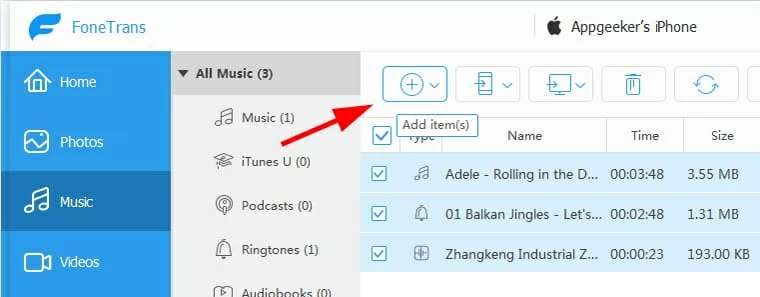
Option 2: Besides that, you can click the Add Item button looks like a plus icon, which should lead you to your music collection and transfer the songs.
5. When all of these are done, you'll be able to enjoy your music on your iPod.
Another popular way to help you transfer music to iPod without going through iTunes is to use the cloud storage service. Typically, you can use a cloud storage service to upload your music to the cloud and then download it to any device you want. here are many powerful cloud storage services, and in this post we will use Dropbox as an example.
Following are the steps you need to follow to transfer music from computer to iPod.
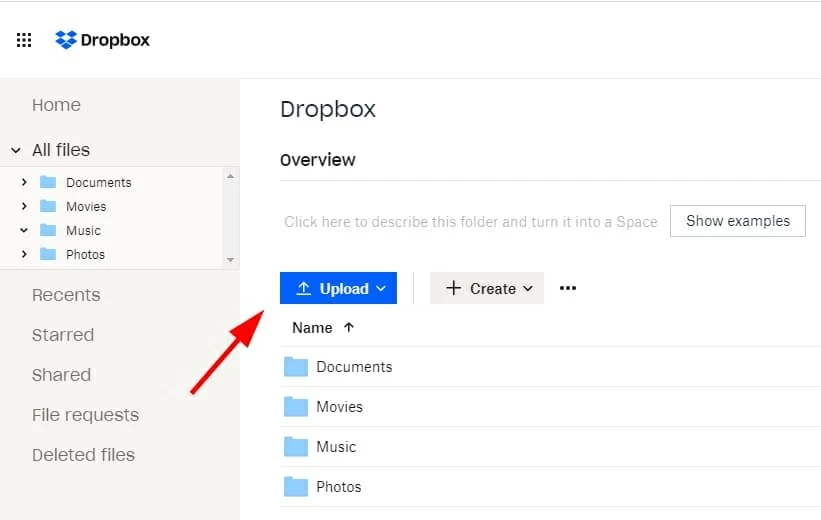
Ensure that you have Dropbox installed on both the computer and the iPod. Sign in the Dropbox with the same account you have on the iPod.
Next, you need to upload the files on Dropbox from the computer. Open Dropbox on your computer. Click on the Upload button to select the music that you want to transfer to the iPod.
[Don't Miss: How to Transfer MP3 Music to iPhone]
Move to your iPod, open Dropbox app. You can see the music that has been transferred from your computer. You can access the songs directly from Dropbox or download them on your iPod.
If you follow these steps correctly, it is ensured that you will easily be able to transfer music from computer to iPod without iTunes.
Dropbox offers us a convenient way to transfer music to iPod. However, everything doesn't always go as planned. Dropbox only offers 2GB for free, which means that if you want to transfer a lot of music, you'll have to pay for it. The good news is that if you subscribe to Apple Music, you can also transfer music to your iPhone for offline listening without iTunes.
Following are the steps you need to follow to add songs to your iPod without iTunes.
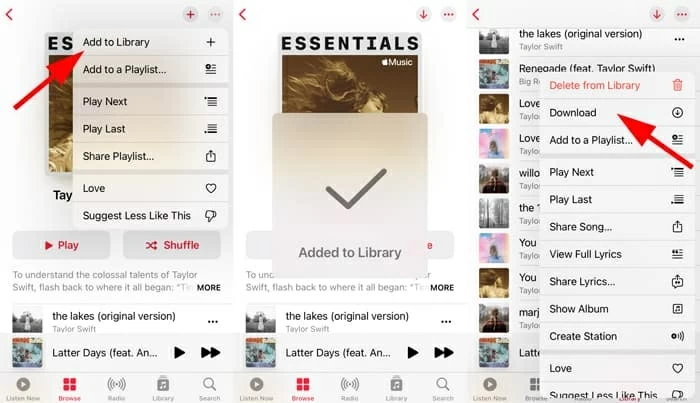
People might face a lot of problems while transferring their music to the iPod through iTunes. But with our easy and straightforward steps, you can quickly and efficiently add the music to the iPod through iTunes have the smoothest experience ever.
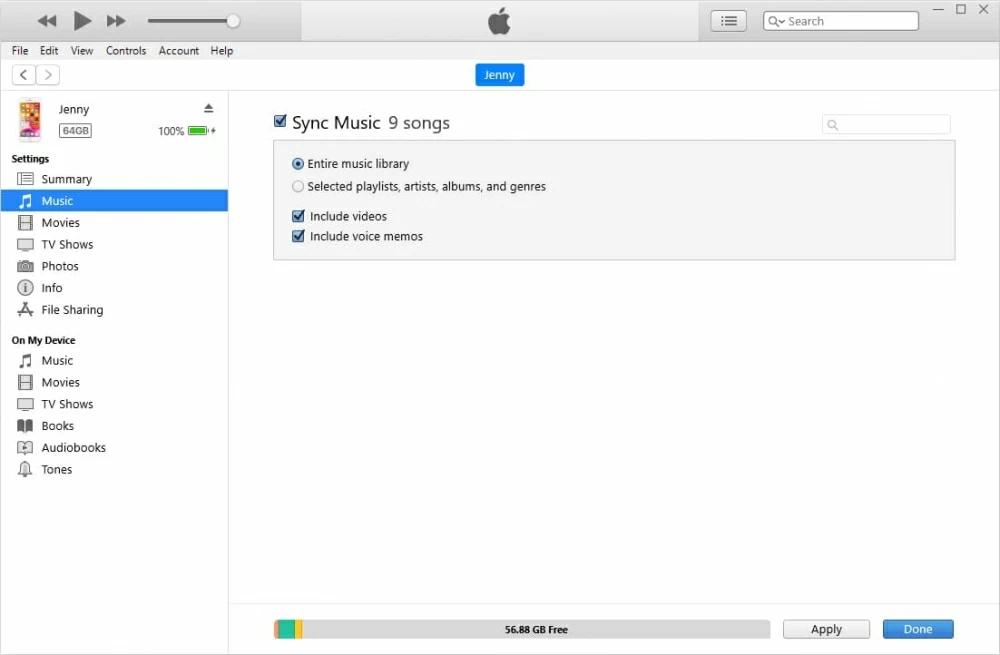
Connect your iPod with your computer by a USB cable. Let iTunes run on your computer. Click on the Device icon in the upper-left corner. Under the Settings section on the left side of the window, select Music.
Next, click Sync Music. Then you can choose "Entire music library" or "Selected playlists, artists, albums and genres", and click Apply to add music to your iPod.
Having iPod can be beneficial as it contains all the fantastic songs a person loves. But there can be many problems if you want to transfer songs from your computer to the iPod with iTunes. Hence this article has every detail you need to know when you want to add music to iPod without iTunes and with iTunes.


