How to Bypass iPhone Screen If Forgot Passcode

Both Mac and Windows have a built-in tool to help you transfer videos from iPhone to computer. And there're other options available for moving your photos and videos.

![]()
You can transfer iPhone videos to computer using desktop-based apps, or do it wirelessly.
Your iPhone likely holds tons of videos, from family moments to unforgettable trips. Transferring these videos to your computer is essential for backup and freeing up space. Whether you use a Windows PC or a Mac, this post will provide several efficient and quick methods on how to transfer videos from iPhone to computer, ranging from wired USB transfers to wireless options.
Since there are many ways to transfer videos from an iPhone to a computer—using built-in apps or third-party software like Appgeeker iPhone Data Transfer—here highlights the key features of each method to help you choose the most suitable one.
With a basic understanding of each method, let's start the journey of getting your videos transferred from iPhone on PC/Mac.
When it comes to stability and speed, connecting the computer and iPhone with a compatible USB data cable can stably and quickly transfer iPhone videos to the computer. If you are using an iPhone model that supports USB 3.0 ports, the transfer speed can reach up to 10Gbit/s, making it ideal for transferring very large video files from an iPhone to a computer.
Both Windows PCs and Macs come with built-in apps that let you import videos from iPhone to computer without needing additional software.
Microsoft Photos app is a software built into Windows 11/ 10/ 8 for managing photos and videos from various sources. It can also import photos from external devices such as mobile devices or external drives. With this default photo app, you can transfer video clips from your iPhone to PC via a cable.
Note:
1. Connect your iPhone to your computer using a suitable data cable.
2. Tap Trust when prompted on your iPhone and enter your passcode.
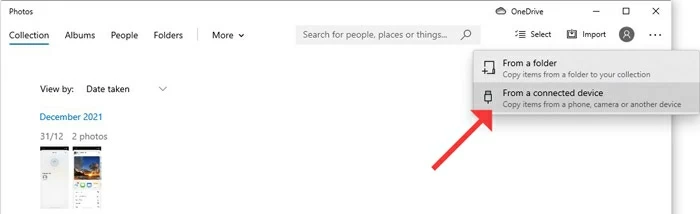
3. Open Microsoft Photos app on the desktop. Or select Import photos and videos in the pop-up AutoPlay window.
4. Click Import in the upper right corner and select From a connected device to start loading videos and photos from your iPhone.
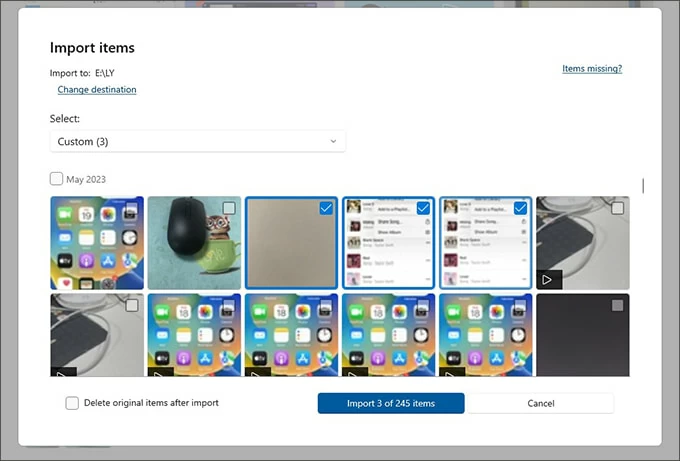
5. Select the photos and videos you want to transfer and adjust the save path.
6. Click Import to get videos from iPhone on the computer.
Tip: The transferred HEVC (H.265) format video may not be compatible with your PC. You may need to install additional extensions or use a third-party player to play the video.
Mac computers also come with a Photos app, but for greater control over your videos, Image Capture is a better option for transferring videos from your iPhone to your computer.
1. Unlock your iPhone and plug it into your Mac with a data cable. Remember to trust your computer.
2. Search for Image Capture using Spotlight or find it in the Applications folder.
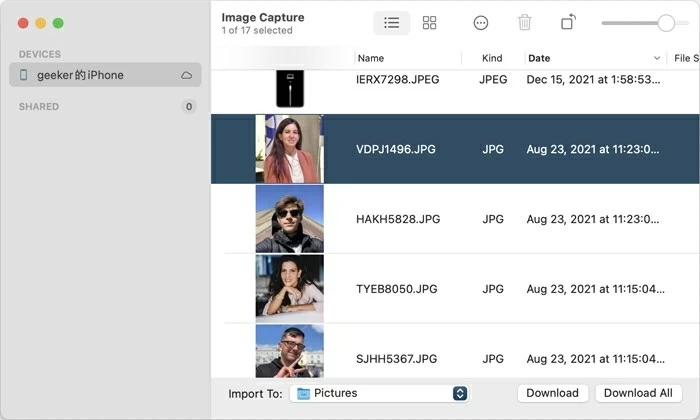
3. In Image Capture, select your iPhone from the list of devices in the sidebar.
4. Choose videos. You'll see a list of all the videos and photos on your iPhone. Use the shift or command key to select multiple videos.
5. At the bottom of the window, pick a destination folder on Import To: section for the transferred videos.
6. Click Download or Download All to begin the transfer.
You can enable 'Delete after import' to delete the videos from your iPhone after transfer, saving space instantly.
Also read: How to transfer photos from iPhone to external hard drive
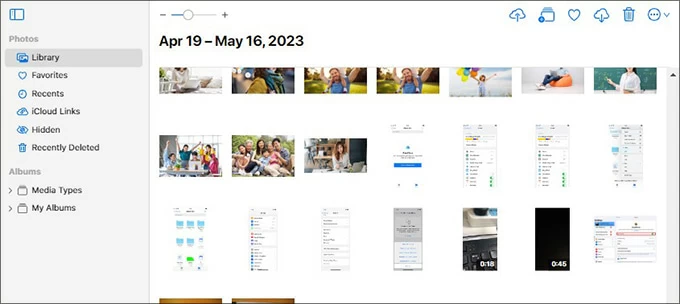
If you're looking for a wireless and seamless way to transfer videos from iPhone to computer, iCloud Photos allows you to upload your photos and videos to cloud storage, then effortlessly download them onto your computer without data cable.
Since iCloud syncs your videos and keeps them updated, it's possible to access them anytime on your Mac, PC, or iCloud.com. Not only can you download photos from iCloud to your iPhone, but you can also access your iCloud Photo Library on any computer via iCloud.com and download your videos in their original resolution.
Note:
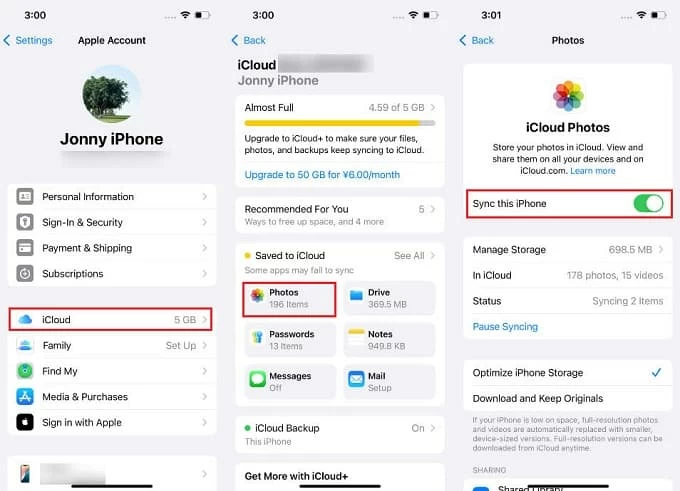
1. Enable iCloud Photos on your iPhone. Open the Settings app, tap [Your Name] > iCloud > Photos, and ensure the Sync this iPhone toggle is turned on. Your videos and photos will automatically upload to iCloud.
2. On your Mac or PC, open a browser, go to iCloud.com, and log in with the same Apple ID used on your iPhone.
3. From the iCloud menu, select Photos to access your photo library.
4. Locate the Library tab, then select the videos you want by checking them.
5. Click the download icon in the top-right corner to download the iPhone videos to computer.
Tip: You can click 'More' > 'More Download Options' to download videos from iPhone to computer in either the most compatible format or the unmodified original.
Alternatively, you can open the Photos app on a Mac or use the iCloud for Windows app on a PC to sync photos and videos from iPhone to your computer directly.
When transferring videos, users care most about transfer speed and preserving video quality. A reliable Appgeeker iPhone Data Transfer software can meet your need to transfer large numbers of 4K video files without compressing their quality. This software enables multimedia file transfers between iPhones, as well as between an iPhone and Windows or Mac, including videos, photos, music, ringtones, text messages, and more.
It can export your iPhone videos—whether from the camera roll or other apps—to a Windows PC or Mac, and supports a wide range of video formats. You can even quickly transfer the entire iPhone video library to your computer in one click without iTunes or iCloud.
Step 1. Download the software and built connection.
Download and launch the iPhone Data Transfer on your PC or Mac. Then connect your iPhone with computer via a USB data cable. If necessary, unlock your device and tap Trust to build connection.

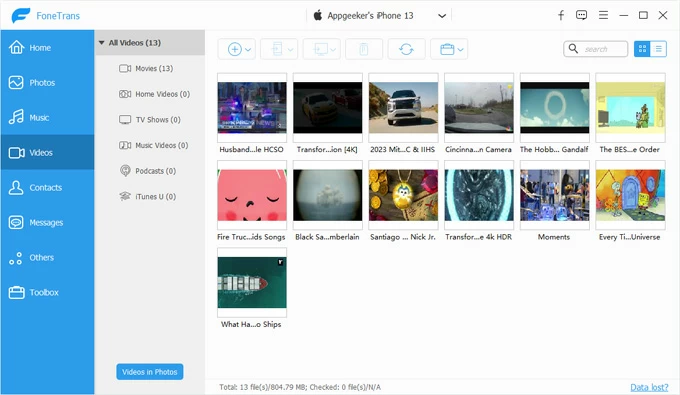
Step 2. Preview your videos from iPhone.
Once connected, navigate to Photos tab in the left side to access all video files from the iPhone, including the Movies, Home Videos, TV shows, Music Videos, Podcasts, iTunes U and more.
Step 3. Select and export videos from iPhone to computer.
Select your desired videos, then click the computer icon at the top taskbar and choose the Export to PC option. In the pop-up window, specify a target folder to save the transferred videos from iPhone on computer.

Windows 10/11 pre-installed File Explorer, named Windows Explorer in Windows 8/7, provides another cable-based method to get videos from iPhone to PC. It can access the DCIM files on the iPhone connected to the PC and then manage and transfer the videos.
1. Hook up your iPhone to the computer with a USB wire.
2. Double-click This PC on your desktop.
3. Locate Apple iPhone under Devices and drives from the File Explorer window.
4. Move to Internal Storage > DCIM.
5. Find and pick the iPhone videos you wish to move to your PC.
6. Right-click on the videos and select Copy from the expanded options.
7. Paste the copied videos into a local folder.

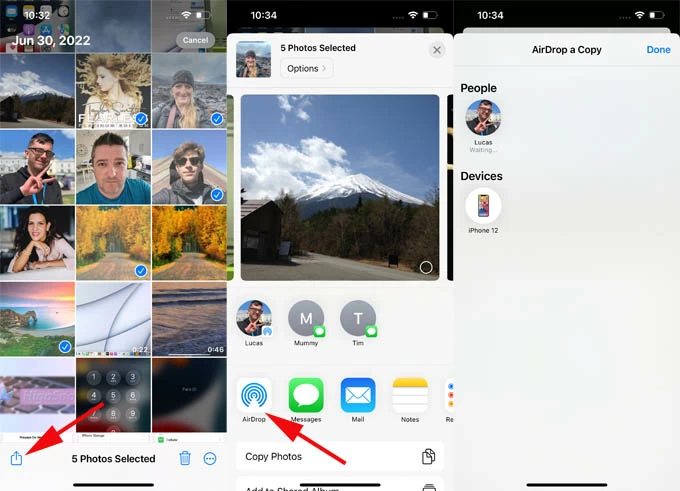
If you want to immediately transfer short video clips to your computer for editing or storage, AirDrop can send videos from your iPhone to your Mac wirelessly using Wi-Fi and Bluetooth. As long as both your Mac and iPhone have Wi-Fi and Bluetooth enabled and the two devices are within 30 feet, AirDrop is a very convenient option for file sharing.
1.Enable AirDrop on your devices.
On your iPhone, swipe down to open the Control Center, press and hold the network settings card, and tap AirDrop. Choose Everyone or Contacts Only.
On your Mac, open Finder and click AirDrop in the sidebar. Ensure visibility is set to Everyone.
2. Open the Photos App on your iPhone, and then select the videos you need.
3. Tap the Share button and choose AirDrop.
4. Choose your Mac's name when it appears on the devices screen.
5. Tap Accept when you see an alert with a preview of video on your Mac.
Conclusion
This article introduces several popular and practical methods for videos transfer from iPhone to computer, including USB cable, iCloud Photos, AirDrop, third-party software, etc. Of course, there are other feasible ways to get iPhone videos on computer, such as sending from Email or using external storage devices. But the above five methods are enough for you to transfer videos and photos from iOS devices to PC/Mac, and it is super easy. Depending on the specific transfer scenario, choose the most appropriate method to start transferring your videos
1. Can I transfer videos to my computer without using USB cable?
Lots of ways to get videos off your iPhone and onto your computer wirelessly, such as iCloud Photos or AirDrop or Email. You can first send your video as an attachment to your email, and then log in to the email address on computer to receive the video file.
2. Why can't I transfer videos from my iPhone to my computer?
Here are some solutions for when video transfers from your iPhone to your computer fail:
3. Can I transfer videos to my computer using iTunes?
You can move videos from iPhone to computer using iTunes' File Sharing feature. However, compared to other transfer methods, iTunes involves more steps, so we recommend you to use the method of transferring videos from the iPhone to the computer without iTunes.
4. What's the fastest way to transfer large 4K videos from my iPhone?
For sheer speed, the USB cable method reigns supreme. Plug into your computer and use File Explorer (Windows) or Image Capture (Mac) to drag those hefty 4K files from the DCIM folder—no internet slowdowns, just raw transfer power. A USB 3.0 cable can turbocharge it further. AirDrop's quick for Macs if the files aren't massive, but for gigabyte-sized videos, USB's your champ.