How to Transfer Videos from PC to iPhone

Want to transfer your iPhone's files to Windows 11? This article will show you exactly how to transfer files from iPhone to Windows 11, covering methods for all kinds of file types.

A versatile Appgeeker iPhone Data Transfer tool enables seamless transfer of various multimedia files between your iPhone and Windows PC—including photos, videos, music, contacts, messages, and more—with no quality loss.
iPhone-to-Windows 11 file transfer can be done via wired connection or wireless methods.
Clutter on your iPhone can quickly exhaust your storage. To free up space, you might consider transferring files from your iPhone to a Windows 11 PC or laptop for backup or further editing.
Files come in many different types, including photos, videos, PDFs, documents, movies, voice memos, ZIP folders, and app-downloaded files, among others. Transferring photos and videos from iPhone to Windows 11 is relatively straightforward. The real focus is on how to transfer non-photo files from an iPhone to a Windows 11 computer.
This article will guide you step by step on how to transfer files from iPhone to Windows 11. No matter what type of file you have, you'll find a suitable method to quickly and easily move them to your computer.
If you have an Apple-certified data cable, a wired transfer of files from iPhone to Windows 11 is the superior choice for handling massive files or large datasets. However, if you only need to move a few files for immediate use, wireless methods offer the convenience you need.
Table of Contents
As the modern successor to iTunes, the Apple Devices app on Windows 11 computers has redefined the way we manage files across platforms. If your files are stored in apps such as VLC, Pages, GarageBand, CapCut, or PDF readers, this app can access your iPhone and transfer files directly from your iPhone to your Windows 11 PC. It is particularly well-suited for documents, audio projects, exported videos, and work files.
However, it's important to note that only apps that support File Sharing can be used with this method. You cannot browse the entire contents of your iPhone through the Apple Devices app; you can only access folders and files that the specific applications have permitted for sharing.
1. Ensure the Apple Devices app on your Windows 11 PC is updated to the latest version, or download it from the Microsoft Store.
2. Launch the Apple Devices app and connect your iPhone to the computer using a reliable USB data cable. If prompted, tap Trust on your iPhone and enter your passcode to authorize the connection.
3. In the left-hand navigation pane of the application, locate and click on your iPhone.
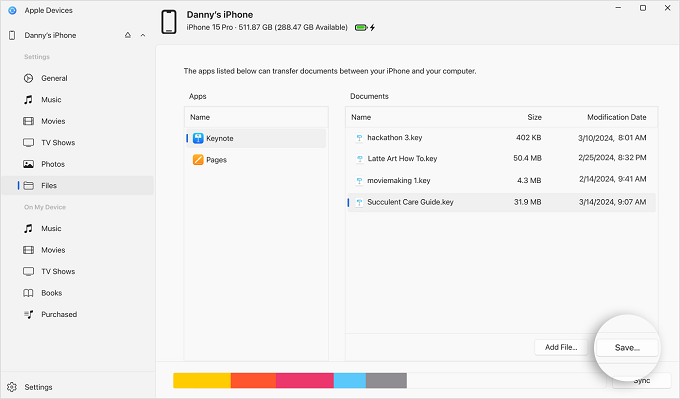
4. Access the Files tab to view a list of iOS apps that support File Sharing and have their own built-in file storage.
5. Scroll through the list of apps to find the one containing your files. In the Documents section, click individual files or use keyboard shortcuts to select multiple files.
6. Hit Save to extract the selected files to a pre-designated folder on your Windows 11. The app will perfectly copy every file's attributes to your Windows 11 PC without any distortion or quality loss.
Note:
When you want to transfer multiple file types from your iPhone to your Windows 11 all at once, or if you're looking for a stable and fast way to move large files (such as 4K videos or massive photo libraries) from iPhone to Windows 11 PC, an Appgeeker iPhone Data Transfer is undoubtedly your best helper.
This software supports cross-platform transfer of different kinds of multimedia files between iPhone and Windows PC, and can automatically convert iPhone-specific formats to ensure full compatibility with your Windows 11 PC.
Beyond allowing you to manually select specific files, it features a one-click transfer option to save you significant time and effort. Built with professional-grade stability, the software ensures zero quality compression and no data loss during the transfer process. With this dedicated tool, moving your files from iPhone to Windows 11 becomes a fast, effortless experience.
Key features of iPhone Data Transfer:
1. Download and launch the software on your Windows 11 PC or laptop, then plug your iPhone into the computer using a suitable data cable.

2. Navigate to the different media file types, such as Photos, Music, Videos, Contacts, and Messages. Each tab further organizes the files into more detailed subcategories.

3. Check the boxes next to the files you want to transfer. You can use the built-in filters to quickly locate the desired files, then click the computer icon in the top toolbar and select Export to PC.

4. Choose a custom save location, and the selected files from your iPhone will be transferred and saved on your Windows 11 computer.
If you want to transfer in the opposite direction, refer to how to transfer photos from PC to iPhone.
For users who prefer wireless file transfer from iPhone to Windows 11, iCloud Drive creates a shared cloud folder between your iPhone and Windows. You can upload any file from your iPhone to iCloud Drive, and these files will automatically sync to all devices associated with the same Apple account, allowing you to download them on your Windows 11 PC.
This method requires no physical connection; you simply need to ensure your iCloud Drive has sufficient storage space and a stable internet connection.
Note:
1. Open the Settings app on your iPhone, tap [Your Name] > iCloud > Drive, and make sure Sync this iPhone is turned on.
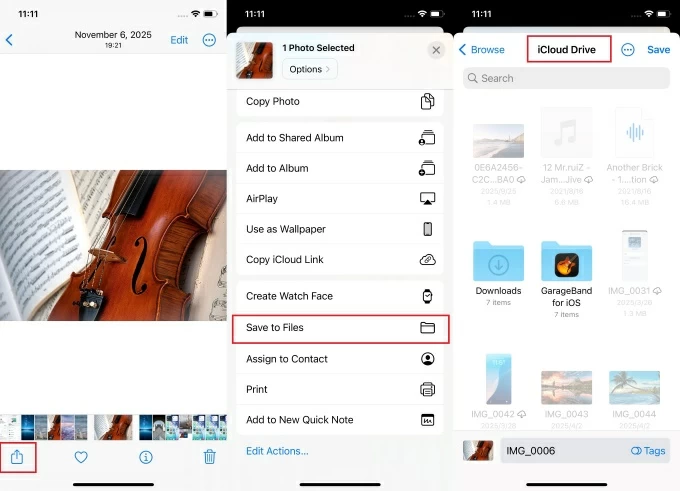
2. Open the target file you wish to move, tap the Share icon, select Save to Files, then choose a folder in iCloud Drive (or create a new one), and finally tap Save.
3. Alternatively, open the Files app and locate the file. Long-press the file to bring up the options, select Move, then navigate to iCloud Drive, choose a destination folder, and tap Copy.
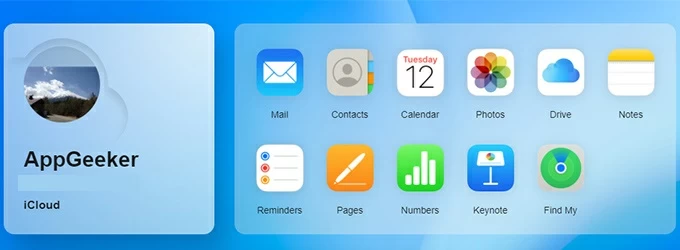
4. On your Windows 11 PC, visit iCloud.com in a web browser and sign in using the same Apple account as on your iPhone.
5. Enter the verification code to complete two-factor authentication.
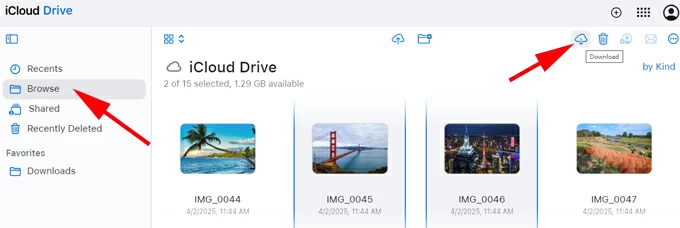
6. From the main dashboard, select Drive and head to the file or folder you uploaded.
7. Once selected, click the Download icon in the top-right corner. Your file(s) will download to your Windows 11 PC, typically as a ZIP archive if multiple files are selected.
Also see: How to access iPhone photos on PC
The Link to Windows app has ushered in a new era of wireless file exchange, connecting your iPhone and PC via Wi-Fi and Bluetooth to completely eliminate the need for cables. This application supports sharing photos, documents, and PDF files from an iPhone to Windows 11.
To use the app for transferring your files from the iPhone to the Windows 11, you need to meet the following requirements:
1. Run the Phone Link app on your Windows 11 desktop and select iPhone as the device to pair.
2. Use your iPhone's camera to scan the QR code displayed in the Phone Link app.
3. A "Pair your devices" box will pop up on your iPhone. Tap Open > Continue.
4. Tap Get Link to Windows, then select the account associated with the Phone Link app on your Windows 11 PC, and tap Sign in.
5. On your iPhone, locate the file you need, tap the Share icon, choose Link to Windows, and select your Windows 11 PC from the list.
6. A notification will appear on the Windows 11 taskbar. Accept it and open the file on your computer.
If the files you intend to transfer from iPhone to Windows 11 are photos or videos, here are two dedicated methods specifically for photos and videos.
For moving photos from iPhone to a Windows 11 PC, especially media files kept on your Photos app or captured with the Camera app, the Microsoft Photos app is one of the fastest official import tools available.
1. Link your iPhone to your Windows 11 PC, unlock the device, and approve the access request to expose its media library.
2. Open the Microsoft Photos app on your Windows 11 from the Start menu or by searching for it in the search bar.
3. In the left sidebar, under External Devices, click on your iPhone. The photos and videos on your iPhone will begin loading and appear in the app.
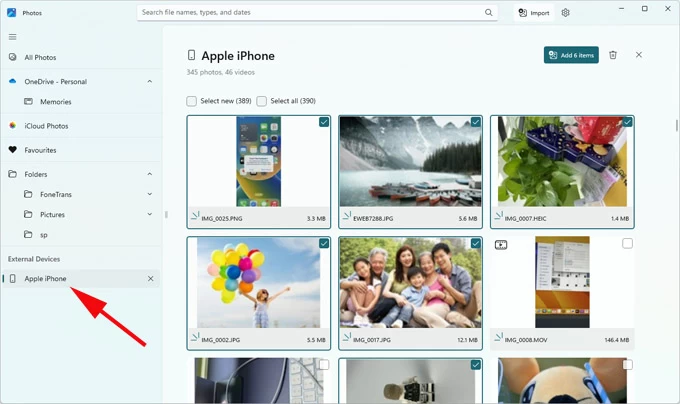
4. Check the files you want to add to Windows 11, then click Add [Number] items in the top-right corner.
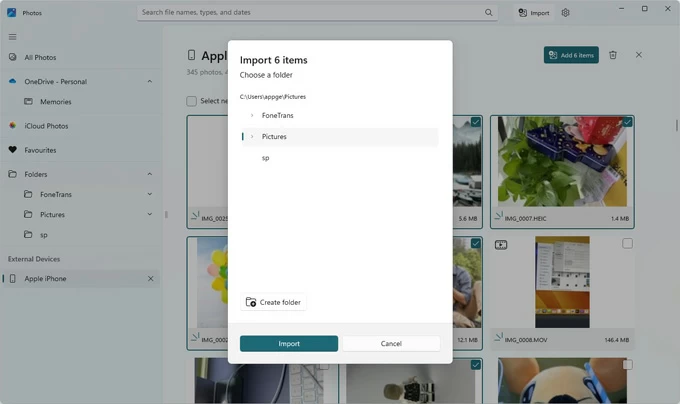
5. Pick a save location, then click Import to transfer them to your PC.
Note:
File Explorer is an excellent choice for users who opt for total control by manually copying iPhone photos and videos to Windows 11. This method gives you direct access to the iPhone's internal media file structure—the DCIM folder, which contains photos and videos captured with the Camera app, screenshots, as well as any media files saved to the Photos app. You can simply copy and paste these files to any location on your computer.
1. Attach your iPhone to your Windows 11 PC via USB.
2. Press the Windows Logo key + E to launch File Explorer, then expand the This PC list in the left sidebar to locate your connected device (usually named Apple iPhone).
3. Browse to Internal Storage > DCIM. Your photos and videos will be organized into various subfolders, typically categorized by date or numerical sequence.
4. Select your particular media files or the entire folder containing your photos and videos, then drag and drop them to your Windows 11 desktop or any folder of your choice.

Read more: How to transfer photos from iPhone to external hard drive
Conclusion
There is no single best method for transferring your files from an iPhone to Windows 11. The right choice ultimately depends on the types of files you have, where they are stored, and how you plan to use them on your computer.
1. My 4K video files look lower resolution after transferring via File Explorer. How do I stop this?
Windows 11 often triggers a background conversion (transcoding) to make high-efficiency Apple files (.HEVC) compatible with older PC players. To prevent this silent quality loss, go to Settings > Photos on your iPhone. Scroll to the bottom and select Keep Originals under the "Transfer to Mac or PC" section. This forces the iPhone to send the raw bitstream of your file rather than a compressed, transcoded version.
2. Which method is best for transferring very large files from iPhone to Windows 11 in lossless quality?
Dedicated Appgeeker iPhone Data Transfer software is the best choice here. It prioritizes lossless migration and includes built-in safeguards against re-compression, making it far superior to native options for high-fidelity, bulk video transfers—especially when native methods may suffer from stability issues or introduce subtle degradation.
For these bulky files, always use a high-quality USB cable and avoid wireless methods to maintain speed and prevent interruptions.
3. What should I do after transferring files to ensure nothing gets corrupted?
Always perform a quick integrity check: Compare the file sizes and counts between your iPhone and PC, spot-check the playback quality of a few videos/photos, and use Windows' built-in tools (Right-click > Properties > Details) or a simple checksum utility if available. For mission-critical files, running a hash comparison is the most reliable way to verify that the data is identical.