How to Transfer Music from Mac to iPhone

Looking to move files from your PC to your iPhone for processing or daily use? This guide lists multiple effective methods to help you transfer files from a Windows PC to an iPhone.

Regardless of your file type and volume, Appgeeker iPhone Data Transfer is a powerful tool that can effortlessly and securely transfer your files from Windows to iPhone without any restrictions.
Consider using a wired connection for bulk transfers first, followed by wireless methods for individual files.
Windows PC and iPhone are two independent systems that use completely different storage languages. Therefore, transferring files from Windows to iPhone is not as simple as just plugging in and copying.
To transfer files from Windows PC to an iPhone, you need to consider the file type and size, as these factors determine the best transfer method. When fidelity and speed are crucial, using a data cable to transfer the files from a PC to an iPhone is undoubtedly the best choice, especially for large files such as 4K movies or photo libraries of dozens of GB. If you prioritize mobility and convenience, wireless transfer is the optimal way to move files to your iPhone.
This guide deconstructs these two physical paths, offering a practical manual on how to transfer files from PC to iPhone, helping you combine the productivity of your Windows computer with the portability of your iPhone.
Table of Contents
The key advantages of transferring your files from PC to iPhone using a data cable are:
If you're transferring actual files—not just photos or songs, but folders, documents, project videos, and compressed archives—a wired connection is the most reliable way to bridge Windows and iPhone.
Apple Devices is Apple's new Windows control center, designed to replace iTunes. While its functionality remains largely similar to iTunes, it is significantly more lightweight and modern.
Its File Sharing feature allows you to transfer files associated with specific apps between your iPhone and Windows PC. This means you cannot simply drop any file into the iPhone's root directory; instead, files must be received and managed through specific iOS apps that support the File Sharing protocol.
1. Download and install the Apple Devices app from the Microsoft Store. If you have already installed it, ensure it is the latest version.
2. Use an appropriate USB-C to USB-C cable or Lightning to USB cable to connect your iPhone to your Windows PC. You will need to tap Trust on your iPhone to allow Windows to access the device.
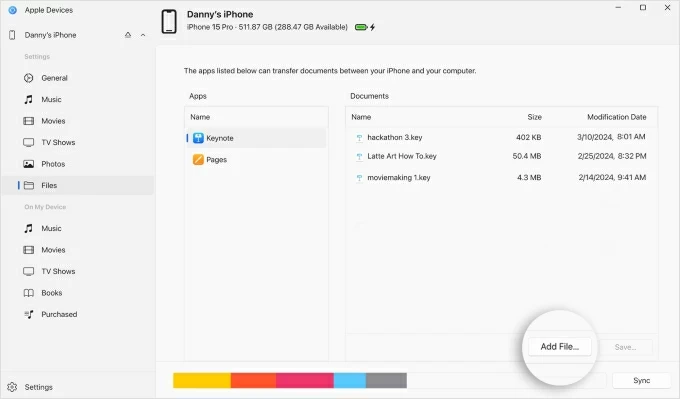
3. In the navigation pane on the left side of the app, click on your device name, then select the Files tab. This will open a window displaying all your iPhone's File Sharing–supported apps.
4. Select the app you wish to use to receive the files from the list, then click the Add File button in the bottom right corner.
5. Locate the files you want to share in the Windows File Explorer, then click Add. These files will be copied from your Windows PC to the corresponding location within the selected app on your iPhone.
Once finished, disconnect the device. Open the chosen app on your iPhone to check your files and confirm they have been transferred intact.
To transfer very large files or batch transfer multiple files from Windows to iPhone, Appgeeker iPhone Data Transfer delivers outstanding performance. As a professional data transfer utility, it enables seamless bi-directional transfer of various multimedia files between your iPhone and Windows PC, including photos, videos, movies, music, texts, contacts, notes, and more.
It does not compromise file quality during the transfer process, fully keeping the original resolution and metadata of your files. Besides, you don't need to worry about compatibility issues between iPhone and Windows PC, as the software supports a wide range of file formats. Its lightning-fast transfer speeds and the ability to process massive batches of files simultaneously are the core strengths of this tool.
1. Download and launch iPhone Data Transfer on your Windows PC, then plug your iPhone into your PC using an Apple-certified data cable.

2. The software will categorize your files into major types: Photos, Music, Videos, Contacts, Messages, and Others. Select the file type you want to transfer.

3. In the top taskbar, click the plus sign (+), then choose Add File or Add Folder depending on your needs to add files to your iPhone.
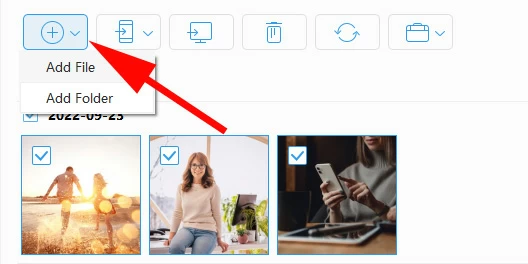
4. Browse your Windows folders and select the files or folders you need, then click Open. The selected files will begin transferring from your PC to your iPhone.
5. Alternatively, you can simply drag and drop the files directly into the software to add them.
Read more: How to transfer photos from iPhone to PC
If you still have iTunes on your Windows PC, its sync feature remains an effective way to transfer photos and video files from a PC to your iPhone.
However, this is different from a simple copy-paste operation; files added to an iPhone via iTunes syncing cannot be deleted directly on the iPhone. To remove them, you must uncheck the folder within iTunes on your computer and then sync the device again.
1. After linking your iPhone to your PC, launch iTunes on your Windows desktop.
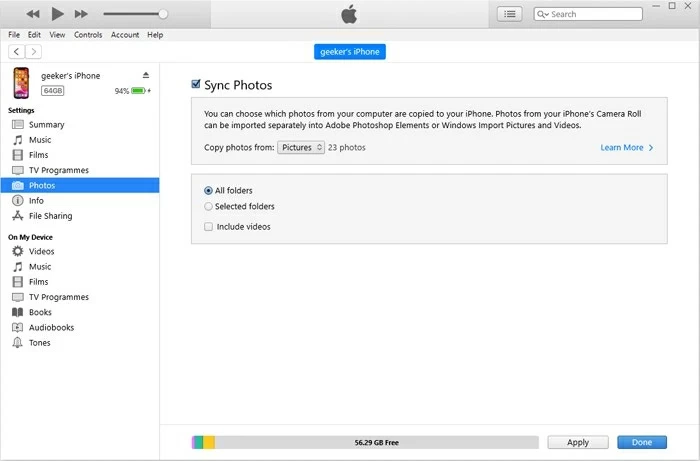
2. Click the device icon in the upper-left corner, then select Photos from the Settings list on the left sidebar.
3. Check the Sync Photos box. From the "Copy photos from:" drop-down menu, click Choose folder... and navigate to your source folder.
Tip: If the Sync Photos option is grayed out, make sure iCloud Photos is turned off on your iPhone. Also, under the Summary tab in iTunes, check "if Manually manage music and videos" has been enabled.
4. Choose to sync All folders or Selected folders to save space. If your folders contain .MOV or .MP4 files, check the Include videos box.
5. Click Apply or Sync. iTunes will start transferring the files from your photo library to your iPhone.
For transferring music files, you can refer to the specific steps in How to transfer music from iTunes to iPhone.
Even without a data cable, when devices are far apart, or when you need to access the same file from multiple locations, wireless transfer allows your Windows PC to send files to your iPhone anytime, anywhere. In these scenarios, your iPhone acts as a remote file receiver, fetching data from cloud platforms, local networks, or browser-based servers.
iCloud Drive is more than just storage space; it is a real-time, persistent bridge that synchronizes file structures between Windows and iOS. As long as you upload your files from your iPhone to iCloud Drive, you can access them on your PC using iCloud for Windows or by visiting iCloud.com.
However, you must ensure that both your iPhone and iCloud have sufficient storage space to accommodate your files. Keep in mind that iCloud offers only 5GB of free storage. Additionally, you need to perform file transfers in an environment with a stable internet connection.
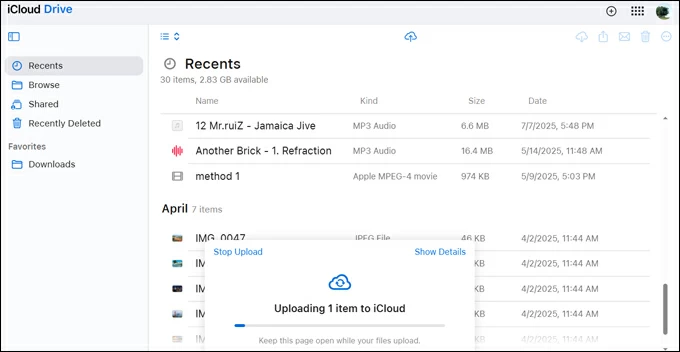
1. Open any browser on your PC and go to iCloud.com.
2. Sign in with your Apple account and complete two-factor authentication.
3. Click on Drive from the main dashboard, then enter the Browse tab.
4. Create a new folder or locate the one where you want to save your files. Click the Upload icon at the top, then browse and select the files to upload.
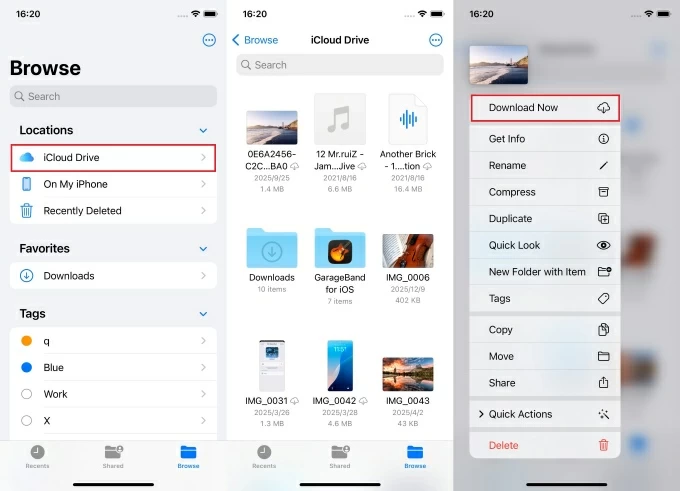
5. On your iPhone, head to Settings > [your name] > iCloud > Drive and make sure Sync this iPhone is enabled.
6. Open the Files app, tap Browse at the bottom, then select iCloud Drive to view the files you transferred.
7. If you want to save them locally to your iPhone, long-press the file and select Download Now to move it from the cloud to your iPhone's physical storage.
Google Drive is another popular cloud service that enables file management and sharing across different platforms, letting you transfer files from your PC to the iPhone seamlessly. Furthermore, the platform allocates 15 GB of free storage capacity.
1. Access drive.google.com on your computer and sign in.
2. Click New in the top-left corner and select File upload or Folder upload.
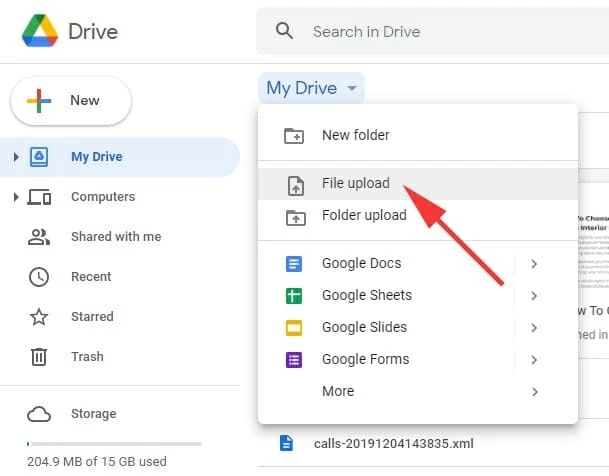
3. Pick the desired files from Windows and wait for the progress bar to complete.
4. Install the Google Drive app on your iPhone and sign in using the same Google account.
5. Use the search bar or the Files tab to locate the newly uploaded directory.
6. If needed, tap the three dots to the right of the file and select Download (or Open in to save it to your device).
LocalSend frees file transfers from physical limitations. By establishing a private local connection, you can send files from your Windows PC to your iPhone over your Wi-Fi network.
1. Download and install the app from the official LocalSend website on your Windows PC, and from the App Store on your iPhone.
2. Launch the app on both devices while they are connected to the same Wi-Fi network; they will automatically discover each other.
3. On your Windows PC, navigate to the Send section, click File to select individual files, or click Folder to send an entire folder.
4. After selecting your items, choose your iPhone from the list of discovered devices as the recipient.
5. On your iPhone, a prompt for the incoming request will appear. Accept it, then choose your saving location (typically the "Files" app or a specific folder).
Also see: Where do AirDrop files & photos go?
The shared folder transfer method is the ultimate guest solution. It allows you to transfer files from a Windows PC where you don't have administrator privileges to install software to your iPhone.
By turning your iPhone into a temporary web server, you can create a local portal accessible through any standard web browser. Simply ensure that both your iPhone and the computer are on the same local area network (Wi-Fi). But the steps for this method are somewhat complex and require a bit of technical familiarity.
1. Open Settings on Windows, click Accounts > Other Users, and add a Microsoft account. Be sure to remember the username and password.
2. Right-click the target folder on the PC and select Properties > Sharing > Advanced Sharing. Check Share this folder, click Permissions to add the user you just created, and then click Apply to save your changes.
3. Return to Windows' Settings, click Network & Internet > Properties, and set the network profile to Private network, then scroll down to find and note your IPv4 address.
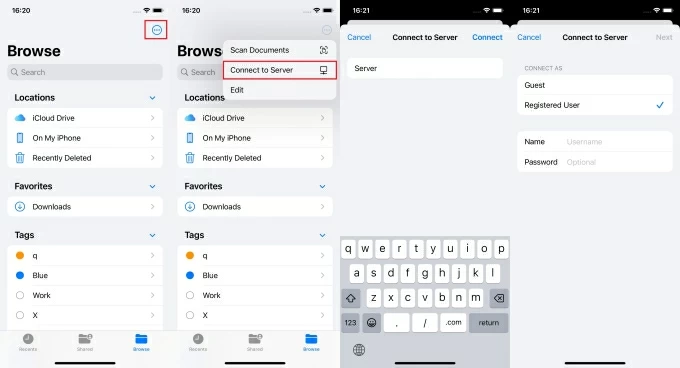
4. Open the Files app on your iPhone, tap Browse, then tap the three dots in the top-right corner and select Connect to Server.
5. Enter your Windows IP address and tap Connect.
6. Select Registered User and enter the credentials for the Microsoft account you added. Tap Next to browse your shared folders.
7. Choose the specific files or groups of files as required, then copy and paste them to a local location on your iPhone.
Related: How to transfer photos from iPhone to external hard drive
Conclusion
Choosing between wired or wireless transfer from a Windows to iPhone is not about which method is "better," but rather how your files need to be moved. Some files demand speed and structured organization, while others require distance and flexibility. Once you understand the specific needs of your data, the choice becomes crystal clear. Based on your current situation, select the most suitable method and start your file transfer today.
1. Can I transfer any type of file from a Windows PC to iPhone?
Yes. You can move documents, videos, music, PDFs, ZIP files, and app data. The key is choosing a method that supports your file type—some tools send files into apps, while others store them in cloud or file folders.
2. Where do transferred files go on the iPhone?
That depends on the method:
3. Which method should I choose if I need to transfer oversized video files without losing quality?
Use a wired method—preferably the Apple Devices app File Sharing or a dedicated lossless transfer tool such as Appgeeker iPhone Data Transfer. These deliver the highest sustained speed and guarantee zero re-encoding or compression. Wireless methods are usually slower for files this large and carry a small risk of interruption on weaker Wi-Fi.