Home > Resources > Get music from Mac to iPhone

How to transfer music from Mac to iPhone in 4 quick ways

Apple offers several tools to make music transfer from Mac to iPhone easier, and Mac users also have other options to get their music on their iPhone efficiently.

face
Jasmin Woods Updated on May 9, 2023 2:03 PM

Quick to know: Syncing Mac music with iPhone can be done easily using different tools and techniques. Solutions like iPhone Data Transfer help every Apple user to transfer their music from Mac to iPhone, or on the contrary, without quality loss in just a few clicks.

There are apps and features you can use to make an easier music transfer from Mac to iPhone.

Music comforts us in many ways, whether we're feeling down or just want to relax. With so much music available these days, it's no wonder that we want to take our favorite songs with us wherever we go. Maybe you just added a new song on your Mac and want to enjoy it on your iPhone. Or perhaps you're looking to transfer your entire music library from a Mac to iPhone. Whatever the situation, transferring music from Mac to iPhone is easier than you might think.

Here, we'll show you how to transfer music from Mac to iPhone in several helpful methods. Whether you're a novice or a pro, you can easily get your Mac music transferred to iPhone all at once or selectively. So let's explore the four quick ways to move music from Mac to iPhone now:

Table of Contents

How to transfer music from Mac to iPhone (Entire music library)

With increasing demands, Apple has introduced data transfer features that make music transfer from Mac to iPhone even easier. The traditional USB cable method is a good way to move music to iPhone from Mac via a physical connection. Or, perform a wireless music sync from your Mac to iPhone if you've subscribed to Apple Music, which makes the process as painless as possible.

Transfer music to iPhone from Mac with iTunes or Finder

Mac comes with a pre-installed music transfer tool called Finder (or iTunes on macOS 10.14 and earlier), which lets you connect your iOS devices to Mac to sync music, songs, sound tracks, albums as well as other files like photos or contacts.

So the first way to transfer music from your Mac to iPhone is to use this oldest and most reliable method based on a wired connection. It's quick and straightforward as long as you've got a workable USB cable on hand. To learn how to transfer music from a Mac to an iPhone:

Note:

  • For the non-purchased songs, you'll need to add them to your Mac's music library first.

Step 1. Launch Finder on your Mac, and connect your iPhone to Mac using a USB cable. If asked, tap Trust on your iPhone to proceed. Your iPhone can also be connected to Mac over Wi-Fi.

Step 2. Click on your iPhone's name when your device shows up in the sidebar, under the Locations section.

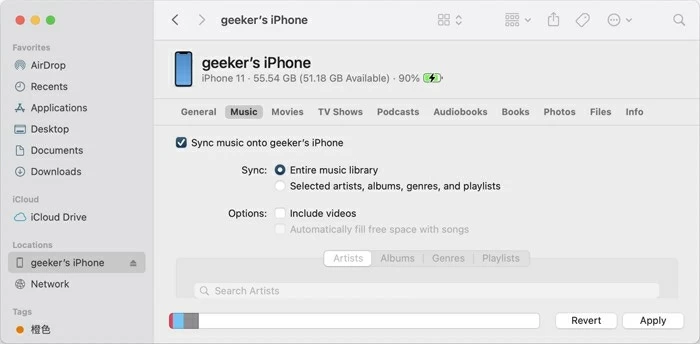
Step 3. Select Music tab from the horizontal menu bar. Here, you've got the option to sync your Mac music with your iPhone.

Let your Mac transfer music to iPhone through Finder or iTunes.

Step 4. To enable the music transfer, tick the checkbox next to Sync music onto your device.

Step 5. Select Entire music library below, it would transfer all your music from Mac to iPhone.

  • If you just want to transfer a selection of your music library, choose Selected artists, albums, genres, and playlists, and deselect the categories that you don't want.
  • It's optional to include the music videos. When you have lots of tracks to move, select the option Automatically fill free space with songs to transfer as many music files as possible.

Step 6. Once ready, click the Apply button. Then your Mac transfers music to your iPhone. Do not eject your device before the process is complete.

Important: Finder or iTunes can only transfer audio files to iPhone from Mac's music library, and the synced music will replace the current songs and playlists on your iPhone. And in case your Finder or iTunes fails to transfer music to iPhone, click the link to learn how to fix.

If you have an Apple Music subscription, make sure the Sync Library option is turned off in Apple Music settings for USB sync to work properly. Alternatively, to avoid data loss, you can use your Apple Music account to sync all your Mac music with iPhone automatically.

Sync music from Mac to iPhone with Apple Music

Another easy option for transferring music from Mac to iPhone is via the Apple Music. The Apple Music account comes with ability to sync your whole music library across all your Apple devices under the same identity. And it's easily accessible on both your Mac and iPhone, allowing you to quickly transfer songs from Mac to iPhone with ease.

With an Apple Music subscription, all your music is automatically transferred from Mac to iPhone, no manual syncing required. The only thing you need to do is to set the Sync Library option to perform a wireless music transfer over the Internet. Here's how to get music from Mac to iPhone:

Step 1. Open Apple Music on your Mac and sign in.

Run the Apple Music app, and select Account from the top menu bar. Log in with your Apple ID that you use with your Apple Music subscription.

Note: It only works for Apple Music subscribers and you need to use the same Apple account on your Mac and iOS device.

Step 2. Enable the Sync Library option for music auto transfer.

In Apple Music, navigate to Music > Settings > General, and then check the Sync Library option. This allows you to access up to 100,000 songs in your cloud music library.

Sync Apple music across your Mac and iPhone.

Step 3. Turn on the Sync Library on your iPhone.

From your iPhone's home screen, open the Settings > Music, and toggle on Sync Library.

Tips: Be sure that your iPhone is signed in with the same Apple account and has stable network connection so that the purchased music on Mac can be accessible on your iPhone.

Step 4. Apple Music syncs your music library instantly.

Once the Sync Library option is enabled on both your devices, all your music will be transferred between your Mac and iPhone by default, including your songs, playlists, tunes and music videos.

Step 5. Download music from Apple Music to your iPhone.

Now, if you add songs on your Mac, Apple Music automatically syncs the tracks so they show up on your iPhone for easy access. Select what you want and download the music to your iPhone.

That's how to transfer music from a Mac to an iPhone wirelessly. After that, you can access the transferred music on your iPhone anytime you're connected to the Internet, or download the music you like to enjoy offline.

If you need non-purchased music that's not available in Apple Music, take advantage of an efficient audio recorder and converter like AppGeeker Screen Recorder to capture any sound you want, then move the files to your iPhone seamlessly.

How to transfer music to iPhone from Mac selectively

For those who don't want to sync their whole music library, it's possible to choose specific songs for transferring music from Mac to iPhone selectively. To do that, you may want to turn to a third-party tool for help, or try to move your songs one by one using AirDrop.

Add Mac music to iPhone with iPhone Data Transfer

Whether you prefer to sync music files in bulk or manually transfer specific songs to your iPhone, the all-in-one file management tool iPhone Data Transfer can handle it all. Just as its name claims, it supports all kinds of files including music transfer from Mac to iPhone or vice versa.

With a cable connection, it lets you simply transfer non-purchased music from Mac to iPhone without overwriting the current music on your device. You can add or remove any music to or from your iPhone with clicks. Moreover, it offers additional features such as automatic audio format conversion, music library organization, custom ringtone creator, and backup and restore functionality, giving you full control over the transfer of Mac music to iPhone without syncing.

Download Now!

for macOS | for Windows

  • Lossless and hyper-fast transfer from Mac to iPhone and the other way around
  • Multiple media file transfer across platforms
  • Duplicate files detection and removal
  • Rebuild iTunes library
  • Support various files like music, MP3 / AAC / MPEG / FLAC files, photos, videos and more
  • Efficient music transfer between iPhone and Mac or PC

Step 1: Install and open iPhone Data Transfer.

On your Mac, download, install and launch iPhone Data Transfer tool.

Step 2: Connect iPhone with Mac.

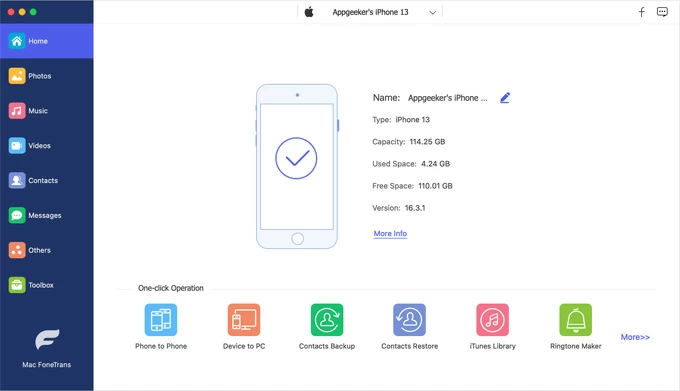
Connect your iPhone with your Mac via a proper USB cable. Tap on Trust if there is a prompt on your device screen. When you do so, the program can detect the iPhone and show its basic info.

The device information appears if your iPhone gets connected successfully.

Step 3: Transfer music from Mac to iPhone.

From the sidebar, select Music tab and it'll load all the existing music on your iPhone by category.

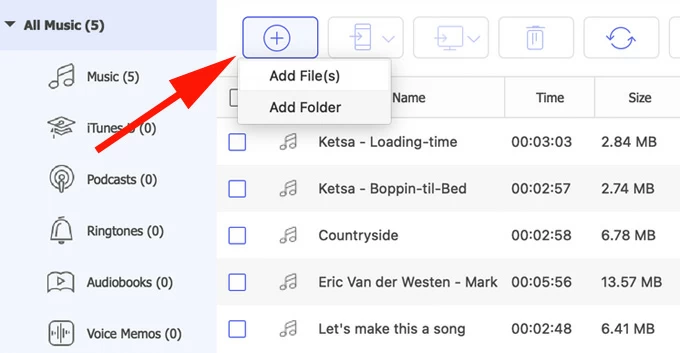
Simply hit the Add icon at the top, and follow the options to select music files from your Mac or choose an entire collection folder that you want to transfer to your iPhone. Alternatively, you may drag and drop the music files into the window and they will be added to your iPhone immediately.

Songs you added here will be transferred in their original quality, and the incompatiable files will be automatically converted to suitable audio formats for easy playback on your iPhone. For those songs that you don't want, simply right-click on them and delete them from the list.

Transfer songs or whole music collection folder from Mac to iPhone via Add button.

Extra tips:

  • To transfer your purchased songs, make sure to get them downloaded first, and then follow the steps to copy music to your iPhone from Mac's local folder.

And that's it! Now, disconnect your iPhone, open the Music app and enjoy! Also, feel free to check the video guide for your ease:

AirDrop Mac music to iPhone

A final way to selectively transfer music from your Mac to your iPhone is to use the built-in AirDrop option on both Mac and iOS devices. Before all else, enable Wi-Fi and Bluetooth connections on your Mac and iPhone, and put them together. When you're ready, follow the steps below to make transfer of music from your Mac to iPhone. This works perfectly especially when you need to transfer small music files from Mac to iPhone and don't want to use a cable.

1. Swipe down from your iPhone screen to access the Control Center, and tap on the AirDrop icon to enable the feature.

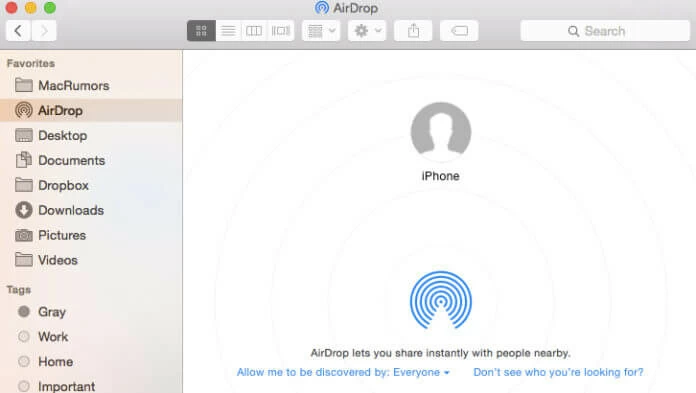
2. Launch Finder on your Mac and head to AirDrop from the left menu. It lets you turn on the AirDrop option so it's able to send files to another AirDrop device nearby.

3. Let your Mac detect your iPhone by AirDrop. You'll see your iPhone's name when it's done.

4. Go to the music files you wish to transfer to your iPhone. If it's not in your Music app, put the audio files on your desktop.

5. Drag and drop the music files to your iPhone icon on the AirDrop screen. It's a quick process for transferring small amounts of music across Apple devices.

6. On your iPhone, tap on Accept when the AirDrop box pops up. This will receive and store the sound tracks on your phone, and then you can play and listen to them freely.

FAQs about music transfer from Mac to iPhone

1. What music format can iPhone play?

iPhone supports a variety of audio formats, including MP3, AAC, FlAC, M4A, WAV, AA, AC3, AAX, and more.

2. Can I transfer music from my Mac to my iPhone without using iTunes?

Yes. One option is to use the Apple Music which is available on both Mac and iOS devices. Another way to transfer music files to iPhone without iTunes is by using 3rd-party file transfer software such as Appgeeker iPhone Data Transfer. It moves music files directly from your Mac to iPhone without going through complex steps and also offers additional advanced features like photo and video transfer, data backup and restore, ringtone maker and more.

3. How to transfer music from my iPhone to my Mac?

There're several tools that can help you to transfer music from your iPhone to Mac. If you prefer to use a wireless way, try the default AirDrop feature or apply a cloud-based drive like Google Drive or Dropbox. Alternatively, use a USB cable to connect your devices and run Finder or iTunes to apply music sync.

Highlight
By clicking "Agree" you allow cookies that improve your experience on our site, help us analyze site performance and usage. See Cookies policy.Agree