How to Transfer Videos from PC to iPad

The computer's storage space is almost full and want to move iTunes library to external drive? Read this guide to see how to move your iTunes library to external drive easily.


Moving your iTunes library to an external drive is a great idea to back up all iTunes media files.
Moving iTunes library to external drive is the simplest and most effective solution, whether you're dealing with limited storage space on your computer or transitioning to a new PC and want to restore your previous iTunes library. Below, we'll show you step-by-step how to move iTunes library to an external drive on Windows and Mac.
Also read: How to unlock a disabled iPhone that won't connect to iTunes without computer
Table of Contents
It's worth noting that content downloaded from the iTunes Store is stored locally. And the process of moving the iTunes library to external hard drive is essentially achieved by moving the media files from the iTunes library to the external drive.
However, by default, iTunes organizes music, TV shows, and movies into separate folders within the iTunes Media folder based on their media type. To facilitate the transfer of your iTunes library to external drive, you should first consolidate all files from the library into the iTunes folder.
Notes:
To move your iTunes library to external drive, follow these steps:
Step 1. Consolidate all files from your iTunes library
1. Launch the latest iTunes app on your computer. For Windows users, to check if your iTunes is updated, go to Help > Check for Updates. As for Mac users, go to Updates > Update iTunes.
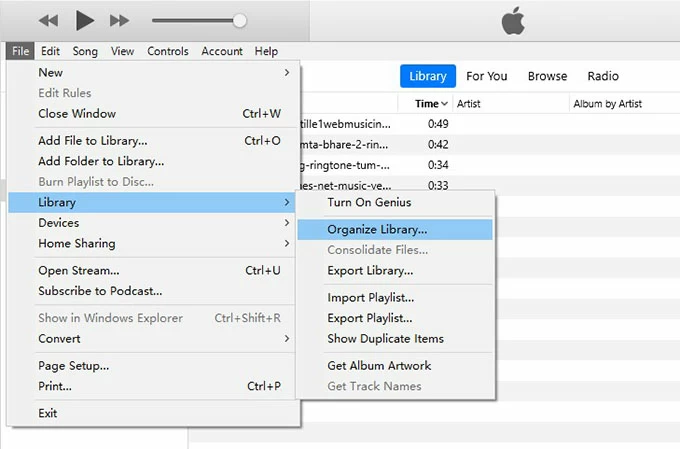
2. Click on the File menu located in the top-left corner of the iTunes window.
3. From the drop-down menu, select Library > Organize Library.
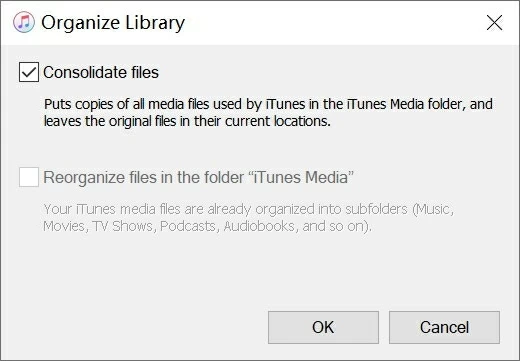
4. Check the box next to Consolidate files option in the pop-up window. Then, click on the OK button to initiate the consolidation process.
Now all the media files in your iTunes library are consolidated into one central location. Keep reading to find the exact location of your iTunes Media Folder.
Tip: Typically, the iTunes Media folder is stored in the default location: [User folder]\Music\iTunes\iTunes Media. However, users may sometimes change its storage location, causing a mismatch between the actual and default locations.
Step 2. Jot down iTunes Media folder location
1. Click on Edit in the upper left corner > Select Preferences from the drop-down menu.
2. Go to the Advanced tab in the Preferences window. Look for the iTunes Media folder location section, and you will find the location of your iTunes Media folder listed below in a box.
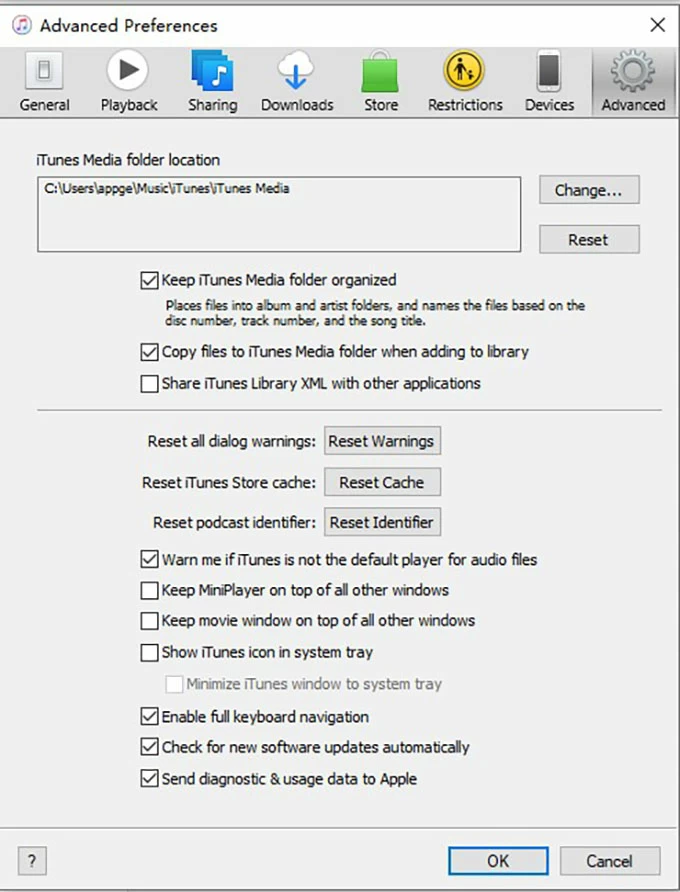
3. Make a note of the location of this folder, then quit iTunes.
Step 3. Create external drive backup of iTunes library
1. Open File Explorer and navigate to the location of your iTunes folder. Then connect the hard drive to your computer.
2. Right-click on the iTunes folder, choose Copy. After that, go to the desired location on the external hard drive.
3. Right-click in the destination folder and select Paste.
Alternatively, you can open two File Explorer windows side by side, one displaying the iTunes folder location and the other displaying the external drive. Simply drag and drop the iTunes folder from its original location to the external drive.
By following these steps, you'll be able to move iTunes library to external hard drive successfully.
Also see: How to import FLAC to iTunes on Mac and Windows
If you are not fond of the traditional methods mentioned above to move iTunes library to an external hard drive and want to seek a simpler and faster way of moving iTunes to external drive with just one click, Appgeeker iPhone Data Transfer can be the way to go.
iPhone Data Transfer is a trust-worthy app for Mac and Windows users to move their iTunes library to an external drive with a smooth and stable transmission process. You also can use the transfer tool to complete different data transfer tasks across multiple devices, like phone-to-phone and phone-to-computer data transfer, etc.
To move iTunes library to an external drive:
1. Connect your external drive to your PC and open iPhone Data Transfer.
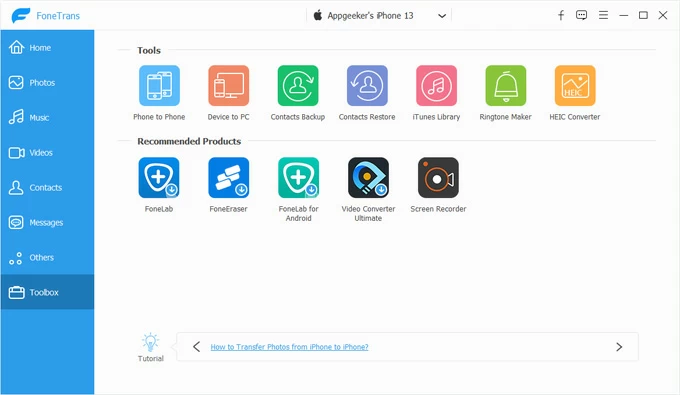
2. Click the Toolbox menu in the left pane > Select iTunes Library from the main iTunes window.
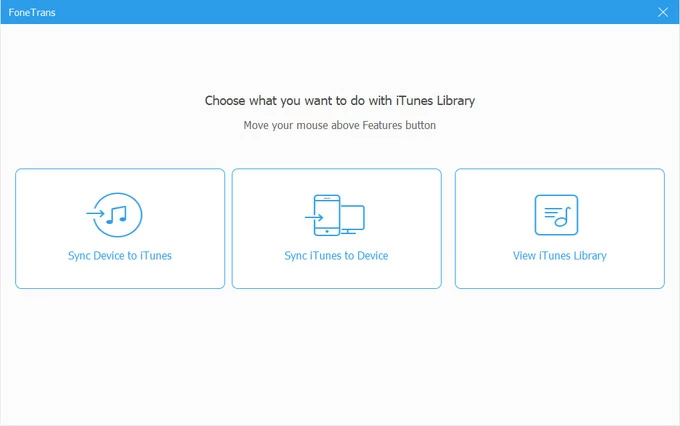
3. Choose Sync iTunes to Device option in the middle.
4. Check the boxes next to the content from iTunes library you want to move to external drive. Such as Music, Movies, TV Shows, Home Videos, Audiobooks, Podcasts, and Playlists. At the bottom right corner, click One-Click to PC to proceed.

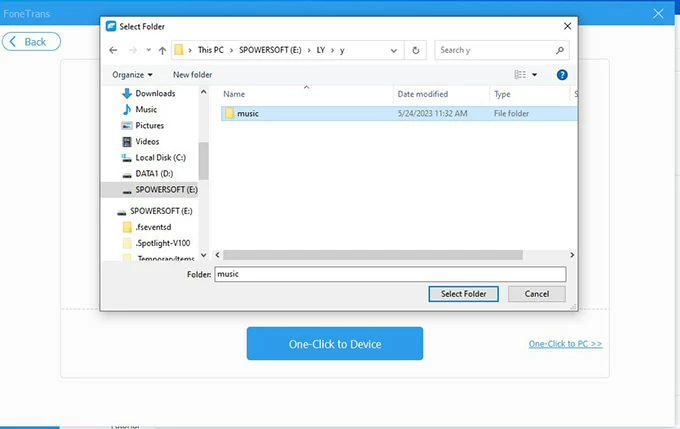
5. Select the external drive as the destination to move your iTunes library to. You can move iTunes library to any folder in your external hard drive. But it would be better for organization if you create a new folder exclusively for media files from iTunes.
6. Click Select Folder to start the transfer process.
Also: How to fix when your iPhone is unavailable
For users who want to transfer their iTunes library to a new computer, moving iTunes library to an external drive is only half the process. You also need to restore your iTunes library from the external drive to your new computer. Before proceeding with our tutorial, ensure that you have downloaded and installed the latest version of iTunes on your new computer.