How to Compress a H.265 Video in MP4 to H.264 for Mac


FLAC (Free Lossless Audio Codec) is a digital audio format that offers a great compromise between marvelous audio quality as well as much small size, delivering the better sound quality than other lossy audio formats like MP3 and AAC, but less space hogging compared to some lossless ones like AIFF and WAV. And it has enjoyed immense popularity among music audiophiles for its open-source and loyalty-free licensing.
If you just downloaded a good chunk of music that is stuck in FLAC, you probably want to load up them on iTunes library and play them from there or sync to an iPhone. Lossless and popular as FLAC though, it isn't natively supported by iTunes (iTunes Alternative) out of the box. Thankfully, if you have the right tool then it's possible and easy to get your lossless FLAC albums and songs into iTunes, and also get some of the associated benefits such as editing FLAC files, adjust the output quality. In this article, a simple solution is here to let you add FLAC into iTunes and enjoy your music in its full glory.
One of the most commonly used ways to handle this is go to convert your FLACs directly to an iTunes-friendly format like lossless WAV, ALAC, AIFF, or lossy AAC, MP3, for trouble-free playback. Out of the many FLAC converters available for either Mac or PC, Video Converter for Mac (for Windows) has managed to catch the fancy of lots of music enthusiasts. Hit the source link below to download this software according to your computer platform.
Despite the name, the program is a definitely solid media conversion tool that converts between audio files, including FLAC track to different lossless and lossy file (i.e.FLAC to Apple Lossless, FLAC to AAC, FLAC to MP3). It also extends support to a laundry list of video formats, including AVI, MKV, WMV, MP4, AVCHD, MOV and so on. There are several other options that you can play with. For example, you can use its built-in device presets if you want a video to be playable on device of your choice; perform basic editing on your video with the handy video editor, and more.
How to Convert FLAC Audio to Play in iTunes
Step 1: Add .flac Source File(s)
To begin, you need to upload FLAC audio file(s) or a full folder that you plan to use in this converter. You can do that by dragging and dropping the source from the media file explorer directly onto the center pane of the program, or by going to "Add File" button located the upper-left toolbar to browse and select the FLAC files.
Your selected FLAC music files will immediately appear as thumbnail in sequence on the left pane of the program, as follows.

Tip: Batch conversion, a rather convenient feature, allows you to add multiple songs to the program to be converted at a time. Plus, the "Merge into one file" option (at the lower right corner) is available for combining several audio tracks together.
Step 2: Choose an iTunes-friendly format as output
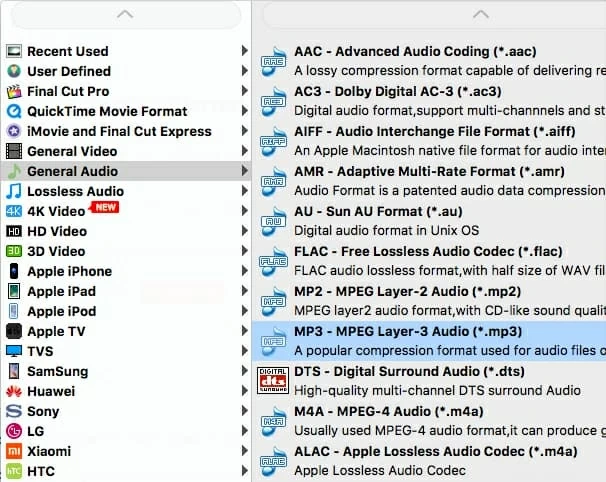
In this step, you're required to select an iTunes friendly audio file from "Profile" dropdown menu as output.
If you want to keep the quality of FLAC audio intact, you'd better convert from FLAC to another lossless audio format such as ALAC (Apple Lossless) to avoid lossy compression. To do this, press "Profile" menu on the lower left corner of the window and select "ALAC – Apple Lossless Audio Codec (*.m4a)" option from "General Audio" extended list.
Or, if you care more about storage space and playback over quality, you then can choose to do FLAC conversion to MP3, a popular and versatile audio format across operating systems and devices. Other iTunes-playable formats such as AIFF (lossless), WAV (lossless), AAC (lossy) are also supported, thus you will enjoy the freedom of using the right type of music you feel like.
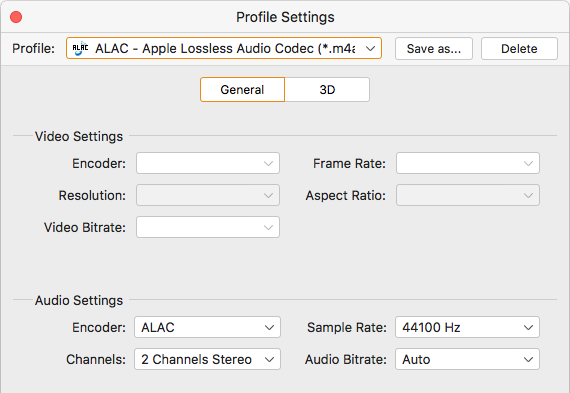
Then click on the "Settings" right beside "Profile", along with "Profile Settings" window popping up, in which covers a number of audio encoding parameters to enhance the quality of the videos. You can adjust the conversion options as you needed including channel, sample rate and bitrate. But if you're a novice, you can leave the default values alone which can also give you a good feel for the resultant.
To cater for various user needs, this program also provides a vast array of preset devices as well on the format panel for instant playback. It will save you plenty of time to figure out what format does your device probably support.
Optional! It seems sensible that there are some occasions your imported music for devices playback may be inaudible or need a volume enhancement, thankfully, this utility can easily make this fixed using "Effect" menu under "Edit" option on the top toolbar to adjust the volume of music by dragging "Volume" scroll bar.
Step 3: Start the conversion from FLAC to ALAC (.m4a) for iTunes on Mac
After all set done, remember to make sure you know where you intend to save the converted FLAC music file. Press "Browse" button beneath "Settings" to specify a local folder on your Mac.
All that is left to do now is hitting the orange "Convert" button on the lower-right hand corner of the interface to start FLAC to iTunes ALAC conversion for and wait until the whole process finished.

Step 4: Import your ALAC M4A tracks into iTunes library
Launch iTunes on your Mac machine and drag and drop your newly created music files into the library, then you can play your favorite songs via iTunes or sync to iPhone, iPad, iPod for enjoy on the go.
That's it!
iTunes Alternative
iTunes is the only option Apple gives us for handling all of your Mac-to-iOS media-syncing needs. Is there any iTunes replacement to manage your media collections between computer and your iOS device, iPhone for example? Absolutely YES!
iTransfer is an amazing piece of iTunes alternative software that's flexible enough not only to support transferring of just about any music or video file between Android, iOS, Mac and PC machine, but it does also works with contacts, photos, call logs, calendar, text messages, podcasts, or audio books.
With its smart conversion technology, the tool is also able to convert your video and audio files to what your device can use on the fly and very quickly. This means you can, without a help of 3rd-party utility or plugin, send any type of music or movie file to your iOS player (iPhone, iPad, iPod), and they'll automatically get converted to something that will work on that device. Even better, you can: