
How to bypass an iPhone passcode when locked


Adopting this exact tone and format, here is a comprehensive guide to transferring photos from iPhone 13 to Mac using native Apple pathways and the robust third-party manager.

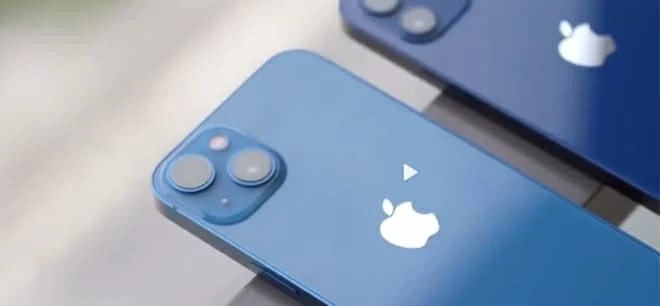
There are several ways of importing pictures to Mac from iPhone 13 media library.
By default, Apple sets up your iPhone 13 to work harmoniously within its own ecosystem, offering seamless background syncing or quick transfer of photos to Mac machine. However, Apple's native methods sometimes lack granular control, especially if you prefer a strict, flexiable folder organization without cloud interference.
Depending on your workflow, you can leverage Apple's built-in cloud and hardware tools or turn to powerful third-party software like Appgeeker iPhone Data Transfer to handle the job.
Here is how to copy photos on your iPhone 13 to your Mac.
Before you start transferring your iPhone 13 photos to Mac, it is vital to understand how your phone saves your images. By default, iOS uses a high-efficiency format called HEIC (High Efficiency Image File Format) to compress your photos to about half the size of a standard JPEG without sacrificing quality.
While macOS handles HEIC files perfectly, older operating systems, web platforms, and non-Apple devices often cannot read them. If you plan to share your transferred photos with Windows users or upload them to legacy websites, you may want your Mac to automatically convert them to JPEGs during transfer, or change your phone's camera capture settings under Settings > Camera > Formats to "Most Compatible" before shooting. Keep this file format distinction in mind as you choose your transfer route.
AirDrop is ideal for transferring a handful of recent pictures (or a specific video clip) from iPhone 13 to Mac without messing with cables.
Step 1. Select images on iPhone 13
Open the Photos app on your iPhone 13.
Navigate to the photo you want to send. (If sending multiple items, tap Select in the top-right corner and tap all the photos you want to share).
Step 2. Tap the Share button
Tap the Share icon (the square with an arrow pointing upward) located in the bottom-left corner of your iPhone screen. This will bring up your iOS share sheet.
Step 3. Select AirDrop and your Mac
Tap the AirDrop icon from the row of sharing options.
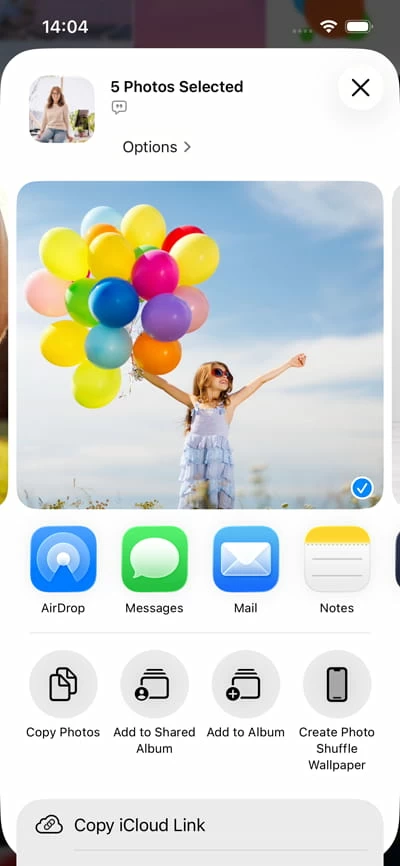
A list of nearby discoverable devices will appear. Tap your Mac's name/profile icon to start sending.
Step 4. Accept the transfer on Mac
If both devices use the same Apple ID: The photos will transfer automatically and save directly to your Mac's Downloads folder.
If they use different Apple IDs: A notification prompt will slide out in the top-right corner of your Mac. Click Accept and choose to save them to Downloads or open them directly in the Photos app.
Note: If your Mac isn't showing up on your iPhone 13's AirDrop screen, double-check that Personal Hotspot is turned off on your phone, as it can block AirDrop from working properly.
Related: Missing text messages on iPhone
If you have subcribed to iCloud+ plan, Apple's proprietary cloud solution is the easiest option. By using iCloud Photos, every picture you stored on your iPhone 13 automatically syncs to the cloud and appears on your Mac in real-time.
Here's how to sync pictures on iPhone 13 with Mac
Step 1: Check your iCloud storage
Before turning this on, make sure you have enough cloud storage. Apple only gives you 5GB of free space, which will quickly be overwhelmed by an iPhone 13's photo library. You may need to upgrade to an iCloud+ subscription (starting at 50GB) by going to Settings > [Your Name] > iCloud > Manage Account Storage on your iPhone.
Step 2: Enable iCloud Photos on your iPhone 13
Open the Settings app on your iPhone 13. Scroll down and tap iCloud. Then select Photos, Toggle the switch next to Sync This iPhone to the green On position.
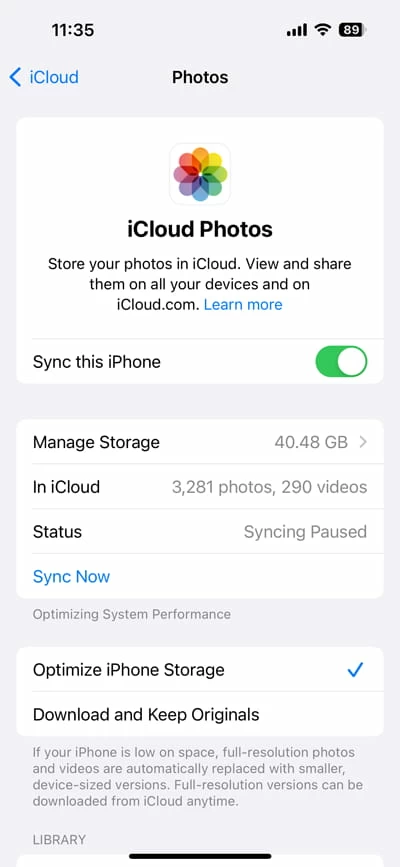
If you are running low on physical phone storage, select Optimize iPhone Storage. This keeps small, space-saving thumbnails on your phone while uploading the full-resolution originals to iCloud.
Step 3: Enable iCloud Photos on your Mac
On your Mac, open the Photos app. Click Photos in the menu bar at the top-left of the screen, and select Settings (or Preferences on older macOS versions). Click on the iCloud tab, check the box next to Photos, and choose Sync This Mac.
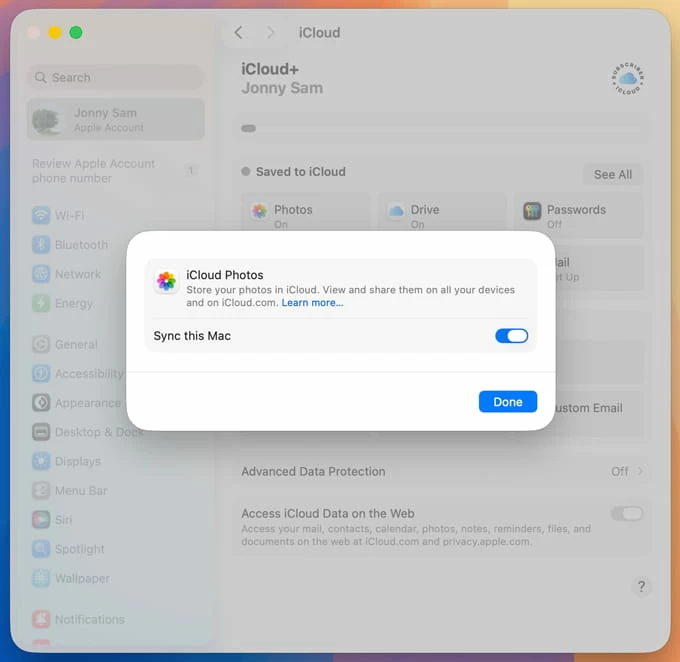
Your photos on iPhone 13 will now sync to Mac over Wi-Fi. Depending on your internet speed and the size of your library, it may take several hours for your entire catalog to appear on your Mac.
Related: Forget iPad passcode
If you do not want to pay for monthly iCloud storage or prefer a secure, offline backup, the classic USB cable route is your best bet. This method uses the built-in macOS Photos app to transfer pictures directly from your iPhone 13 to Mac.
Step 1: Connect and trust your devices
Plug your iPhone 13 into your Mac using your Lightning-to-USB-C cable. Unlock your phone screen. If a prompt appears on your phone screen asking "Trust This Computer?", tap Trust and enter your lock screen passcode to establish a secure connection.
Step 2: Open the macOS Photos app
The macOS Photos app should open automatically on your Mac. If it doesn't, locate the app in your Applications folder or via Spotlight Search and open it manually. Look at the left-hand sidebar under the "Devices" category; you should see your iPhone 13 listed there. Click on it.
Step 3: Choose your destination and transfer
At the top of the Photos window, you can select an import destination using the Import to drop-down menu (you can choose your main library or a specific album).
To import only select images, click on the photos you want and click Import Selected in the top-right corner.
To import every photo taken since your last transfer, click Import All New Items.
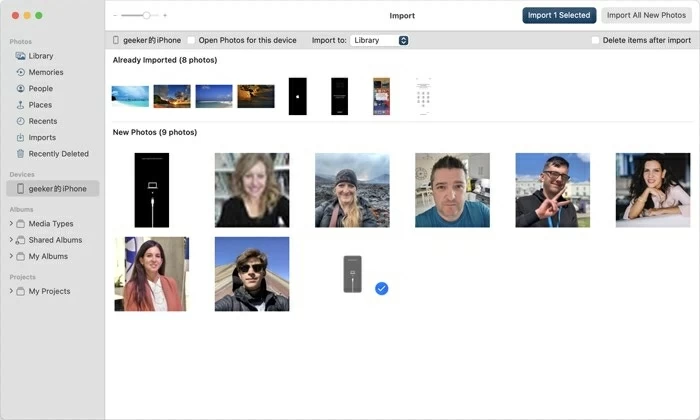
You can check a box labeled "Delete items after import" if you want to instantly wipe the transferred photos from your iPhone 13 to free up phone storage space.
While Apple's native tools are great for basic photos transfer from iPhone 13 to Mac, they can be incredibly rigid. If you want to transfer your photos directly to a specific folder on an external hard drive, bypass the macOS Photos library entirely, or preserve your detailed folder hierarchies without dealing with iCloud, you need a third-party tool. Appgeeker iPhone Data Transfer is widely considered the gold standard for iOS device management.
It is a comprehensive iOS device manager for Mac and Windows that provides advanced control over Apple devices far beyond what Apple's native tools allow. Its standout features include seamless drag-and-drop file transfers, and direct, two-way management of media like music, videos, and photos. It also excels at data preservation, enabling users to browse, search, and export text messages, WhatsApp chats, contacts, notes, and call logs into printer-friendly PDFs or spreadsheets.
Follow these steps to move your photos from an iPhone 13 to an Mac.
Step 1: Download and launch the software
Download and install the right version of the software on your Mac from the link above. Open the app. If you are using the Windows and want to transfer iPhone photos to PC, download its PC version.
Connect your iPhone 13 to your Mac using your cable.
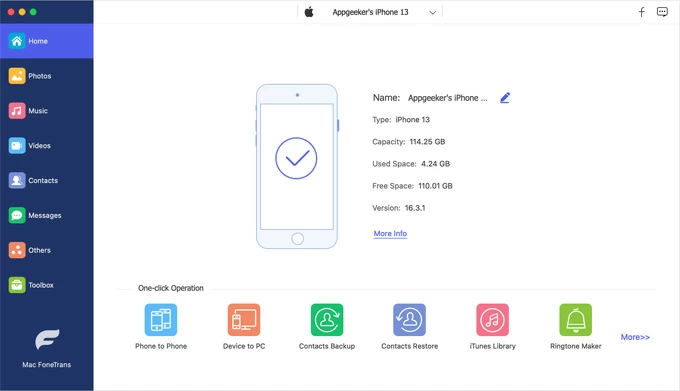
Step 2: Access the iPhone 13's photos library
From the sidebar, click on the Photos icon. The software will load your iPhone's entire photo library, categorized by albums, media types (like Live Photos, Bursts, or Place), and dates.
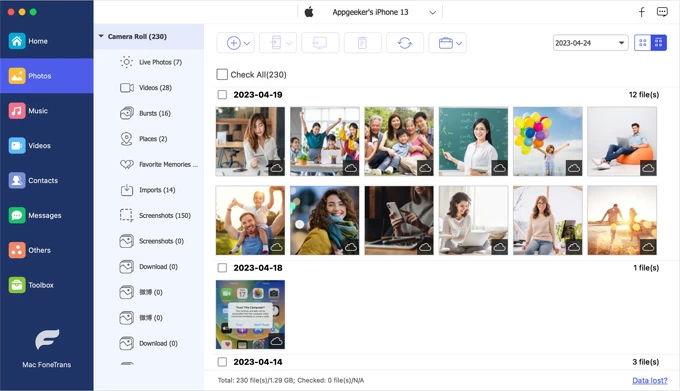
Step 3: Select Your pictures and export
Browse through your library and select the photos you wish to move. You can select multiple items by holding down the Command key while clicking, or press Command + A to select everything.
Once your selection is complete, click the Export to Mac button located at the top of the window.

A small window will pop up. Choose exactly where the files will land on your Mac or external drive.
Confirm the save location on your Mac, and let the software run. A progress bar will track the photo transfer. Once finished, you can find your cleanly organized photo files waiting for you in Finder.
Related: How to transfer music from laptop to iPhone
Regardless of which path you choose, moving your photos off your iPhone 13 to Mac keeps your device running fast and ensures your favorite memories are safely backed up. If you want an effortless, automated experience, stick with iCloud Photos. If you want a quick, cable-bound local transfer, use the built-in Photos app. And if you want absolute control over your file structures, conversion formats, and storage directories, let Appgeeker iPhone Data Transfer do the heavy lifting.