
How to Factory Reset iPhone without Computer

Learn both wired and wireless methods to transfer entire photo library or individual photos to a PC from iPhone 13, 13 Pro, 13 Pro Max or 13 Mini.

If you want a one-stop solution for iPhone-to-PC photo transfer in full quality, the reliable & efficient Appgeeker iPhone Data Transfer can help import photos in camera roll or personal albums in simple clicks. Windows-to-iOS photo transfer is also supported.
It could be easier to move pictures from an iPhone 13 over to a Windows computer, whether with a cable or wirelessly.
Your iPhone 13 likely holds thousands of photos and videos—from family memories and travel shots to screenshots and work files. But sooner or later, you'll want those pictures safely stored on your Windows PC for backup, editing, or freeing up storage space on your iPhone.
Transferring photos from iPhone 13 to PC should be a seamless process. No advanced technical skills are needed for the cross-platform photo transfer. Whether you prefer a direct USB cable connection or wireless cloud syncing, Microsoft and Apple provide several reliable ways to move your camera photos and albums on your iPhone 13 to the PC with Windows 11, 10, 8, 7, etc.
In this guide, you'll go through a few ways on how to transfer photos from an iPhone 13 to a PC with or without a USB cable, while keeping the original quality.
Table of Contents
It doesn't have to be complicated to import photos from your iPhone 13 to your computer, but you need to make some preparations.
Apple stores many iPhone photos in HEIF/HEIC format. So before getting photos off iPhone 13 to PC and saving your gallery to the hard drive, many users may ask "Can Windows open HEIC photos from iPhone 13?"
The answer is YES, but some PCs requires HEIF images extensions. To avoid compatibility issues, Apple provides an easier solution to automatically convert the HEIC images to JPG during transfer so Windows can handle your iPhone photos smoothly once transferred. Here's how.
This way, your iPhone 13 will always check for compatibility every time you initiate a photo transfer to the PC.
Having pictures on iPhone 13 transferred straight to the PC can be done through a simple USB connection. By implementing the cable-based transfer, you can copy large quantities of high-resolution photos, screenshots, downloaded apps photos directly from your iPhone Camera Roll to a local folder on your computer, letting you free up the device's space or create backup of your entire gallery memories.
The wired methods generally follow a simple pattern: Connect your iPhone, trust your computer to allow access, preview and select the photos you'd like to migrate, and import them to the PC's drive in bulk or individually.
Below are three popular apps you can use when you're worried about how to transfer iPhone 13 photos to a Windows PC with a cable - without iCloud.
When it comes to moving your photos from iPhone to PC without extra software, the built-in Photos app for Windows 10 and Windows 11 is your hands-on solution to complete the transfer with a direct USB cable connection. It works for both selective and bulk imports, making it easy to transfer large photo library or certain photos in minutes.
1. Plug your device into your Windows computer using a lightning cable.
2. Unlock the iPhone and tap "Trust" if prompted to give your PC rights for the picture transfers.
3. Open Photos app from Start Menu.
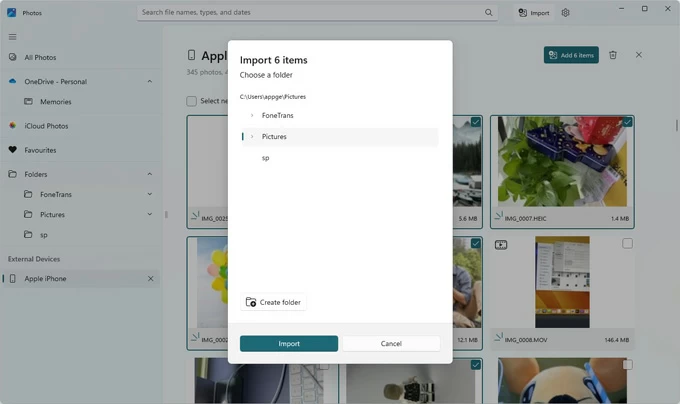
4. At the upper right corner, click Import > From a connected device. Wait while Windows scans your iPhone for all photos and videos from the camera Roll.
5. Browse and select the images you wish to copy.
6. Click Add [number] items button on the top right position.
7. On the dialog window that opens, choose a save path, and hit Import button to kick off the migration.
After you get photos from your iPhone 13 to your PC, you can edit and organize them freely.
Tip: The updated version of Photos app, particularly on Windows 11, has removed the "Delete original items after import" option, which makes a bit inconvenient in case you want to free up iPhone space right after importing photos to your computer.
Read also: How to recover permanently deleted photos on iPhone
Fix- Why Windows Photos cannot import some iPhone 13 photos to PC?
If you find Photos app can't access your iPhone photos on the PC and fail with the transfer, it's very likely that you've enable iCloud Photos to have your ORIGINAL photos saved onto the cloud sever instead of the device storage. To force Microsoft Photos to display all iOS pictures and ensure a successful photo transfer from iPhone 13 to your Windows PC, try to set your iPhone to keep the full-resolution photos on your iOS device.
If you're struggling with large photo library and looking for a high-speed transferring solution, then Appgeeker iPhone Data Transfer should be your handy tool. It acts as a flexible, straightforward bridge for seamless media files transfer between iOS devices and PC/ Mac, offers a full scan on your phone's library to preview photos, albums, videos and music, and gives you flexibility to select exactly what to import to the computer.
Featured with an intuitive & organized interface and faster transfer technique, the software allows you to quickly batch transfer photos from the iPhone 13 to the desktop PC without compromising the original quality, and to automatically convert HEIC image format to ensure the compatibility with Windows system. Other functions for managing and editing photos are also included, such as adding new photos, deleting or renaming pictures, creating or deleting photo albums.
Here're detailed instructions on how to transfer photos from iPhone 13 to the computer through a wired connection by using Appgeeker iPhone Data Transfer.
Step 1. Download the program and install it on your PC. Then launch it, and connect your iPhone 13.

Step 2. Navigate to Photos tab on the left sidebar to access your Camera Roll.
All your iPhone photos, including standard photos, Live Photos, Screenshots, Favorites, Travel, Download, will be displayed and sorted in the original structure for easy access.

Step 3. Check the photo files or albums you need to export to your PC.
Step 4. After selections, click the Export to PC (computer icon) at the top, and designate a folder to put the photos to the PC locally.

File Explorer remains the practical way on a PC for transferring photos from an iPhone 13, and is a traditional copy-n-paste option. Once connected via USB cable, Windows lets you get to iPhone internal storage, where you can find the DCIM folder to selectively copy and paste iOS photos to a local folder of your computer.
The caveat is that File Explorer can only transfer the Live Photos as a static image. To import photos to PC from iPhone 13, do these steps:
1. Unlock your phone and attach it with your computer.
2. Open File Explorer, and click This PC on the left pane.
3. Under Devices and drives, click Apple iPhone, and head to Internal Storage > DCIM.
Tip: Alternatively, you can right-click Apple iPhone and choose Import pictures and video from the text menu. Then, you're given option to import entire photo library, or select specific items for transfer.

4. Browse through the month-based subfolders until you find the specific pictures you want to download onto computer.
5. Select the photos to copy them over to PC.

Related: How to reset iPhone without Apple ID password
Aside from manual transfers of photos with wired method, you can also use the wireless options for transferring photos to PC from iPhone 13 without a USB cable.
As long as you have enough iCloud storage (only 5GB free storage), turning on iCloud Photos to sync media library across devices enables you to upload photos from iPhone 13 to the PC wirelessly. Here's how to sync photos between an iPhone 13 and a Windows PC wirelessly.
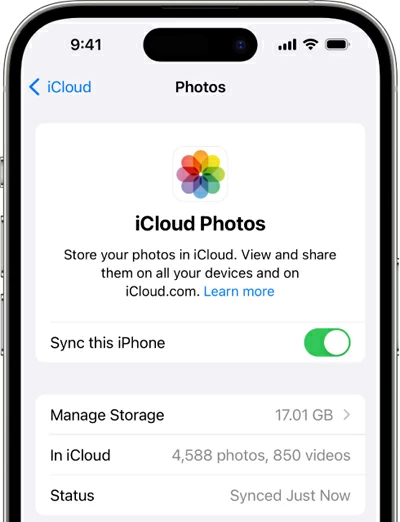
First, Enable iCloud Photos to sync iPhone photos. Go to Settings > [Your Name] > iCloud, then choose Photos under Saved to iCloud, then toggle on the Sync this iPhone switch.
After syncing, you can set up iCloud for Windows or visit icloud.com to get your iPhone 13 photos onto your computer.
Enable Photos on iCloud for Windows
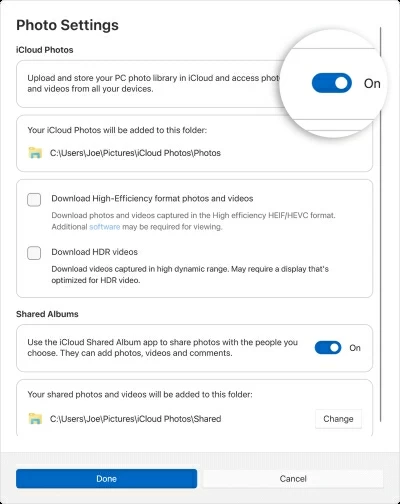
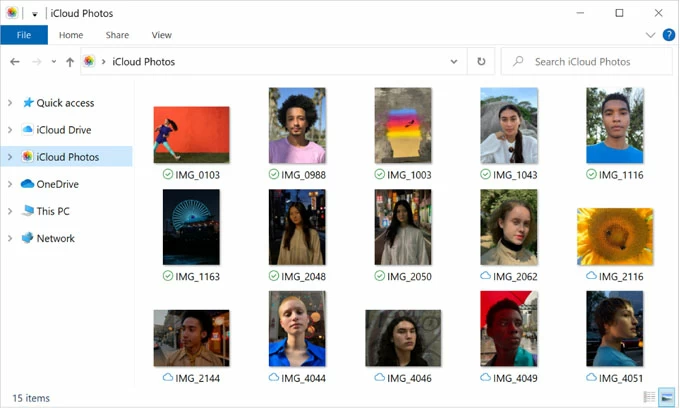
For photo transfer from iPhone 13 to PC using iCloud Photos, open File Explorer, then click iCloud Photos in the Navigation pane. Double-click the photo to download and save it locally.
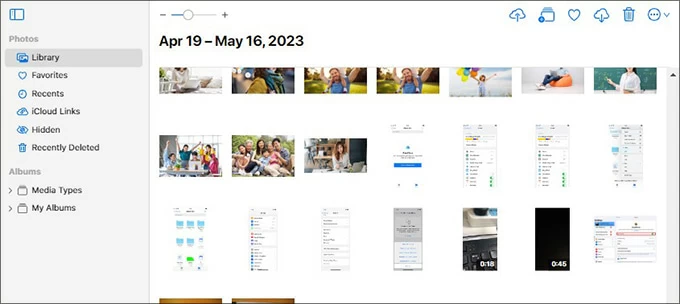
Download iPhone 13 photos onto PC from icloud.com
Visit icloud.com, log into your iCloud account, then click Photos to open your iPhone photo library. Select the photos you need and click the Download icon at the top right corner to have your iPhone 13 pictures imported to your PC over the internet.
Similar to Apple iCloud Photos, other online syncing programs like Google Photos, Google Drive, Dropbox, OneDrive, etc. have capability of moving photos over from the iPhone 13 to the Windows computer without a USB cable connection.
These cloud-based services for iPhone picture transfer to PC follow the same working flow. All you need is to upload your iPhone photos and then download them onto your computer's desktop through a wireless connection.
When deciding which is your best way for importing photos from iPhone 13 to the Windows computer, first consider what your actual needs are - transferring entire massive photo library or just a small amount of photos, and whether you prefer wired or wireless method.
1- Can I transfer my photos from my iPhone 13 to computer without iTunes?
Yes. Windows Photos app, File Explorer, and even iCloud Photos sync doesn't required iTunes for the photo transfers.
2. Why my iPhone photos in iCloud are not loading on my PC?
With iCloud Photos enabled, you can easily download the photos from your iPhone to the PC. However, if iCloud photos not loading on your PC, make sure that your computer is running Windows 10 or 11, you've set up iCloud for Windows with the same Apple Account logged in.
3. What is the fastest way to transfer 100GB+ of photos from iPhone to PC?
For massive libraries, a direct wired connection through a USB-C to USB-C cable using Windows Photos, File Explorer or Appgeeker iPhone Data Transfer could be the fastest method to complete the transfer, which is not limited by the Wi-Fi speed.


