
How to transfer videos from PC to iPhone

Whether you want to sync iPhone photos to your Mac automatically or manually, check out these efficient methods to transfer your photos wirelessly or with a cable.

Easy ways to sync pictures and videos from iPhone to Mac wirelessly or using a cable.
Transferring photos from iPhone to Mac makes it easier to manage and edit your pictures and videos. Whether you're looking to free up device storage or keep a backup of your precious memories, there are a variety of ways to sync photos from iPhone to Mac.
If you're wondering how to sync photos from iPhone to Mac, this guide covers a range of methods to suit your needs. From automatic syncing to manual import, wired connection to wireless transfer, these options ensure a hassle-free experience to sync your iPhone photos with Mac easily in their full quality and resolution.
Table of contents:
Not relying on iCloud or iTunes, Appgeeker iPhone Data Transfer offers a direct option, letting you import entire Photos Library or move individual pictures from iPhone to Mac, without losing quality.
Within Apple's ecosystem, iCloud offers a wireless option to sync photos from iPhone to Mac automatically. When iCloud Photos is enabled, all pictures and videos in your iPhone Photos Library will automatically sync across all devices linked to the same Apple ID, allowing for real-time access to your iPhone photos from your Mac over the internet.
Note: iCloud only offers 5 GB of free storage per account, which can fill up quickly if you have a large Photos Library. For uninterrupted photo syncing from iPhone to Mac, consider upgrading to iCloud + for additional storage.
To get started, ensure both your iPhone and Mac are connected to an active Wi-Fi network. Here's how to sync iPhone photos to Mac with iCloud wirelessly:
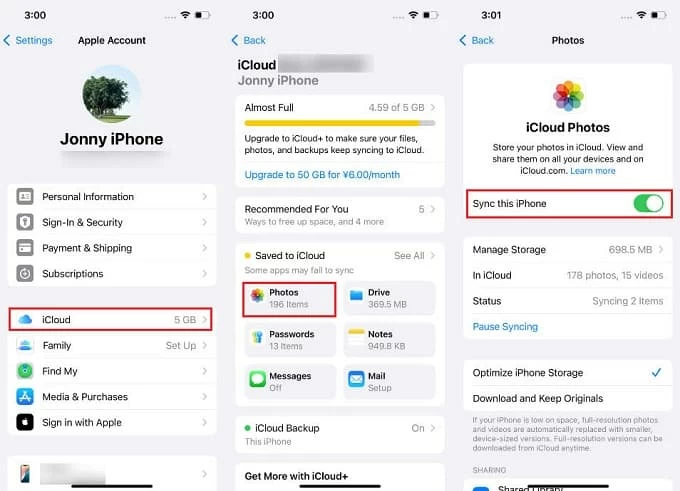
Step 1. Enable iCloud Photos on iPhone.
Your iPhone Photos Library will then sync with iCloud in their original formats and resolution.
Step 2. Turn on iCloud Photos syncing on Mac.
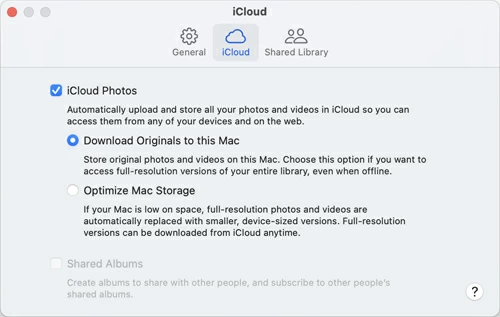
Once enabled, the videos and photos on your iPhone will automatically sync with your Mac and appear in the Photos app. When you delete an iPhone photo, the deletion will also update to your Mac. Get help if you're looking to recover permanently deleted photos on iCloud and iPhone.
If your iCloud storage is running low, Appgeeker iPhone Data Transfer offers a reliable and direct way to sync photos between iPhone and Mac in their original quality. Whether you want to transfer your entire Photos Library or selectively import specific pictures, videos, or albums, this tool makes it easy.
Supporting all iOS image formats—including HEIC, Live Photos, and Photo Streams—it ensures seamless photo transfer from iPhone and Mac, or vice versa. You can effortlessly manage, view, add, or delete photos in one place. Also, with its built-in HEIC Converter, it allows you to easily convert HEIC images to widely compatible formats like JPEG or PNG for greater flexibility.
Using a USB cable, here're the steps to transfer photos from iPhone to Mac without iCloud or iTunes, available for all iOS and macOS versions:
Step 1. Run iPhone Data Transfer on Mac and connect your iPhone with a USB cable. If required, unlock your device and tap Trust to allow for authorization.
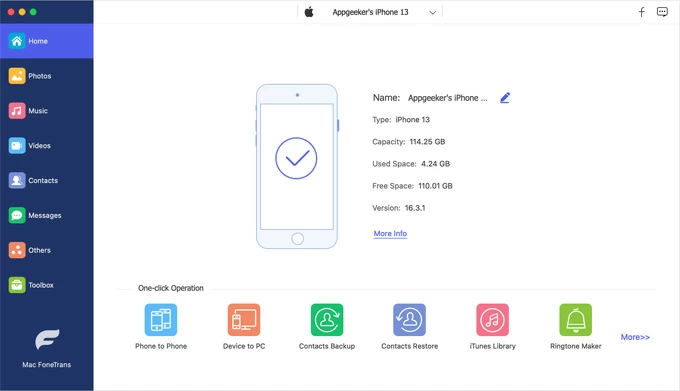
Step 2. To access your iPhone Photos Library, click Photos tab from the left side. From here, you'll see all pictures and videos in your Camera Roll and other albums.
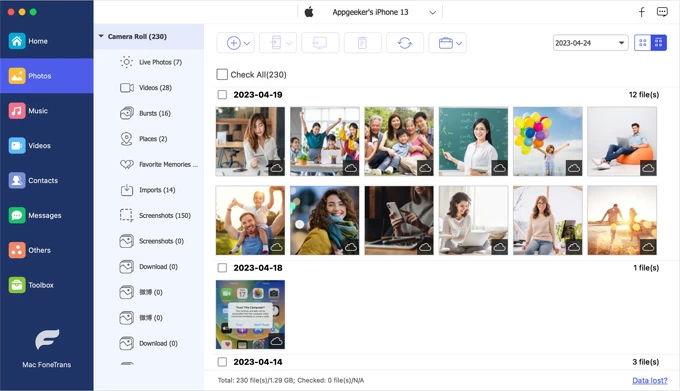
Step 3. Preview and select your desired iPhone photos. Click to select the pictures you want to transfer to your Mac, or simply select Check All at the top.
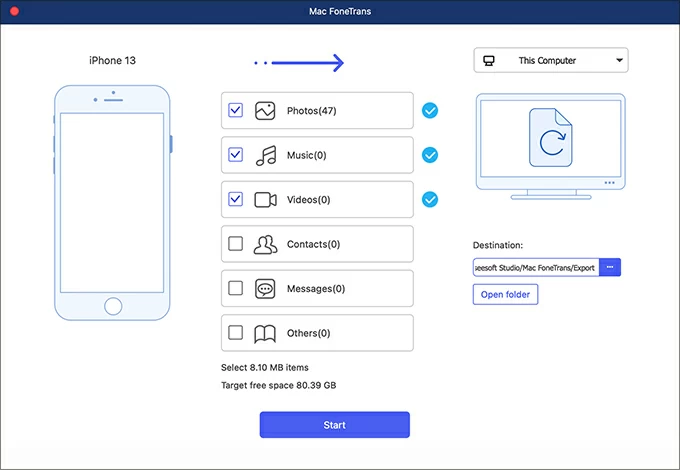
Step 4. Sync iPhone photos to Mac. Click the computer icon at the top; in the pop-up window, specify a local folder on your Mac.

This way, the photos on your iPhone will sync to your Mac in no time. To free up device storage, you may choose to delete original pictures after the transfer. It also works if you'd like to transfer your photos from Mac to iPhone.
In addition to syncing iPhone photos to Mac selectively, it also offers a one-click shortcut to sync your entire Photos Library from iPhone to Mac without using iCloud or iTunes:

Video guide: Transfer photos from iPhone to Mac easily
Another cable-based way to sync iPhone photos with Mac is using the pre-installed Photos app on macOS Yosemite 10.10 and later. By connecting your device with a USB cable, the Photos app allows you to import photos and videos from iPhone to Mac manually. This seamless process lets you access, manage, edit, and share iPhone photos on your Mac - all in one place.
To keep your iOS pictures organized and ready for use, follow the outlined steps on how to sync iPhone photos to Mac using Photos app:
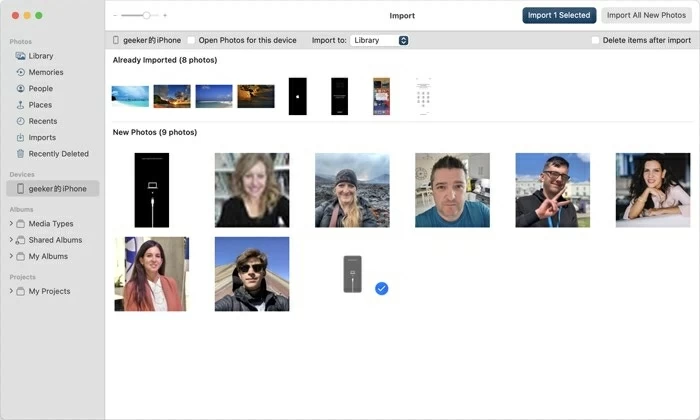
Step 1. Connect your iPhone with Mac and open the Photos app.
TIP: If iCloud Photos is enabled on your iPhone, the Mac Photos is unable to load and transfer photos from your iPhone.
Step 2. Choose where to save the imported iPhone photos on your Mac.
Step 3. Import iPhone photos to Mac.
Don't disconnect your device until the syncing process finishes. Note that the Photos app has replaced iPhoto on newer macOS, so you may follow these steps to transfer photos from iPhone to Mac without iPhoto.
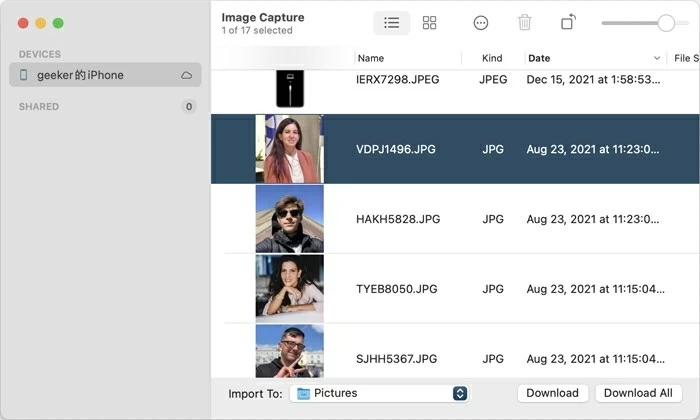
For manually syncing photos from iPhone to Mac, Image Capture is a quick option. Came with macOS, it enables you to import images and videos from your iPhone to your Mac's local folder directly. Here's how to copy photos from iPhone to Mac with Image Capture via a USB cable:
TIP: A live photo will be downloaded on Mac as two separate files: a still-image file and a video file. Once the pictures are imported to your Mac, you have the option to transfer these iPhone photos to an external USB flash drive for potential use or backup.
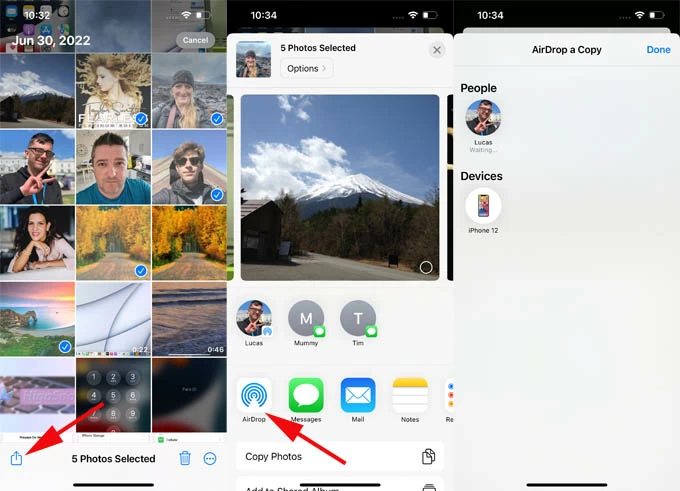
Built into all Apple phones and computers, AirDrop is probably the most convenient way to send photos from iPhone to Mac wirelessly. Simply placing them within the range of Wi-Fi and Bluetooth connectivity, AirDrop lets you share iPhone photos with Mac in just a few simple taps.
1. Enable AirDrop on your iPhone.
Swipe down from the top of your iPhone to access Control Center, light up AirDrop icon and set it to be discovered by Everyone or Contacts Only.
2. Turn on AirDrop on Mac.
On your Mac, open a Finder window and click AirDrop on the left side; in the next window, set Allow me to be discovered by Everyone or Contacts Only at the bottom.
3. AirDrop photos from iPhone to Mac wirelessly.
The process is quite straightforward, especially when syncing a few iPhone photos to your Mac.
When using iCloud Photos for automatic photo sync from iPhone to Mac, the process relies on:
For iPhone photos sync to Mac automatically, ensure there's enough cloud storage in your iCloud account. Although iCloud offers 5 GB of free cloud storge, it can be quickly used up due to the increasing number of your photos and videos.
Go to Settings > your name > iCloud. The bar graph at the top shows your overall storage usage. If you're running out of storage, try upgrading to iCloud + for more cloud space, or tap Manage Storage to remove some unnecessary data to free up your iCloud space.
iCloud requires a stable network connection on both iPhone and Mac to start photo syncing. You may switch to a different Wi-Fi network to see if your iPhone photos sync with your Mac again.
To sync photos automatically, ensure that both your Mac and iPhone are registered using the same Apple ID. On your Mac, open the Apple menu > System Settings, click on your Apple ID and make sure it's the same account that used to set up your iPhone.
If the photos on your iPhone still cannot sync to your Mac, consider alternative options to transfer your pictures and albums manually, such as Mac Photos app, Image Capture, or AirDrop.
To make things easier, some third-party tools like iPhone Data Transfer support seamless photo transfer between iPhone/iPad and Mac/PC quickly and efficiently, without losing any quality.
Q1. How do I automatically sync photos from iPhone to Mac?
Supported by Apple, iCloud Photos enable automatic photo syncing across devices, including iPhone and Mac. To use it, simply enable iCloud Photos on both your iPhone and Mac:
Ensure to use the same Apple ID and connect to an active network, the iPhone-to-Mac photo syncing will start automatically.
Q2. How do I sync the entire photo library from my iPhone to my Mac?
There are a couple of options that can help sync entire iPhone Photos Library to Mac:
Q3. How do I transfer my photos from iPhone to Mac wirelessly?
Built into Apple ecosystem, iCloud Photos and AirDrop enable wireless photo transfer from iPhone to Mac, without using a USB cable. Alternatively, other services like Google Photos or email can also help transfer photos from iPhone to Mac wirelessly without using a cable.


