
How to transfer WhatsApp data from iPhone to iPhone seamlessly

Explore multiple ways to transfer data from an iPhone to a Windows 11 or 10 PC, using USB or wireless methods to move photos, videos, files, documents, app data, etc.

If you want an all-in-one solution for iPhone-to-PC data transfer, the across-platform tool Appgeeker iPhone Data Transfer can help you move various types of data in simple clicks, including photos, videos, music, contacts, messages, and more.
This guide will show you how to transfer data from an iPhone to a Windows 11/10 PC, whether with a cable or wirelessly.
Looking to transfer data from your iPhone to a Windows PC but don't know which tool to use? Since iOS and Windows are within different ecosystems, some people may find it challenging to transfer data from iPhone to PC. But don't worry, there many ways to bridge the gap.
Whether you're backing up important files, managing photos and videos, or moving standard documents for work, this guide covers both wired and wireless options to help you transfer data from your iPhone to a PC on Windows 10 and Windows 11, from built-in apps to reliable tools.
While cable-based transfers offer faster speeds and are ideal for moving large media libraries such as high-resolution photos and 4K videos, wireless transfers, on the other hand, provide convenience and flexibility, allowing you to transfer iPhone data to PC through network-based cloud services, without relying on a physical cable.
Table of Contents
Cable-based transfers provide a direct, stable connection between your iPhone and PC for data transfer. It is the most efficient method for moving large media files, such as high-resolution photos and 4K videos, avoiding cloud storage limits and internet speed constraints.
When it comes to transferring photos from iPhone to PC, the built-in Windows Photos app (or Microsoft Photos on newer Windows system) allows you to complete the transfer easily. Through a cable connection, it enables you to import iPhone photos and videos directly in bulk, letting you free up the storage space on your iPhone and save a secure media backup on your Windows PC.
1. Connect your iPhone to Windows 11/10 PC with a USB cable or Lightning cable. If your iPhone asks for Trust This Computer, tap Trust and enter your passcode to allow data access.
2. Open the Photos app from Windows Start menu. You can press the Windows key and search Photos in the task bar.
3. In Photos app, click the Import button in the top-right corner and select Apple iPhone. Or, check Apple iPhone in the left section.
4. Allow it a short while to load all available photos and videos on your device.
5. Click to select individual pictures and videos, or simply check Select All box at the top.
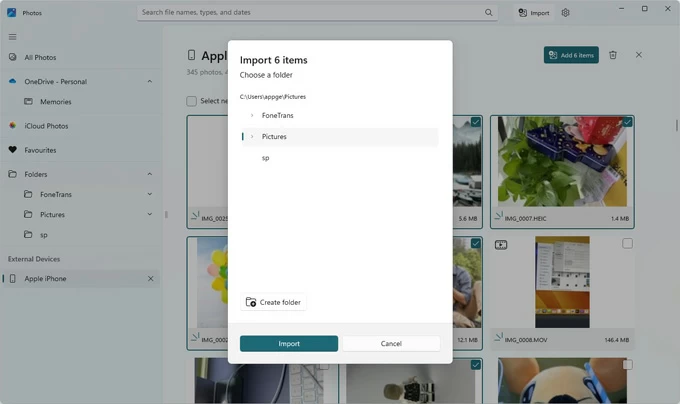
6. Hit the Add [X] items button in upper-right corner.
7. When prompted, select a local folder on your PC and confirm the Import option.
This will transfer the iPhone photos to your PC and save them locally for future viewing.
Another built-in method for transferring iPhone photos to a PC is File Explorer. This approach allows you to access photos and videos stored in your iPhone's Camera Roll, including pictures, screenshots, and screen recordings.
Once your iPhone is connected and trusted, it appears in File Explorer under This PC. From there, you can navigate to the DCIM folder on iPhone and transfer files to your PC without iTunes by simple copy-and-paste or drag-n-drop. This provides direct control over which media files you want to move.
1. Link the source iPhone to your PC using a suitable data cable.
2. Double-click This PC icon on your computer and then open Apple iPhone.
3. Access DCIM folder or Internal Storage > DCIM path.
4. You will see multiple subfolders sorted by month. If you have a large amount of media data, it may take a while to locate the photos you desire.
5. From there, select the images and videos that you want to transfer to your PC. You can press the Ctrl key and click on each item, or use Ctrl + A to select them all.
6. Right-click on the iPhone photos and select Copy in the expanded menu.
7. Navigate to a destination on your PC to paste the photos. Alternatively, you can drag and drop the iPhone photos to a PC folder directly, with no need for using iTunes.

A more streamlined option is to use Appgeeker iPhone Data Transfer, a dedicated cross-platform tool designed to move data from an iPhone to a Windows PC, or vice versa.
This tool supports a broad range of file types, including photos, videos, music, contacts, messages, and other commonly used data, which makes it a comprehensive solution for iPhone-to-PC data transfer on both Windows 10 and Windows 11.
Additionally, it supports both selective transfers and bulk transfers, giving you greater control than standard USB methods. It also includes a built-in HEIC converter, allowing you to convert iOS photos to common JPEG or PNG for better compatibility with Windows applications.
Compatible with most iPhone models and current iOS versions, it enables smooth and efficient data transfer from iPhone to a Windows PC without iTunes. Here's how:
Step 1. Run Appgeeker iPhone Data Transfer on your Windows PC.

Step 2. Attach the iPhone with a USB or Lightning cable. If the Trust This Computer prompt appears on your device, tap Trust and enter the passcode as required.
Step 3. From the left-side categories, select the data type you prefer to transfer from iPhone to PC. Here we use the Photos as an example:


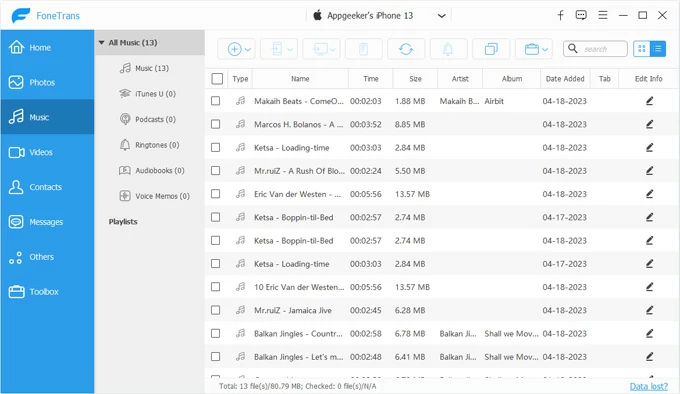
Alternatively, you can also choose the Music tab to transfer music from your iPhone to PC directly. If needed, it can also add music to your iPhone without iTunes from your computer.
If you want to transfer app data from your iPhone to a PC wirelessly or without iTunes, iCloud is Apple's official solution. Primarily designed for the Apple ecosystem, iCloud also supports Windows through "iCloud for Windows" app or iCloud.com, allowing you to sync iPhone data with a PC once you sign in with the same Apple Account.
Unlike manual file transfers, such as moving specific photos or videos, iCloud automatically syncs supported app data from your iPhone to the cloud, making that data accessible on your Windows PC over the internet.
Keep in mind that this method relies on a stable Wi-Fi network and sufficient iCloud storage. Here's how to transfer data from iPhone to PC by syncing specific apps in iCloud:
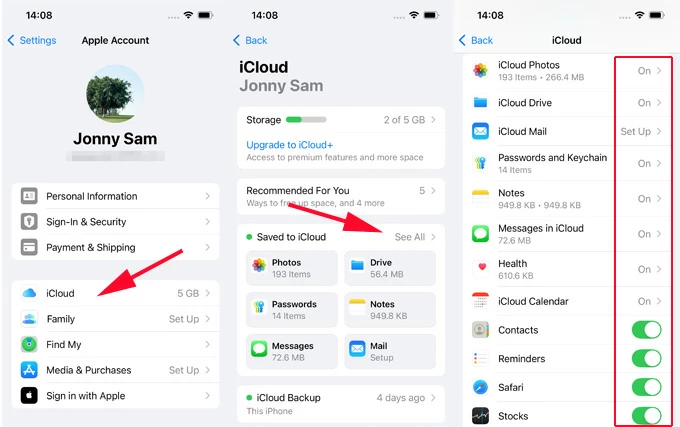
1. On your iPhone, you can manage what app data is synced by going to: Settings > your Apple Account > iCloud > See All.
TIP: iCloud storage starts from 5GB for free. To transfer large data files, the paid plan iCloud + offers more storage space.
2. From there, choose to enable iCloud syncing for specific apps and data categories. The general options include:
Once enabled, the selected data becomes accessible on your PC either through the iCloud for Windows app (File Explorer integration), or a web browser at iCloud.com.
Also see: Restore messages from iCloud backup
Use iCloud for Windows
1. On your PC, download and install iCloud for Windows from Microsoft Store or Apple official site.
2. Open iCloud for Windows and sign in with the same Apple Account you use on your iPhone.
3. If required, follow the onscreen instructions to verify your identity for security. It usually requires a code sent to your device or phone number.
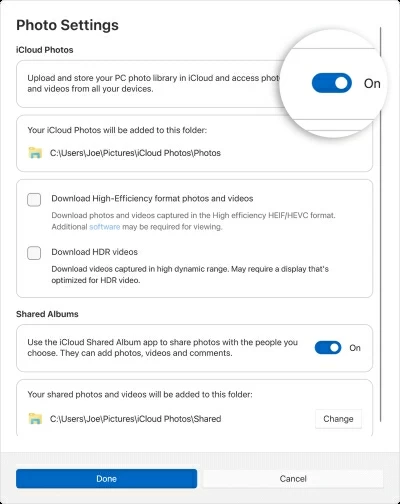
4. From the list of apps, select your desired and turn on the app for iCloud syncing.
For example, click the arrow next to iCloud Photos and turn on the option; then click Done to save the settings. This enables you to access your iPhone photos on PC through the default path in C:\Users\[user name]\Pictures\iCloud Photos\Photos
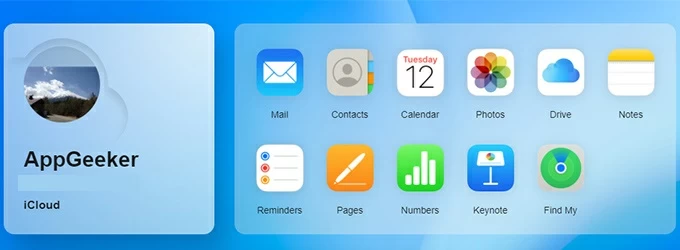
Use iCloud.com
Additionally, you may access iCloud.com and download certain iPhone onto your Windows PC.
If you're transferring iPhone data to your PC to create a full backup for preventing future data loss, iTunes (or Apple Devices on newer Windows versions) is the most reliable option.
Developed by Apple, iTunes creates a complete backup of your iPhone data, system settings, and app information at a specific point in time. If you accidentally delete important data, you can restore your iPhone from a saved backup to recover everything.
However, note that the backup is not saved as individually accessible files. It is stored in a proprietary format, so you cannot open or view specific files directly. If you just want an entire backup, here are the steps to transfer iPhone data to a Windows PC with iTunes:
1. Open the latest version of iTunes (or Apple Devices) on your Windows PC.
2. Plug the iPhone into your computer with a USB or USB-C cable. Make sure to tap Trust on Trust This Computer prompt if asked.
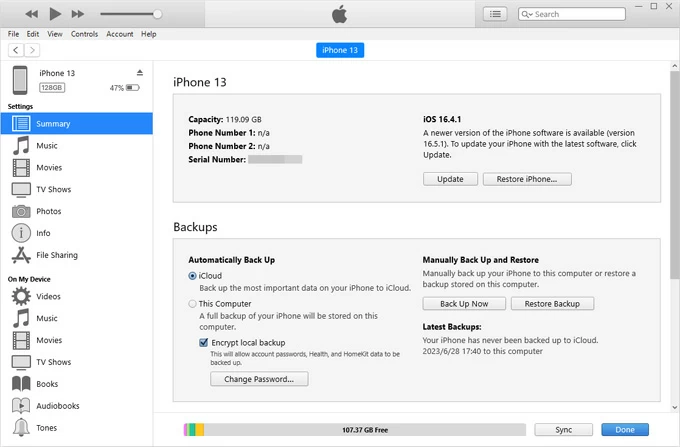
3. Click the phone icon in the top-left corner on iTunes window.
4. In Summary tab, scroll down to the Backups section.
5. Select This Computer and click Back Up Now button to create a full iPhone backup manually. For added security, you can enable Encrypt local backup and set a password.
Once done, all data on your iPhone is transferred to your PC and stored securely within the iTunes backup. This allows you to recover your iPhone data if anything is accidentally deleted.
For a small amount of data from iPhone to PC, the transfer can be completed easily and quickly by using email.
Simply attach the iPhone files to an email, such as PDF or Docs, and then send it to yourself.
After that, you can log in to your email account on your Windows PC and download the data files. No extra skills required.
After transferring data from your iPhone to a Windows PC, you can access your selected files locally at any time. If you're still experiencing issues during the transfer process, the following answers may be helpful.
Q1 - How do I transfer everything from my iPhone to a Windows computer?
To transfer all data and settings from iPhone to Windows, iTunes (or Apple Devices on newer Windows versions) is the most complete method to create a full backup of your device, includes photo library, system settings, app data, contacts, messages, and other internal content.
However, the drawback is that you cannot open or browse individual files directly on your PC. The data can only be accessed by restoring the backup to an iPhone.
If you just want to transfer all media data (such as photos, videos, and music) for direct access on your PC, a powerful tool like Appgeeker iPhone Data Transfer may be more suitable. It supports cross-platform transfers from iOS to Windows, and vice versa, allowing you to view and access files individually after transfer.
Q2 - Can you transfer iPhone data to PC without iTunes?
Yes. Several methods allow you to transfer data from an iPhone to a PC without using iTunes:
The best transfer method depends on the type of data you prefer to move.
Q3 - How can I transfer data files from iPhone to PC using a USB cable?
For photos and videos, use the built-in Windows Photos app or File Explorer to import or manually copy files.
For broader file sharing, especially for app-specific data, install and use Apple Devices app, which supports file sharing and full device backups.
Alternatively, some cable-based 3rd-party tools support seamless data transfer across iOS and Windows platforms, letting you complete the process easily.


