Transfer Photos from iPhone to External Hard Drive

Moving iPhone data to a laptop is easy. Both Windows and Mac users can quickly transfer data wirelessly, or using a USB cable hassle-free - photos, videos, music, documents...

You can use official Apple tools or Windows built-in features to get data from your iPhone to laptop.
Your iPhone holds your most valuable digital assets — photos, videos, music documents, contacts, messages, and other personal data, and it's no surprise that you'll want to transfer anything to your laptop, whether you're creating a secure backup, freeing up phone's storage space, or editing photos or videos on a bigger screen.
Luckily, transferring data from an iPhone to a laptop shouldn't feel complicated, and there're multiple reliable ways to get the iPhone file transfer to Windows or macOS laptop done — both wired and wireless.
No matter you prefer the reliability of cable transfer for large or batch files or the seamlessness of the wireless option for small files, this article will provide a comprehensive walkthrough on how to transfer data from iPhone to laptop effortlessly for local access or easy management.
Appgeeker iPhone Data Transfer adds support for bidirectional data transfer between iPhone and laptop. Whether you use Windows laptop or MacBook, you can move a wide range of data files including photos, songs, videos, documents, etc. smoothly across platforms.
Table of Contents
There are both wired and wireless approaches for data transfer from iPhone to laptop. We've detailed the most convenient and fastest methods here to tailor to your specific needs and have your media files and other standard files moved onto your computer.
The wired approach - for speed and stability
When you're going to transfer 50GB (or more) of data, especially with thousands of photos or massive 4K video files, the cable-based transfer is still king. This large data transition doesn't have to take all night anymore.
The wireless approach - for convenience and mobility
If you're on the move or only need to send a few dozen individual files or small batches from the iPhone to the laptop, wireless transfer is the way to go. While it's cable-free, the transfer speed mostly depends on internet signal.
Tip: If you move large photo & video library and bulk data to your laptop, they will quickly take up a lot of storage on the laptop. To avoid clutter while importing data from iPhone, it's wise to free up lots of space on your Mac or save any files that you don't need regular access to an external hard drive. See also: How to transfer photos from iPhone to USB flash drive
Copying data from iPhone to laptop via a USB cable typically faster, more stable, and ideal for bulk transfers.
The Apple Devices app in Windows 10 and Windows 11 is the modern successor to iTunes, and acts as a direct bridge between your iPhone and your laptop's file system, enabling a seamless iPhone data transfer to laptop over a USB connection.
After connected, you can navigate to the File Sharing function to move various types of data across to Windows or macOS device from compatible iPhone apps that allows for file sharing such as Keynotes, Pages, Numbers, iMovie, GarageBand, VLC, etc.
Mac users can utilize Finder to complete the process, which is similar to using Apple Devices app. For older Windows versions and macOS 10.14 or lower, use iTunes. Steps to transfer iPhone app-specific data to a laptop:
1. Plug your iPhone into your laptop using a USB cable. If prompted on your iPhone, tap Trust and enter your passcode to establish a secure connection.
2. Launch Apple Devices, Finder, or iTunes on your laptop, depending on your operating system.
3. From the sidebar on the left, click on [your iPhone] to continue.
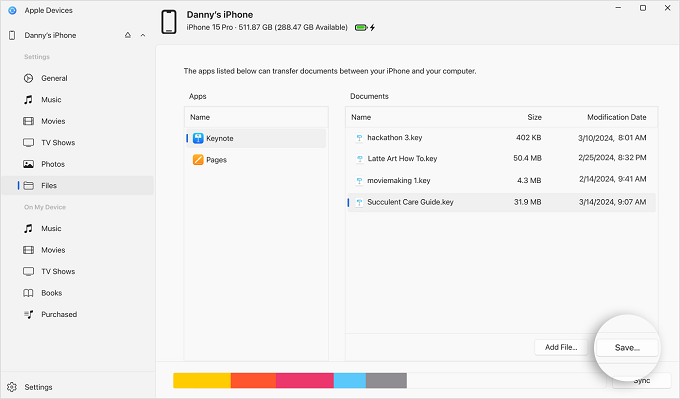
4. To transfer app-specific files from the iPhone to laptop, click Files (or File Sharing). Then, you will see a list of apps on your iPhone that support File Sharing for a direct file transfer.
5. Click on the app containing the information you want, then select the files for import.
6. Press Save button, then specify a local folder on your laptop to which you wish to copy the data files to, and click Save again. You can also drag your files from the Documents list directly onto laptop's desktop or into a folder within the system to finalize the migration.
Tip: The Add Files button next to Save button can handle the files transfer from laptop to iPhone.
If Apple's File Sharing feature feels too restrictive, then Appgeeker iPhone Data Transfer should help, especially when you're looking for a way to transfer all data from your iOS device to the laptop in one click—photos, music, videos, TV shows, movies, playlists, documents, messages, contacts, voice memos, WhatsApp chats, and many more.
By a wired connection, this cross-platform software gives you total control over your iPhone and direct access to your files, letting you easily transfer entire iPhone data straight to any computer (Windows or Mac) in one place, or vice versa. It works at a fast speed for migrating large files without quality loss such as large 4K videos, entire photos library with thousands of photos and videos, or massive music collection. Selective transfer is also supported so you can preview and choose exactly what to export.
The program has board compatibility with all iOS devices, Windows PCs & laptops, as well Macs, iMacs & MacBooks, making iPhone to laptop transfer seamless and quick. You can download Appgeeker iPhone Data Transfer on your Windows or macOS laptop.
Once downloaded and installed, follow the instructions on how to move data from an iPhone to any laptop for local access.
Step 1. Run the software, and connect your iPhone to your laptop through a data cable.

Step 2. Select the type of data you want to transfer from the connected iPhone to laptop.
On the left column, you can click the category of Photos, Music, Videos, Contacts, Messages, etc. for complete access to your iPhone data on laptop.
After that, select the individual files or entire folder to be transferred over to the computer.

Step 3. Import data from iPhone to laptop with original quality.
Once you're satisfied with your selections, click Export to PC icon at the toolbar, then choose a local folder to get those data files onto your hard drive instantly.

If you're transferring photos from your iPhone to a Windows PC or laptop, there's no file format compatibility issue—the software automatically converts the HEIC photos to high-quality JPG and PNG file. This smart format conversion also works for converting incompatible MOV, HEVC videos to MP4 during the transfer so they actually work on your Windows laptop.
Appgeeker iPhone Data Transfer utility can also transfer everything on the iPhone to the computer in one click by using the built-in "Device to PC" function, which can be found under One-click Operation in its main interface.
Windows Files Explorer remains the popular USB-based iPhone to laptop transfer of the photos and videos taken with the camera or saved from apps. You're granted to reach into iPhone's DCIM folder, where all your photos and videos are stored in a standardized, unencrypted format for easy copying data between iPhone and laptop.
The catch is that, if you have thousands of photos scattered across dozens of subfolders, finding the right photo or video in File Explorer can be time-consuming. If you insist on this way to transfer photos and videos from iPhone DCIM to your laptop for free or without iCloud/ iTunes, do the following.

In case you need to transfer photos, videos and other data from the iDevice to Windows laptop, bypassing the clunky DCIM folder structure entirely, consider other alternatives mentioned in this article.
For Mac users, tools like Photos and Image Capture can handle the iPhone camera photos and videos migration via a wired connection.
Also: How to transfer contacts from iPhone to computer
Cable-free options like iCloud Drive, AirDrop, iCloud Photos are feasible to help transfer data wirelessly from iPhone to your laptop.
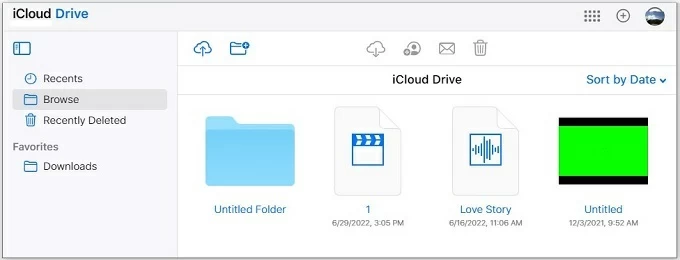
Unlike direct cable data transfers, iCloud Drive works to sync your files between your iPhone and laptop over the internet.
When you save a file to the iCloud Drive folder on your iPhone Files app, it will instantly appear in the iCloud Drive folder on your Windows or Mac laptop without manual import. This eliminates the need for physical cables and allows for seamless productivity, as any changes made to a file on one device are automatically updated on the other in real-time.
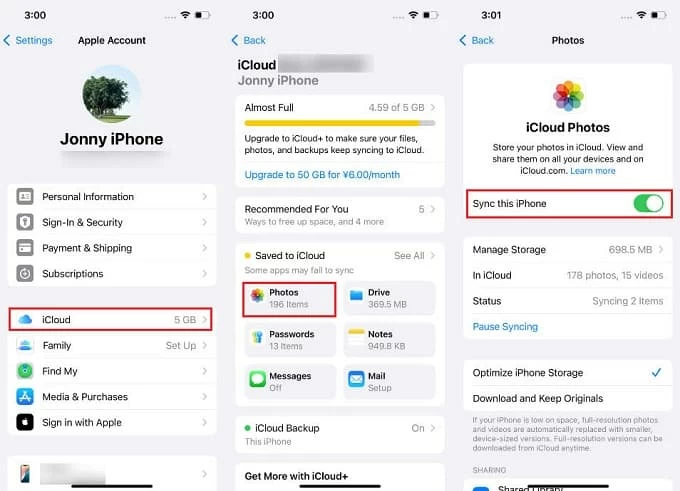
1. Enable iCloud Drive on iPhone through Settings > [your name] > iCloud > Drive > Sync this iPhone.
2. Upload files to iCloud Drive.
If you have files saved locally on your device within Files app, do these to move the existing data to iCloud Drive.
To upload photos or videos
To upload documents
3. Access iPhone data on laptop from iCloud Drive.
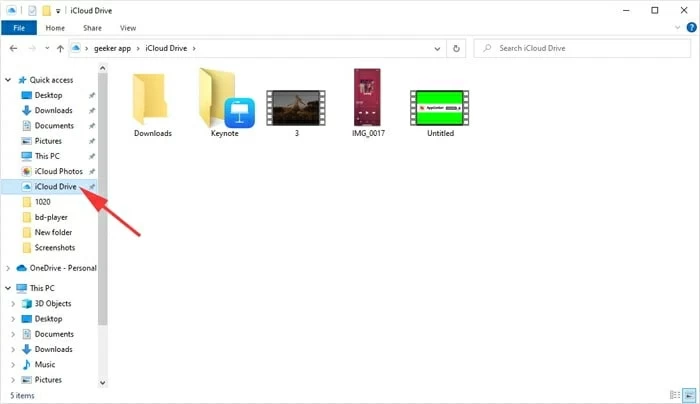
To finalize the iPhone-to-laptop data transfer, you can enable an automatic syncing via iCloud for Windows or Finder or a manual download from iCloud website.
Use iCloud for Windows app
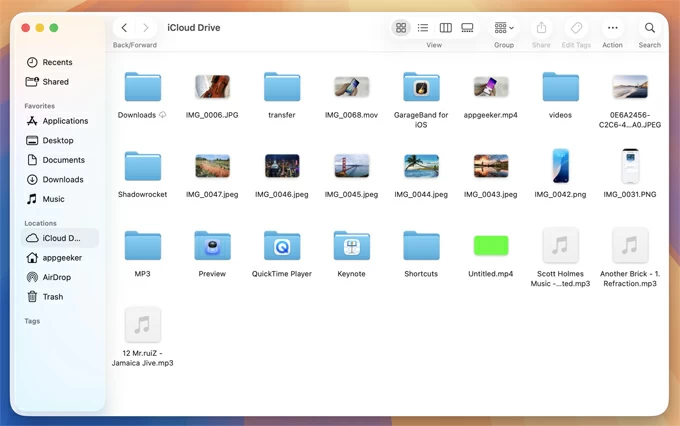
Use Finder on MacBook
Download files to laptop via icloud.com
Be sure that you have a stable Wi-Fi or cellular connection as well as enough iCloud storage space to hold the files you're copying over (Apple only provides 5GB for free.)
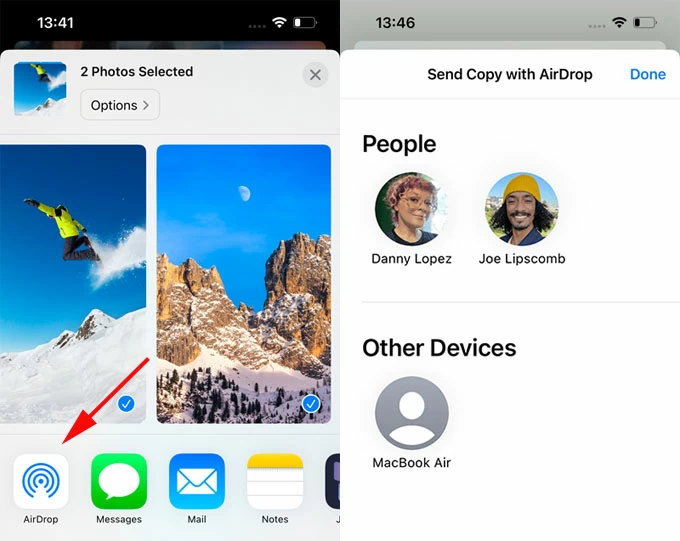
If you're using a macOS laptop to transfer data from your iPhone, then AirDrop could be your option. It's Apple's wireless technology, enabling an instant data sharing for photos, videos, Apple music, documents (PDF, Word, Excel), contacts, website links, and various file types supported by the macOS Finder and iOS Files app.
There is no strict file size limit, though data larger than 500MB takes take longer to transfer. After AirDrop transfer, files are usually saved in their native apps or the Downloads/Files folder.
If you have small batches of data to be moved from your iPhone to your laptop, take a look at these steps. We take transferring photos from iPhone to a MacBook as an example.
Once done transferring, it's now easy to access and open your iPhone files on your Apple laptop.
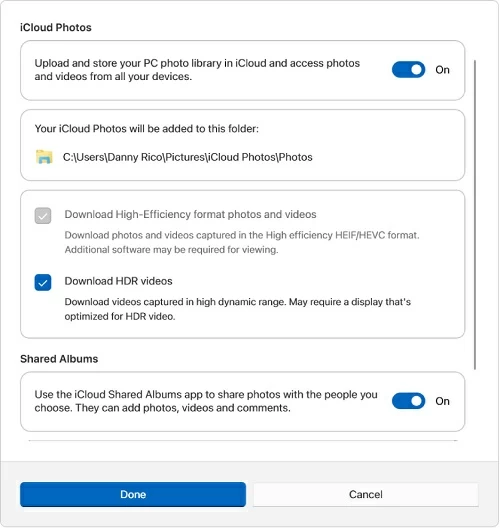
Provided that the data you're going to transfer to your laptop is your Camera Roll's photos and videos, the simplest way is to enable iCloud Photos on both your iPhone, iCloud for Windows or MacBook and sign into the same Appe ID. This triggers an automatic synchronization with a cable, meaning that photos and videos on your iPhone will appear in iCloud Photos folder on Windows laptop or Photos app on macOS laptop. You can then export the data to laptop's local drive for offline access.
The problem is that this wireless option can be very slow, especially if you're transferring larger data files. The process may not sync when your internet signal is poor; you have to manually restart iCloud Photos and force it to sync again.
Step 1. Enable iCloud Photos on iPhone and laptop
On iPhone
On Windows laptop
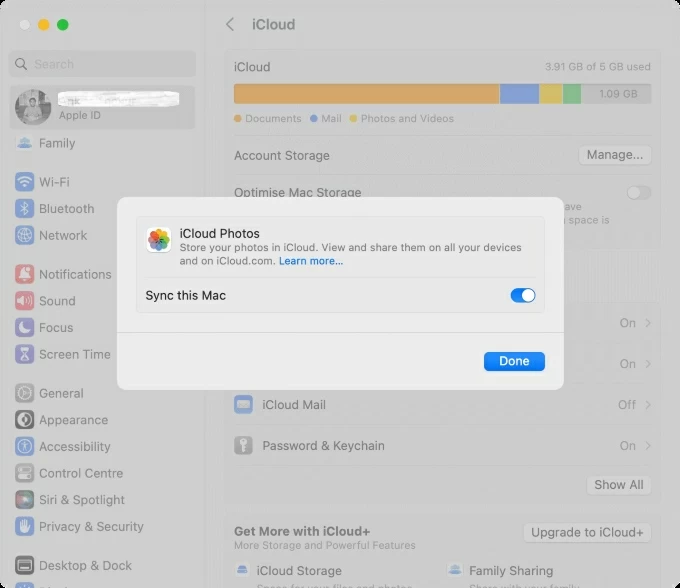
On MacBook Pro/ Air
Step 2. Get iPhone media data onto laptop
With iCloud Photos syncing activated, all photos and videos from your iPhone will go onto your laptop over the air.
Files are accessible in iCloud Photos folder via File Explorer on Windows and Photos app on MacBook. You can export the data to laptop's folder.
You can also email small data files to yourself without connecting via a USB cable. This could be a photo, video, document, or any other supported file type. Or you could use third-party cloud-based services (Google Drive, Dropbox, OneDrive, etc.) to wirelessly copy files between iPhone and laptop and save them locally - thanks to the cross-platform compatibility.
Now you know exactly how to transfer data from an iPhone to a laptop (Windows & macOS, whether you prefer a fast wired connection or a flexible wireless method.
The fastest way to transfer large files is a wired USB transfer—in terms of speed and stability. If you prefer convenience and have only a few files to transfer, the wireless options could make file sharing easy and time-saving.