How to Transfer Music from iPod to iPhone

If you need to transfer your music files from a MacBook to iPhone, don't miss this guide. Here you'll learn about different easy ways of transferring songs to iPhone from MacBook.

If you're searching for efficient ways to transfer music from your MacBook to your iPhone, you'll discover a range of options to suit your needs. One standout choice is Appgeeker iPhone Data Transfer, which lets you easily transfer your music between your MacBook and iPhone in both directions, granting you the ability to manage your playlists and albums directly within the software.

It's just a breeze to add music to iPhone from MacBook with an appropriate transferring tool.
If you have a collection of downloaded or recorded music on your MacBook that you want to enjoy on your iPhone while on the go, knowing how to sync music from your MacBook to iPhone is essential. Look no further. Here we've compiled a list of methods that will assist you in seamlessly transferring your MacBook music to your iPhone.
Related: 5 quick ways to record MP3 audio on Mac [Full Guide]
Table of Contents
Tip: To record high-quality music or other audio on a MacBook, the AppGeeker Screen Recorder is here to exceed your expectations. This extraordinary tool empowers you to selectively record internal or external audio. It's also equipped with many other features waiting to be discovered.
When it comes to syncing music from your MacBook to your iPhone, you have convenient built-in options like Finder or iTunes at your disposal. Just connect your iPhone to the laptop via a cable or WIFI, and open the software on the MacBook to sync the iPhone music, then you can get the audio files from your MacBook to your iPhone.
In case your MacBook operates on macOS Catalina or a more recent version, you'll locate Finder on your laptop. However, if you're using macOS Mojave or an older version, iTunes serves as the alternative to Finder.
Here we'll show you the steps to transfer your songs from MacBook to iPhone using Finder.
1. Launch Finder on your MacBook, and make connection between the laptop and your iPhone. Use a cable to connect your iPhone with your MacBook. Select "Trust" if you get a message on your iPhone or MacBook.
2. From the left sidebar on Finder, click your iPhone's name below the "Locations" section.
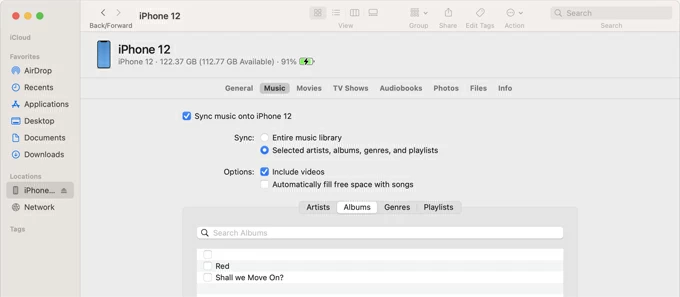
3. Select "Music" in the button bar at the top, and then tick the checkbox next to "Sync music onto your iPhone's name."
4. Choose the music you need to transfer from your MacBook to your iPhone. Beside the "Sync" section, select "Entire music library" to sync all the music in your laptop library to your iPhone; or click "Selected playlist, artists, albums, and genres" and pick the music you want to sync.
5. After selection, hit "Apply" at the bottom right of the window to start the music transfer. Once done, hit the "Eject" button on the sidebar next to your iPhone's name before you unplug it from the laptop.
Tip: Before you begin transferring, you can also select syncing options covering "Include videos," "Include voice memos," and "Automatically fill free space with songs." The last one means that free space on your iPhone will be filled up with songs synced from your MacBook.
Compatible with all the macOS systems, Appgeeker iPhone Data Transfer works perfectly for transferring music from a MacBook to iPhone while preserving the original quality. With this excellent tool, you can quickly sync a handful of tunes between your MacBook and iPhone in both directions. Plus, it provides intuitive music management features, allowing you to move your sound tracks, create playlists, and remove duplicate songs, etc.
Moreover, it has a built-in player for convenient music playback and the option to craft personalized ringtones for your iPhone. And its user-friendly interface ensures that even those with limited technical knowledge can easily complete the music transfer without any hassle.
Impressive features:
Follow these steps to sync music to iPhone from your MacBook using iPhone Data Transfer:
1. Unlock your iPhone and attach it to your laptop with a cable. If asked, tap "Trust" on your iPhone's screen.
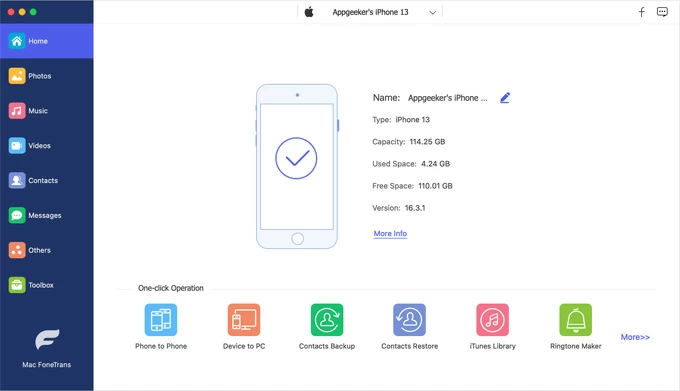
2. Open the software on your laptop. Your iPhone's information will be displayed on the main interface if connected.
3. Click "Music" on the left column to view your iPhone music library. Here you can see all the music files stored on your iPhone, and organize them manually.
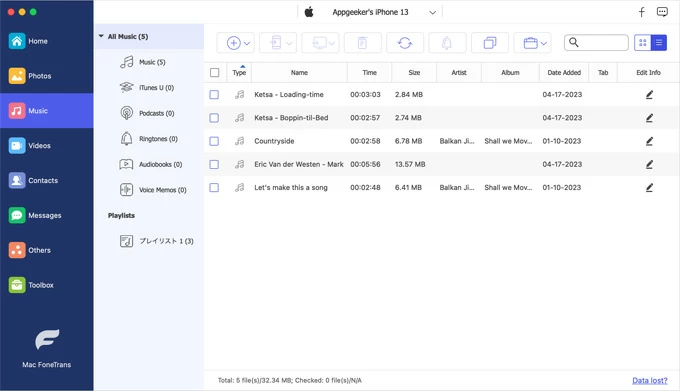
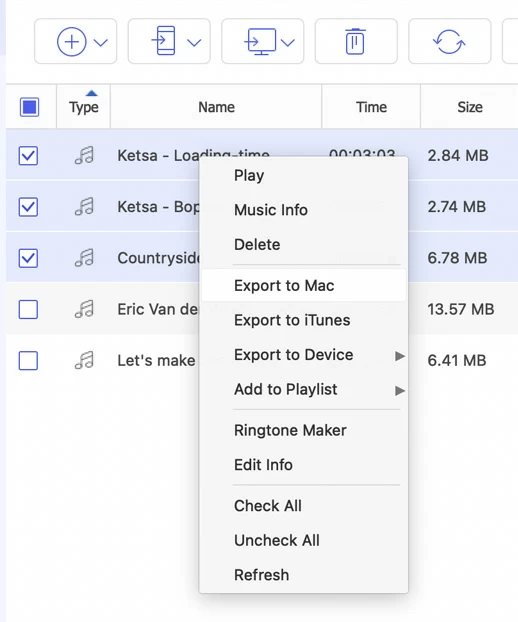
You can also export, delete or play some songs in bulk by ticking the box next to them and right click to get the action menu.
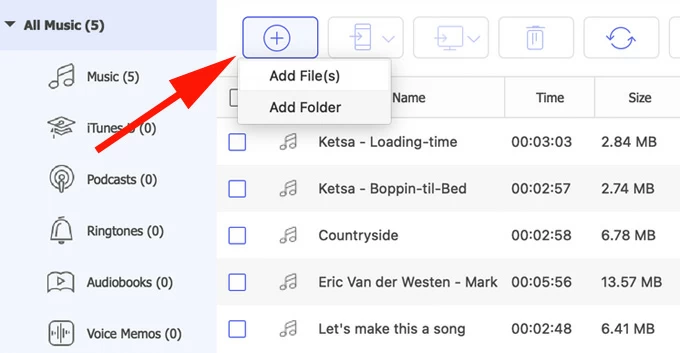
4. Hit the "Add" icon at the top, then select "Add File(s)" or "Add Folder" to choose the music from your MacBook to transfer to your iPhone. Alternatively, you can open the folder where you save the audio files, then drag and drop the music to the software.
When the transfer is done, you can check the music files on your iPhone. Make sure your iPhone is stably connected to your MacBook during the transfer process.
Read more about how to transfer videos from PC to iPhone here.
Apple Music is a popular streaming service offered by Apple, which not only allows you to access a vast library of songs but also provides a way to transfer music from your Mac to your iPhone without iTunes or Finder seamlessly.
While it offers convenience and a wide selection of music, it requires a subscription with a monthly cost, and limits you to sync 100,000 songs at most. Besides, you'll have to log in with the same Apple ID account on both your MacBook and iPhone for the music transfer in this way.
In the Apple Music app on your MacBook:
Note:
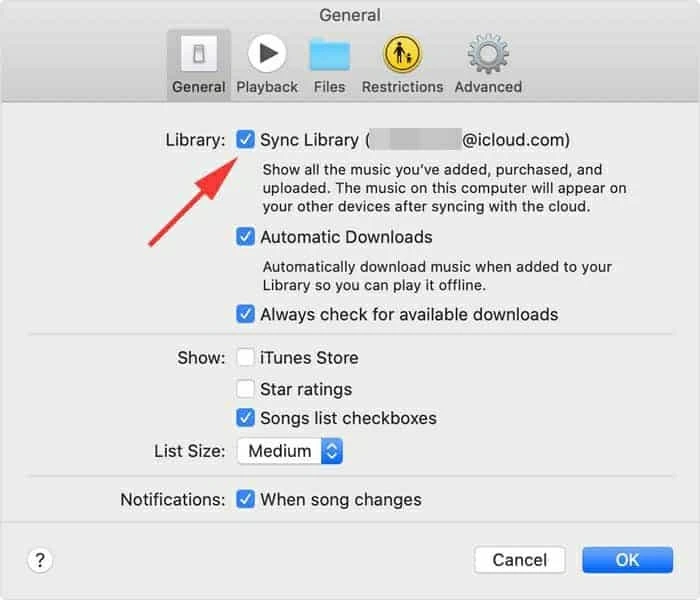
In the Settings app on your iPhone: Locate and tap Music, then enable Sync Library. Also, confirm that the Apple ID is the same as the one on your MacBook.

See also: Transfer MP3 to iPhone from computer
Wrapped up
In conclusion, transferring music from your MacBook to your iPhone is an easy endeavor once you grasp the detailed process. Above, we've examined different methods, including Finder, iPhone Data Transfer, and Apple Music. Among them, iPhone Data Transfer shines as the optimal choice, delivering efficient and high-quality music transfer capabilities. With this tool, transferring tunes from your MacBook to your iPhone becomes an effortless task.