How to transfer photos from PC to iPhone 17 - 7 ways

Whether you're on Windows or macOS, this guide covers all wired & wireless methods to help you transfer photos from your iPhone 17 to computer easily.

This guide explores all proven ways to transfer photos from an iPhone 17 to a PC or Mac seamlessly.
Photos and videos capture life's best moments. If your iPhone 17 is full of memories, transferring photos to your computer would be a good idea to keep them safe. Whether to free up space on your device, create a backup copy, or simply edit them on a larger screen, this guide will show you how to transfer photos from iPhone 17 to computer, for both Windows PC and Mac users.
From the wireless iCloud Photos to wired solutions like Photos app and File Explorer, we'll explain all how-to steps for photo transfer from iPhone 17 to computer, covering all iPhone 17, iPhone 17 Air, iPhone 17 Pro, and 17 Pro Max.
By using Appgeeker iPhone Data Transfer, anyone can transfer photos & videos from their iPhone 17 to a Windows PC or Mac computer effortlessly.
Table of Contents
Depending on whether you're using a Windows PC or a Mac, the transfer process can be different. Fortunately, there are some tools (like iPhone Data Transfer) working for both platforms, letting you transfer photos from your iPhone 17 to either a PC or Mac seamlessly.
One of the easiest ways to transfer photos from your iPhone 17 to your computer is by using iCloud Photos — Apple's official cloud service. When enabled, iCloud Photos automatically syncs your entire Photos Library across all devices signed in with the same Apple ID, including your iPhone, iPad, iCloud.com, and Mac or PC.
This means that any video or photo added on your iPhone 17 becomes instantly accessible on your computer. From there, you can download them for offline viewing, editing, or sharing.
To ensure successful transfer, ensure:
Steps to transfer photos from iPhone 17 to computer wirelessly via iCloud Photos:
1. Enable iCloud Photos on iPhone 17 for cross-device syncing.
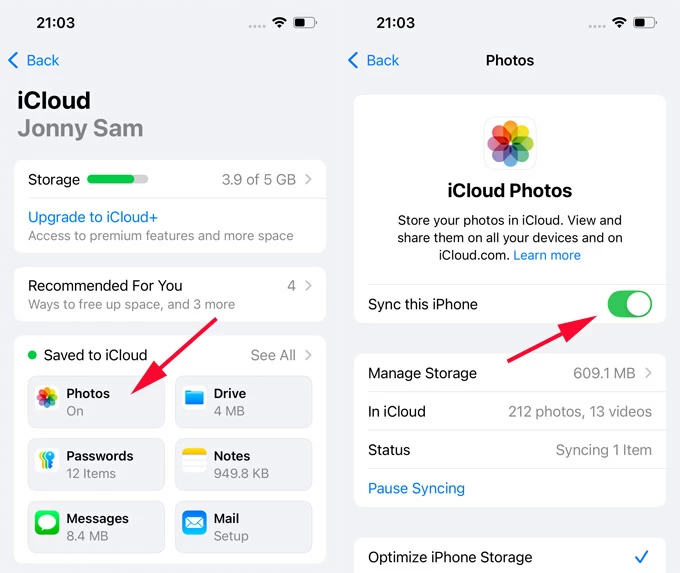
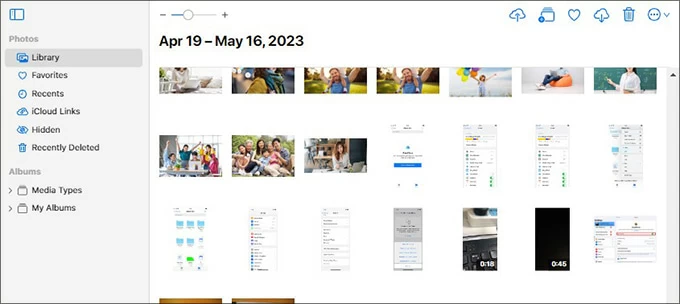
2. Sign in to iCloud.com on your computer.
3. Download iPhone 17 photos on computer.
TIP: To avoid compatibility issues after the transfer, select More > More Download Options, then decide how you'd like to get your iPhone 17 photos on computer:
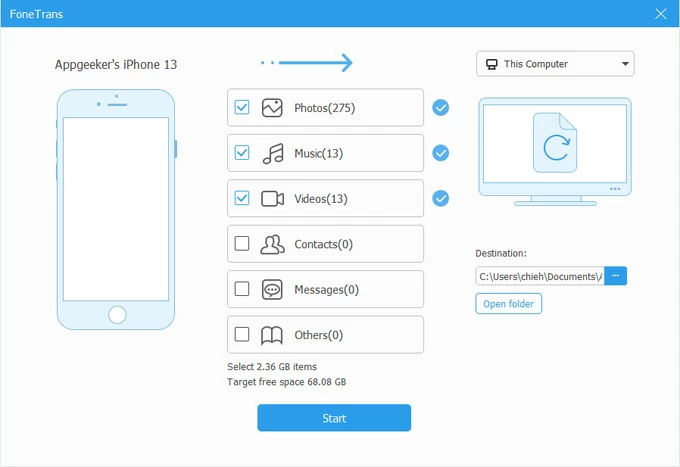
If you don't use iCloud Photos or your iCloud storage is full, Appgeeker iPhone Data Transfer can be the best alternative for transferring photos from an iPhone 17 to a computer. It works with both Windows and macOS, letting you import photos & videos from any iPhone/iPad in clicks.
Whether to transfer all photos at once or handpick the images you want, this tool offers a full view of your entire Photos Library, so that you can select any desired photos on your iPhone 17 and transfer them to your computer without any quality loss.
The best part? It includes a built-in HEIC Converter, which converts iPhone photos to widely-used JPEG or PNG formats for better compatibility, making them easier to view or edit on computer or anywhere else. See how to transfer photos from iPhone 17 to PC/Mac without iCloud:
1. Run iPhone Data Transfer on your PC or Mac. It works with all Windows 11, 10, 8, 7, and macOS computers.
2. Connect the iPhone 17 to computer via a USB cable. To allow data access, tap Trust when you're prompted with Trust This Computer message.

3. Navigate to Photos tab from the left sidebar. From here, you're able to view all existing photos, videos, and albums in your iPhone Photos Library.
4. Select the iPhone 17 photos you want to transfer to computer. You may click on individual pictures to select them, or simply click Check All at the top.

5. Click the Export to PC button to start photo transfer from iPhone 17 to computer. It's a computer icon in the upper toolbar; then specify a local destination folder.

All selected photos will be transferred from your iPhone 17 to your computer in lossless quality.
More features you may like:
After the transfer, open the local folder on your PC or Mac to access your iPhone photos. This tool also supports the cross-platform transfers of videos, music, contacts, messages, and more.
If you're using a Windows PC, you can easily make photo transfer from your iPhone 17 to computer through a wired connection.
Windows PC comes with a preset Microsoft Photos (or Windows Photos) app that not only lets you view and organize pictures on your computer but also import photos and videos directly from your iPhone 17 via a cable-based connection.
This method works on both Windows 11 and Windows 10 and is ideal for quickly transferring iPhone photos to a local computer folder for backup or editing. Here's how you can transfer photos from iPhone 17 to PC with a cable using Photos app:
1. Link your iPhone 17 to computer using a USB cable. When asked whether to trust this computer, tap Trust and enter passcode to proceed.
2. Run Photos app from Windows Start menu if it doesn't open automatically. You can press the Windows key, type Photos in the search bar, then select it to open.
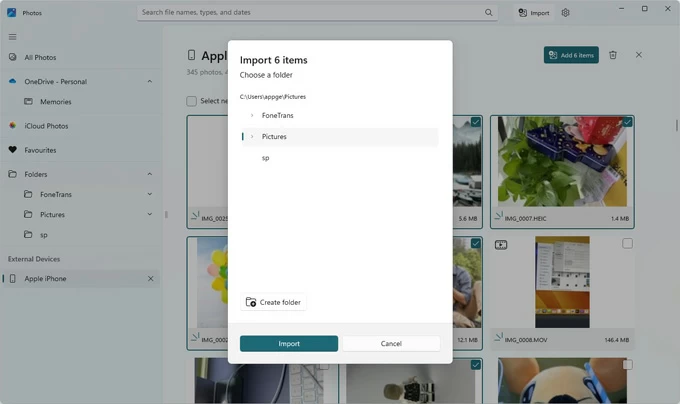
3. Click the Import button from the top-right corner and select your Apple iPhone from the connected devices.

4. Wait for Photos app to scan and load all photos and videos on your iPhone 17. TIP: If the photos are stored in iCloud instead of on your device storage, make sure to download them first.
5. Click to select the photos and videos you want to import, or simply check them all.
6. After selection, hit Add [X] items button in the upper-right corner.
7. On the pop-up box, select an existing folder on your computer or create a new one.
8. Confirm the Import option.
All selected iPhone photos will transfer to your PC immediately. Feel free to check them in the local folder on your computer.
Built into Windows PC, File Explorer is another wired option for transferring photos from iPhone 17 to computer. With a trusted physical connection, File Explorer recognizes your iPhone as an external USB drive, so that you can access its internal storage and move the photos to your computer by simple copy-n-paste.
However, keep in mind that File Explorer can only detect and display your Camera Roll photos and videos in monthly folders — which may take some time to locate specific pictures you want. Follow the steps to copy photos from iPhone 17 to computer using File Explorer:
1. Unlock your iPhone 17 and connect it to your computer with a USB cable. When required, tap Trust in Trust This Computer prompt and confirm with your passcode.
2. Double-click This PC on your desktop to open a new File Explorer window.
3. Select Apple iPhone under Devices and drives. If you don't see your device, unplug your iPhone and re-connect it firmly.

4. Double-click to open Internal Storage folder. You'll see multiple subfolders sorted by month.
5. Browse the folders to select all photos you want to transfer from your iPhone 17. See what to do if your photos are not showing up on iPhone Camera Roll.
6. Right-click on the selected photos and choose Copy from the expanded menu.
7. Open a computer folder, right-click on the blank and select Paste.
Alternatively, you can drag and drop the iPhone photos to a local computer folder where you prefer to save them for future access.

For macOS users, Apple's ecosystem has made it effortless to transfer photos from an iPhone 17 to a Mac computer.
Based on a wired connection, the native Photos app on Mac allows you to import photos and videos from an iPhone 17 device directly — which is pretty helpful, especially if your iCloud is running out of cloud storage.
1. Attach your iPhone 17 to your Mac using a USB cable. If prompted, click Allow to allow accessory to connect.
2. Open the Photos app on your Mac and select your iPhone 17 under Devices on the left. If asked, unlock your iPhone and allow it to trust this computer.
3. In the opening Import screen, all photos and videos on your iPhone 17 will load for viewing.
4. In the top menu, choose a computer album where you'd like to import your photos and videos.
5. Select the iPhone photos you want by clicks and hit the Import Selected button. Or, click Import All New Photos instead.
Do not disconnect your iPhone 17 before the photo transfer is complete on your Mac.

Part of Apple's ecosystem, AirDrop makes photo transfer from iPhone to Mac quick and straightforward. Simply turn on AirDrop on both devices, keep them close to each other and within the Bluetooth and Wi-Fi range. Once AirDrop is active, you're able to share any photos from your iPhone 17 to computer wirelessly in seconds:
1. Enable AirDrop on iPhone 17.
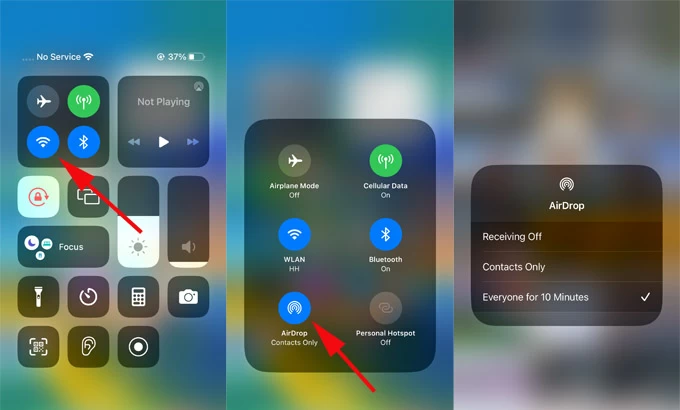
2. Turn on AirDrop on Mac.
3. AirDrop photos from iPhone 17 to Mac.
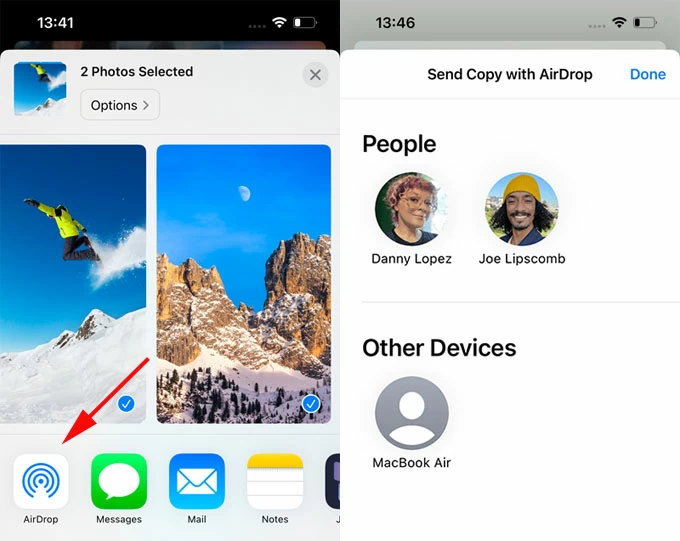
4. Accept AirDrop photos on Mac.
TIP: If your iPhone 17 and Mac are signed in with the same Apple ID, the AirDrop prompt won't appear as the photos are sent to your Mac automatically.
Using cloud services or email lets you wirelessly send photos from an iPhone 17 to a computer without needing a cable, whether you're on a Windows PC or Mac.
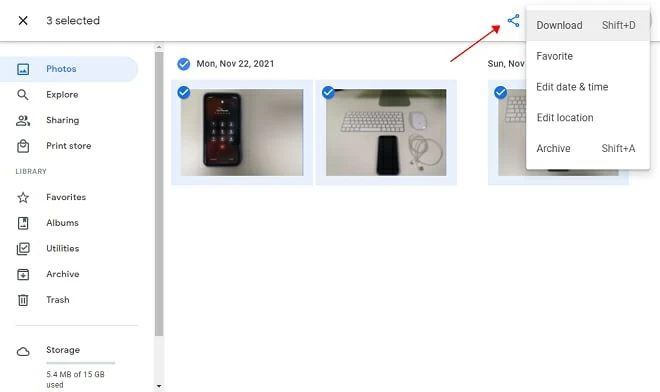
Similar to iCloud Photos, Google Photos offers 15 GB of free cloud storage, letting you back up and sync your iPhone 17 photos across devices online. Just upload photos from your iPhone to Google Photos and then download them to your computer from any network-linked browser:
Alternatively, emailing the iPhone 17 photos to yourself is also a quick, wireless way to transfer them to your computer, with no need for a USB cable.
If you've tried the methods above but still can't get your iPhone photos onto your computer, here are some troubleshooting steps to help:
When using wired methods like Photos app and File Explorer, ensure your iPhone 17 is connected with a compatible USB or USB-C. If it's connected but not recognized, install or update the latest iTunes or Apple Devices app on your computer to enable photo import.
To get photos off iPhone 17 to computer, make sure to tap Trust when you see the Trust This Computer prompt on your device. This allows you to access iPhone photos on PC or Mac for transfer.
Cloud services, such as iCloud Photos or Google Photos, require sufficient cloud storage and stable network to complete wireless iPhone photo transfer to computer. If your cloud storage is full, the syncing process stops itself.
By default, iPhone 17 captures pictures in HEIC format. To avoid compatibility issues, you may change the image format through iPhone Settings > Camera > Formats > Most Compatible.
Or, you can use Appgeeker iPhone Data Transfer to convert your HEIC photos to widely-compatible JPEG/PNG formats while transferring them to your Windows PC or Mac.