How to transfer MP3 to iPhone without iTunes — PC & Mac guide

Switching to iPhone 17? Learn the best ways to transfer music from your old iPhone, Android, or computer, so your playlists, songs, and albums are ready to enjoy instantly.

Upgrading to a new iPhone means getting the latest features and performance boosts. When switching to a new iPhone 17, you may want to transfer all your purchased & non-purchased music to it and enjoy your favorite songs right away.
Whether your music collections are stored on your old iPhone, Android, or a computer, this guide covers every reliable way to transfer music to iPhone 17 for smooth playback. From streaming services like Apple Music to computer-based tools such as iTunes or Finder, we'll cover step-by-step methods and show you how to transfer music to iPhone 17 wirelessly or with a cable.
There're various ways for transferring music to an iPhone 17, whether from an old Apple or Android device, or a computer.
And for those who prefer a seamless, lossless music transfer to iPhone 17 — either from an Apple device or a PC/Mac, Appgeeker iPhone Data Transfer offers an all-in-one solution to add local & non-purchased music to iPhone, with no need for iTunes.
Table of Contents
The music transfer methods outlined in this guide work for all iPhone 17, iPhone 17 Air, iPhone 17 Pro, and 17 Pro Max models.
Transferring music from an old iPhone to a new iPhone can be easy if you have a subscription with Apple Music. Or, you can transfer music to an iPhone 17 using a third-party alternative.
When it comes to transferring music to a new iPhone 17, Apple Music can be the simplest solution — it allows you to sync music library on any devices signed in with the same Apple ID, including your old iPhone, iPad, iPod, or a computer.
With an active Apple Music subscription, you can enable its Sync Library feature to stream your entire music library from your old Apple device on your iPhone 17 via your Apple ID. Then, you're able to download all purchased songs, playlists, and albums on your iPhone for offline listening.
The process relies on a stable Wi-Fi network. Here's how to transfer music to an iPhone 17 wirelessly via Apple Music syncing:
1. Open the Apple Music app on both your old iPhone and new iPhone 17.
2. Tap the photo icon and tap Account Settings.
3. Ensure you're signed in with the same Apple ID that you use for Apple Music subscription.
4. Navigate to Settings app and select Music.
5. Turn on the toggle next to Sync Library. Allow it a few minutes to sync the current music library on your old iPhone to the new iPhone 17.

6. Open the Music app on iPhone 17 and you'll see all synced music loading in Library.
7. Press and hold any purchased song, album, or playlist you want and tap Download. Then, feel free to enjoy the local playback in your iPhone 17's Music app.
If you don't see Sync Library option:
For other music steaming services like YouTube Music and Spotify, you may follow their syncing instructions to transfer music between iPhones and download everything you like.
If you have non-purchased music or don't join Apple Music subscription, iPhone Data Transfer by Appgeeker is an excellent alternative. It works with all Apple devices, letting you easily transfer music to your iPhone 17 from another iPhone, iPad, iPod Touch, or even a PC or Mac.
Simply connect both iDevices to your computer, browse the source device's Music Library, and select the songs you want. All music will transfer to the target iPhone 17 in its original quality. You can also manage playlists, create new ones, and add MP3s, music videos, ringtones, voice recordings, and more.
Here's how to transfer music from old iPhone to iPhone 17, compatible with all iOS models:
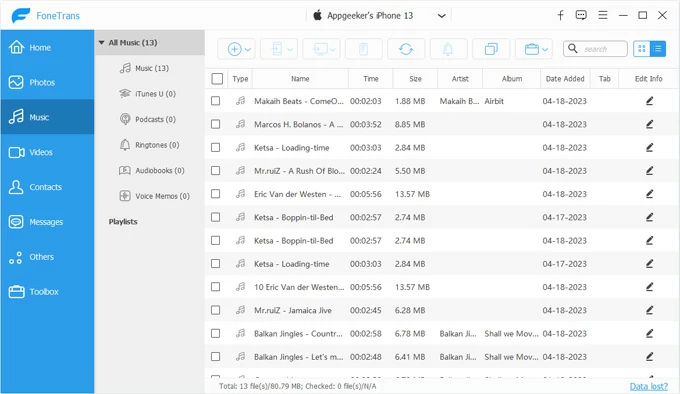
Step 1. Launch iPhone Data Transfer on computer. It works for both Windows and macOS.
Step 2. Connect iPhone 17 and the source Apple device via cables. Make sure to select the source device from the drop-down menu at the top. If asked, tap Trust to allow data access.

Step 3. Go to Music tab and select the songs you want to transfer. Accessing the left-side Music tab, you'll view all playlists and songs in Library; click to select everything you like.
Step 4. Click "Export to Device" button and transfer music to the target iPhone 17. It's a phone icon located in the top toolbar.
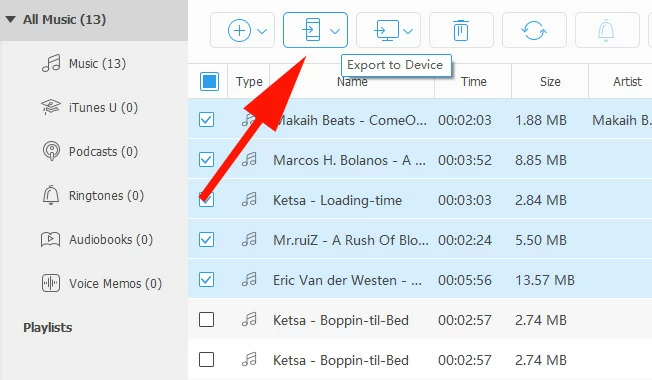
All selected music files will be moved to your iPhone 17 from the source iPhone, iPad, or iPod Touch. Once done, open the Music app to access all transferred songs and enjoy them offline.
If you have a large music collection on computer, either a PC or Mac, the following three options can help with the music transfer to iPhone 17 effortlessly.
Whether you're on Windows or macOS, Appgeeker iPhone Data Transfer makes it easy to transfer music to an iPhone 17 quickly and without losing audio quality
With just a few clicks, you can add local playlists, non-purchased songs, MP3s, audio recordings, and other music files from your computer directly to your iPhone 17 — no iTunes or Apple Music required. Also, the software can automatically detect the source music and convert incompatible files into iOS-friendly formats, ensuring smooth playback in your iPhone's Music app.
Best of all, this process won't erase any existing music on your iPhone — unlike iTunes or Finder. You can enjoy all newly added tracks while keeping your current music library intact.
Follow these steps to transfer music from PC/Mac to iPhone 17 without iTunes:
Step 1. Run iPhone Data Transfer on your source PC or Mac.
It works seamlessly on Windows 11, Windows 10, 8, 7, and all supported macOS computers.

Step 2. Connect your iPhone 17 with a USB cable.
If prompted, tap Trust to trust this computer. Your device info should appear then.
Step 3. Move to Music tab on the left.
The existing music files on your iPhone are all available here. If you want, you can create a new playlist, organize the tracks, or merge duplicate songs.
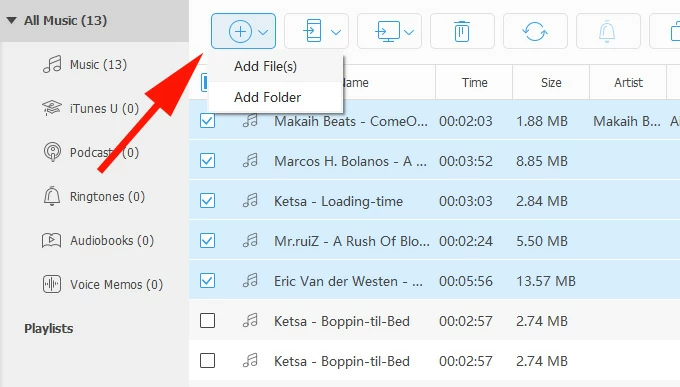
Step 4. Add music from computer to iPhone 17.
Hit the "+" button in the upper toolbar and select Add File(s) or Add Folder in the expanded menu. A local computer folder should appear, letting you add either individual songs or an entire music folder to your iPhone.
Keep your device connected until the transfer process is complete. After that, open the Music app on your iPhone 17 to enjoy all added songs offline.
Additionally, this tool also enables the transfers of your photos, videos, movies, TV shows, ringtones, documents, and more — whether from computer to iPhone, or vice versa.
As Apple's official method for transferring music from a Windows PC to an iPhone, iTunes is now split into Apple Music (for managing your library) and Apple Devices (for syncing content with iPhone/iPad). Its sync feature lets you add either your entire library or selected playlists, albums, and songs to your iPhone 17 via a wired connection.
Important: Syncing with iTunes will replace your iPhone's existing Music Library with the content from your computer. It erases any tracks already in your Music app, which is fine if you're planning to build a new library.
Steps to transfer music from PC to iPhone 17 with iTunes or Apple Devices:
1. Run iTunes or Apple Devices on your Windows PC.
2. Add music from computer to iTunes/Apple Devices.
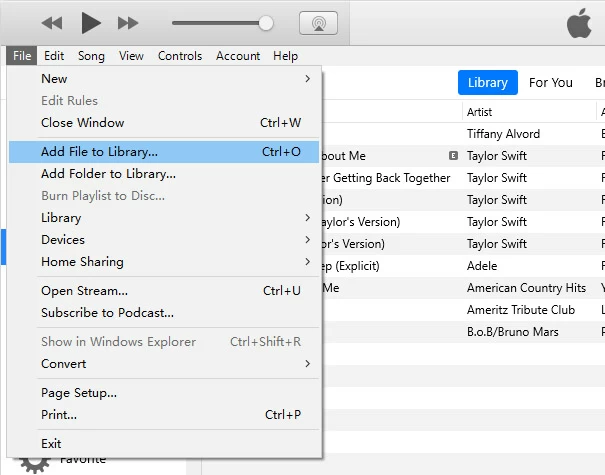
3. Attach your iPhone 17 to computer with a USB cable.
TIP: To enable the transfer, ensure Sync Library is disabled in Apple Music Settings on iPhone.
4. Transfer music to iPhone from iTunes or Apple Devices.
Once done, select the Eject button and disconnect your device. The transferred music will display in Music app on your iPhone 17.
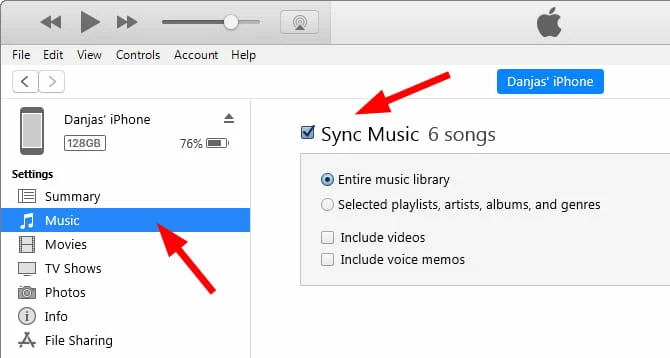
Since macOS Catalina 10.15, Finder has replaced iTunes for file management and device syncing. On newer versions of macOS, you may transfer computer music to your iPhone 17 directly through the Finder app.
However, the drawback is that this process will overwrite all music currently on your iPhone. Any previously stored songs will be erased completely, leading to unavoidable data loss. See what to do for music transfer from Mac to iPhone 17 via Finder:
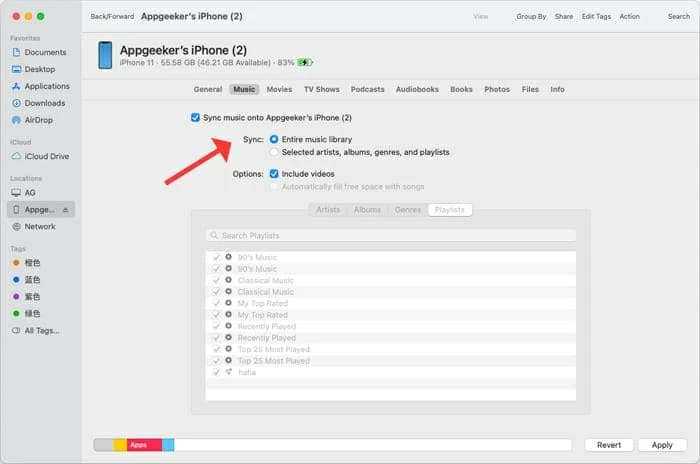
After successful transfer, disconnect your iPhone 17 and enjoy all your favorite songs in Music.
The common method Apple suggests for Android-to-iPhone music transfer is to export the music files from your Android device to a computer, then manually add them to your iPhone 17 through iTunes or Finder. But, can we make the things easier?
To make more direct music transfer from Android to iPhone 17, the cross-platform data migration tool — Appgeeker Phone Transfer comes in handy.
It can quickly scan the source music on your Android and transfer it to your iPhone 17, or the other way around — no quality loss. Not limited to this, it also supports the transfers between Android and iOS devices for photos, videos, contacts, messages, bookmarks, calendar, etc.
It's compatible with all Apple devices and major Android brands. Now, explore how to transfer music from Android to iPhone 17 without using iTunes:
Step 1. Launch Phone Transfer tool on your Windows PC or Mac.
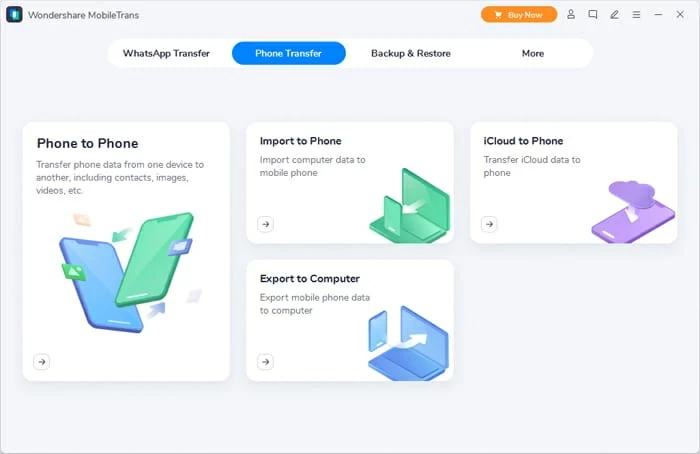
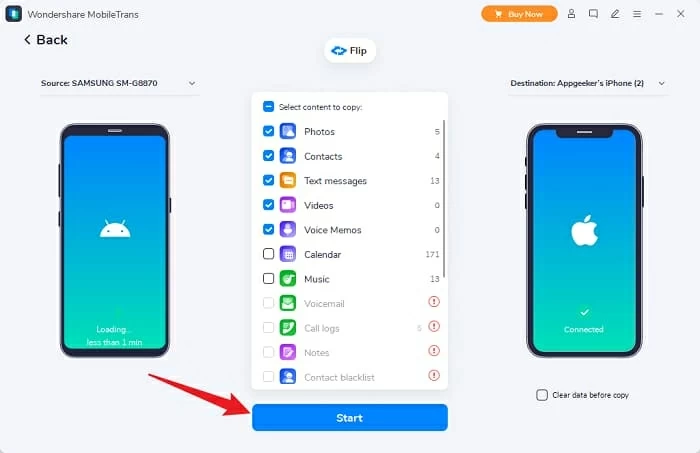
Step 2. Select Phone to Phone mode and connect both devices.
To move music from Android to iOS, ensure your source phone is placed on the left side. Or, you can click the Flip button at the top to put them correctly.
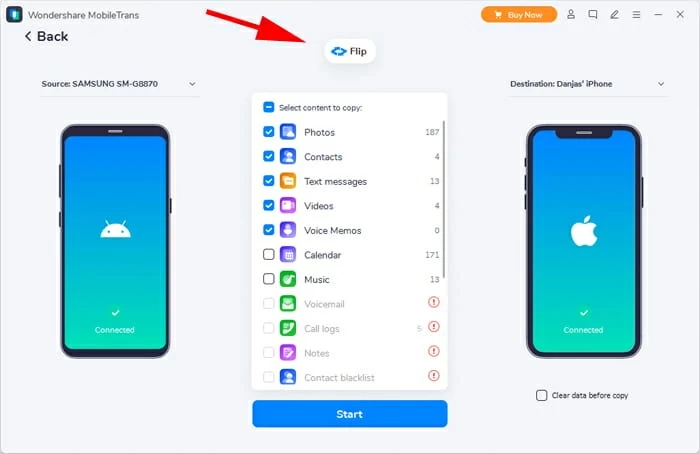
It works with various Android brands, such as Samsung, LG, Google Pixel, Sony, Motorola, OPPO, VIVO, OnePlus, Lenovo, HUAWEI, ZTE, Mi, Redmi, and more.
Step 3. Select Music checkbox and hit the Start button to begin.
From the data files listed in the middle, click the tickbox next to Music. This will transfer the music on your Android to your iPhone 17 in minutes.
When switching to an iPhone 17, your Apple Account offers 5 GB of free iCloud storage by default. This enables you to sync music files across all your devices linked to the same Apple ID. That is, with sufficient cloud space, you can upload songs and tracks from a source phone or computer to your iCloud storage, then download the music to your iPhone 17 for offline listening.
Note: These downloaded tracks won't import to your Music app. If you want to add music like MP3s to iPhone's Apple Music Library directly, follow the iPhone Data Transfer method above.
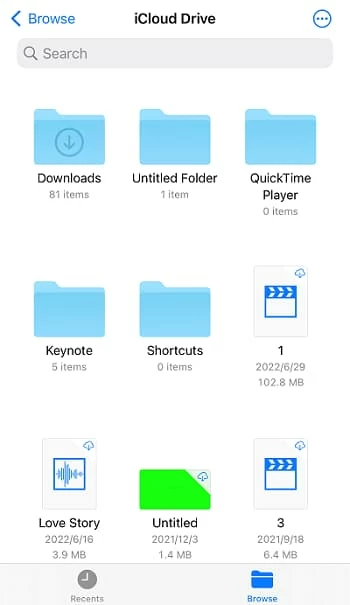
Step 1. Upload source music to iCloud.
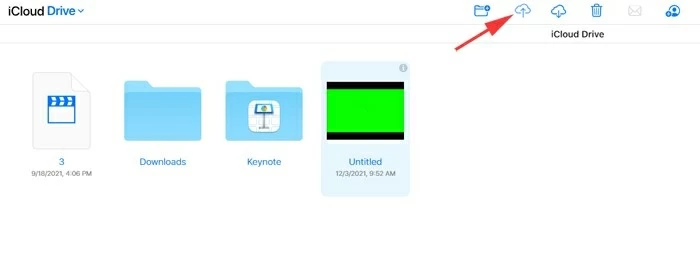
Step 2. Download music to iPhone 17 from iCloud Drive.
If your music collections exceed iCloud's 5-GB limit, try upgrading your storage plan or using Google Drive which offers 15 GB of cloud storage for free.
With these efficient methods, you're now able to transfer music to your iPhone 17 from all platforms and sources. After the transfer, take your time to manage your Music Library and download every desired song for seamless playback and offline listening. If you still cannot transfer music to iPhone, check the link for fixes.