How to Download YouTube Music to iPhone

To transfer meaningful photos from your computer to your iPhone 17 for viewing, this guide will tell you how to transfer photos from a Windows PC to the iPhone 17 series.

If you want a truly seamless experience, a top-tier Appgeeker iPhone Data Transfer can make the process effortless—skip the complicated transfer steps and move your entire photo collection from your PC to an iPhone 17 / 17 Pro / 17 Pro Max / Air without losing quality.
Here are multiple PC-to-iPhone 17 photo transfer methods to meet your various preferences.
When users switch to a new iPhone 17, besides the excitement, they also have an important task—data transfer. This includes what many people want: transferring photos from their PC to the iPhone 17 for storage, easy management, or sharing on the go.
At first glance, it seems simple: plug in the phone, then drag and drop. But in reality, Apple's ecosystem offers multiple ways to move images, each optimized for different needs—some fast and cable-free, others precise and offline.
This guide will bring you smarter methods to transfer photos from your PC to your iPhone 17. You'll no longer rely solely on traditional iTunes syncing but will explore creative alternatives and modern tools that fit your actual device usage—whether you prefer automatic cloud syncing, selective album transfers, or one-time wireless sharing. Ultimately, you'll know exactly how to get your computer's photos onto your iPhone 17, iPhone 17 Pro, iPhone 17 Pro Max, or iPhone Air without data loss or unnecessary complexity.
Table of Contents
On the surface, moving pictures from PC to iPhone 17 sounds straightforward, but the key is selecting the most suitable method to meet your photo transfer needs. Different methods vary in performance and requirements. Large photo libraries risk sync errors, duplicates, or incomplete transfers if you're not careful.
Tailored to user requirements for transferring photos—such as batch-moving hundreds of images, preserving full resolution and metadata integrity, or achieving faster and more secure transfers—this article will help you pick the right method to transfer photos from your Windows PC to your iPhone 17, saving you significant time and effort.
If you want to know about transferring in the opposite direction, refer to How to Transfer Photos from iPhone to PC.
Here are seven effective methods to get your photos transferred from PC to iPhone 17, covering both USB and wireless options, letting you balance speed, convenience, and reliability.
Best for: Users comfortable with older Apple tools and seeking an offline, cable-based method.
Even in the era of modern syncing tools, iTunes remains a dependable fallback for users who prefer traditional wired transfers. It operates completely offline, ensuring your photos are transferred from PC to your iPhone without relying on the internet. If your Windows PC has the latest version of iTunes installed and a compatible USB-C cable ready, you can get started:
1. Go to Settings > [Your Name] > iCloud > Photos on your iPhone and check if Sync this iPhone is turned off. If it's enabled, disable it; otherwise, you won't be able to copy photos to your iPhone 17 from your computer using iTunes.
2. Link your iPhone 17 to your PC and open iTunes. When prompted on your phone, tap Trust this computer.
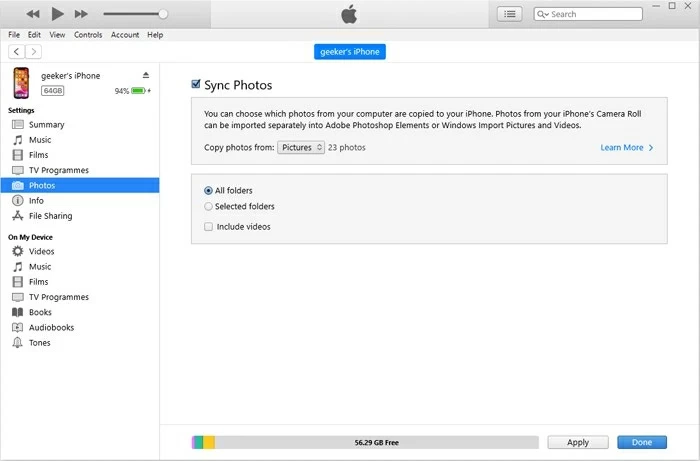
3. Click the device icon in the top left corner, then locate Photos from the left-hand menu.
4. Tick the box next to Sync Photos.
5. In the Copy photos from section, select the folder or subfolder containing your desired photos.
6. Check All folders to transfer all photos in the folder, or choose Selected folders to pick specific ones. You can also transfer videos from the folder.
7. Once everything is set, click Apply or Sync and watch your photo library begin its journey to your iPhone 17.
Note:
Also see: [SOLVED] iPhone won't sync with iTunes
Best for: Windows users who prefer a cleaner, updated interface for syncing photos.
For modern Windows 10 and Windows 11, Apple has gradually replaced iTunes with the Apple Devices app. This app has a cleaner interface, faster performance, and is designed for seamless, high-volume data transfers between PC and iPhone. It shares a similarity with iTunes when transferring photos and videos to the iPhone 17—you need to disable iCloud Photos.
1. Go to the Microsoft Store and install the Apple Devices app.
2. Plug your iPhone 17 into the PC. Launch Apple Devices and allow your iPhone to Trust This Computer if prompted.
3. In the sidebar, select Photos, then toggle Sync photos onto [your iPhone] from.
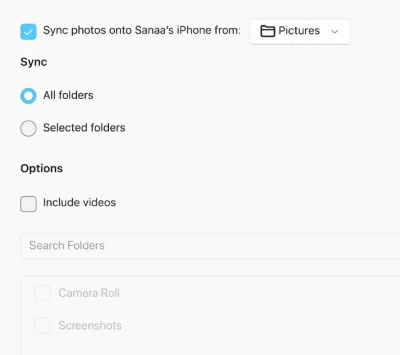
4. Choose the folder or albums you want to transfer, and decide whether to sync the entire folder or just select photos.
5. Click the Apply button in the bottom right corner to begin the transfer.
Note:
Best for: Users who need more flexibility in the process of transferring your photos from PC to iPhone 17 without iTunes.
Both iTunes and the Apple Devices app have a major flaw: they conflict with iCloud Photos. To avoid the risk of overwriting photo library or causing data confusion, Appgeeker iPhone Data Transfer can completely transform your experience by offering simple drag-and-drop operations, fast bulk transfers, and more powerful album management features.
This software can transfer photos from the PC to the iPhone 17 at once while preserving their original quality, without affecting the existing iPhone photo library. When dealing with a large number of photos and videos, its transfer speed is typically faster and more stable than iTunes. In short, it's a great assistant for two-way photo transfers between your computer and iPhone.
1. Connect your iPhone 17 to your PC with a certified data cable, then open the iPhone Data Transfer software on your desktop.

2. Click Photos on the left to start the photo transfer process. Here, you can also view photos from your iPhone 17.

3. To import photos from your PC to your iPhone 17, click the plus (+) icon in the top menu, select Add File or Add Folder, and navigate to the corresponding location to choose the photos you wish to transfer to your iPhone.

4. Once selected, click Open, and the photos will be added from your PC to your iPhone 17's photo library and saved.
5. Alternatively, you can manually drag and drop the photos into the software for automatic transfer to your device.
For music transfer, see how to transfer music to iPhone 17.
Best for: Users who prefer seamless syncing between PC and all Apple devices.
For users who like to seamless photo transfers from their PC to their iPhone 17, iCloud, tightly woven into Apple's ecosystem, plays a significant role. The iCloud for Windows app automatically syncs your photos across devices. By integrating directly with File Explorer app, it creates a magical two-way sync, ensuring that any photos added to a designated folder on your PC instantly appear on your iPhone 17, and vice versa.
1. If you haven't installed it yet, download iCloud for Windows from the Microsoft Store.
2. Open iCloud for Windows and sign in with the Apple ID used on your iPhone 17. You may need to complete two-factor authentication as required.
3. When you see the "Sync iCloud Photos to Microsoft Photos" wizard, click Sync Photos in the bottom right corner.

Note:
4. Follow the instructions and choose whether to also sync other data and share iCloud analytics.
5. Finally, click Finish Setup. You will see that iCloud Photos is set to On.
6. Open File Explorer (Win + E) on your PC, go to iCloud Photos in the left panel, then drag the photos into it.
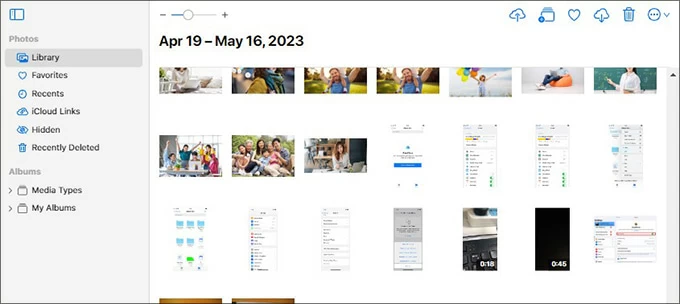
With iCloud Photos enabled on the iPhone 17, you can open the Photos app and see the photos transferred from your PC.
Best for: Occasional or one-time transfers without installing software.
Additionally, if you prefer not to install iCloud for Windows app, iCloud.com provides a browser-based, quick-transfer option for occasional use. It's simple to use and requires no setup. All you need to do is upload your photos from your PC to iCloud, and they will then sync to your iPhone 17 via iCloud Photos—as long as you have an internet connection.
1. Visit iCloud.com in a web browser on your PC and log in with your Apple account credentials.
2. You may need to receive a verification code from another trusted Apple device or phone number to verify your identity.
3. From the panel, select Photos to access the iCloud Photo Library.
4. Click the Upload icon in the top right corner, then select the images you need to upload and wait for them to finish.
5. On your iPhone 17, make sure iCloud Photos is turned on. Then go to the Photos app and check for your newly downloaded pictures.
Note:
Best for: Users who want platform-independent syncing or extra cloud storage.
Not everyone relies entirely on the Apple ecosystem. Google Photos, with its cross-platform capabilities and generous free storage (15 GB), serves as an excellent alternative for many users looking to transfer photos from a PC to an iPhone 17. For those already using Google services and wanting to avoid frequent manual operations, it's a perfect solution.
1. On your PC, access photos.google.com and sign in with your Google account.
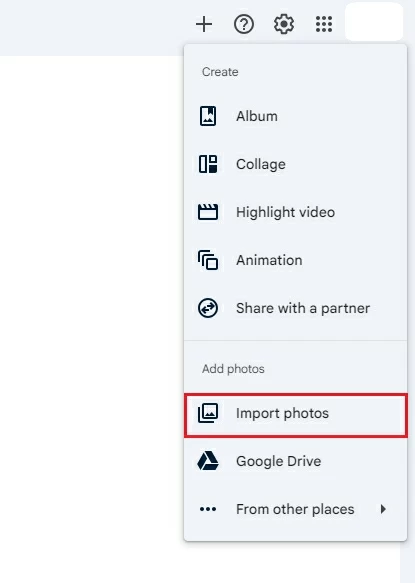
2. Click the plus (+) icon in the upper right corner, select Import photos, then browse your computer and choose the pictures you need.
3. Click Open to add them to your Google Photos library.
4. Open the Google Photos app on your iPhone 17 and sign in.
5. You can view the photos synced to Google's cloud. If you want to save them locally, select your photos, then tap More > Download.
Read more: How to access iPhone photos on PC
Best for: Sending a small batch of urgent photos.
For transferring just a handful of pictures to iPhone 17 from your PC quickly, email is the most straightforward method. While it's not ideal for large files, it works perfectly for small, urgent batches.
1. Compose a new email on your PC, attach the photos, and send it to yourself.
2. Open your Mail app on the iPhone 17.
3. Find the email, open the attachments, and select Save Image to add them to photo library.
Conclusion
Transferring pictures to from a computer an iPhone 17 is easy once you match the method to your needs. For speed and control, Appgeeker iPhone Data Transfer tool is hard to beat. iCloud or Google Photos work best for wireless syncing, while iTunes, Apple Devices, or even email suit offline or quick fixes. Select the method that fits your workflow and showcase your photos perfectly on your iPhone 17.
1. Will transferring photos with iTunes overwrite my existing albums?
It can if you re-sync with a different folder. When you sync a new folder from your PC, it will typically replace the existing synced photos from a previous sync. To avoid overwriting, use the same photo folder or choose a transfer tool that preserves your albums.
2. Is there a wireless method if my USB cable isn't available?
Yes. iCloud for Windows, Google Photos, iCloud.com or email can all transfer photos wirelessly using your Wi-Fi network.
3. Why aren't the transferred photos showing up on the iPhone 17?
Ensure that iCloud Photos is enabled and that you're connected to a strong and stable network. If you're using cloud services for photo transfers, also check that you have enough cloud and device storage space. If moving photos via a data cable, make sure you've trusted the computer to authorize access to your iPhone 17, or try using a different USB port or cable on the PC.
4. What's the fastest way to transfer a large photo library to my iPhone 17?
Use a reliable Appgeeker iPhone Data Transfer tool or a wired connection with Apple Devices app—these options handle bulk transfers quickly without depending on internet speed.