
How to unlock iPhone 17 without passcode

Apple includes several tools and options to help you transfer a video from iPhone to a flash drive. Here's how to export your videos, regardless of having a computer or not.

Tip: If you don't have a USB adapter for your iPhone and the flash drive, you may use a desktop-based tool named Appgeeker iPhone Data Transfer to quickly export your videos, photos, and music. It consistently stands out for its reliability, polish, and thoughtful design, and allows bidirectional transfer and content management.
Modern iPhones allow videos transfer to USB drive or flash drive through the Lightning or USB-C connector.
The iPhone storage is full and need to offload videos to free up some space? Whether you're filming 4K travel footage, recording family memories, or capturing content for social media, videos can quickly consume massive amounts of storage.
Traditionally, when it comes to transferring videos from iPhone to flash drive, external hard drive, or USB drive, you need to connect the device to a computer, copy the videos, then paste them to your target drive. But today, Apple provides a dedicated option to make the process easier. If you have a Lightning or USB-C adapter, you can make use of the "Save to Files" feature to move videos directly from your iPhone to a flash drive in minutes. The process works similarly in recent iOS versions.
This article provides a complete guide to transferring videos from an iPhone to a flash drive with USB adapter. We will also show you how to accomplish the tasks when your laptop is available, or you have sufficient iCloud storage for large video files.
Table of Contents
This is the most convenient and modern approach. Apple now allows transferring videos to external storage through the Files app. It works entirely on your iPhone—no computer required.
Here's how to save videos from iPhone to flash drive or external hard drive.
1. Check your iPhone port type
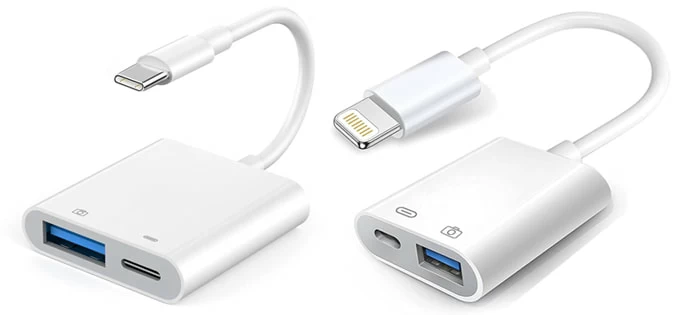
iPhones with USB-C (iPhone 15 series and newer): You can plug a USB-C flash drive directly into the phone, or use a USB-C to USB-A adapter for traditional flash drives.
iPhones with Lightning ports (iPhone 14 and older): You need a Lightning to USB Camera Adapter. It's recommended that you use a USB 3 version, which includes a power passthrough port.
2. Choose a compatible flash drive
Not all flash drives or USB drives are support for direct transfer by Files app. Choose one of the following:
If needed, reformat the drive first using a computer. exFAT format is recommended, which is superior for modern use due to its support for large video files. FAT32 works, but it's limited to 4GB per file.
Avoid
3. Plug the flash drive directly into your iPhone, or connect both devices using the Lightning or USB-C connector.
When prompted, tap "Allow" to give access to the drive. Your flash drive should now appear in the "Files" app under "Locations."
4. Open the "Photos" app on your phone, select the videos you want to transfer.
You can select one or more items at once.
5. Tap "Share" then select "Save to Files."
Note, if your videos have been edited ever before, the unmodified original version will be exported. You should tap "Export Unmodified Original" option instead.
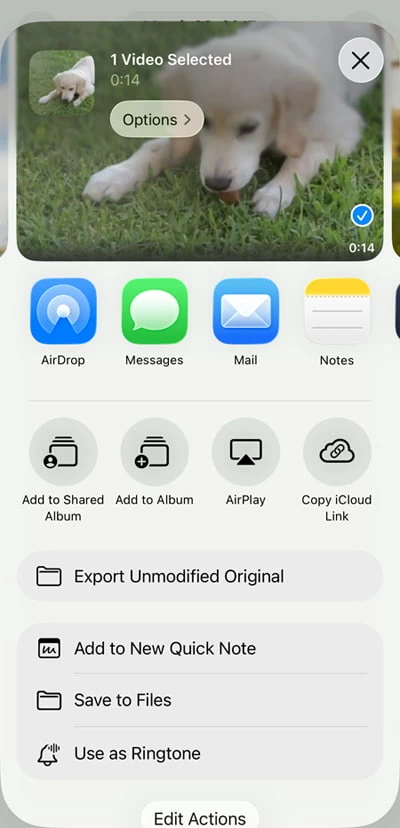
6. In the Files interface, select your flash drive under "Locations."
7. Tap "Save."
The videos on your iPhone will begin transferring to your chosen flash drive (USB drive, or any other external hard drive). Large 4K or ProRes files may take several minutes.
Once done, Safely eject the drive from your iPhone.
Related: How to Get Into a Locked iPhone
For videos that have been already in Files app, follow these steps:
1. Open the Files app.
2. Locate the video files saved in apps like iMovie, CapCut, or Downloads
3. Long-press and choose Move or tap the ellipsis (...) > Move.
4. Select your flash drive and destination folder.
While the USB adapter method is the most convenient and straightforward, you may still prefer or require traditional computer-based workflows. The next option we're going to use is a tool named Appgeeker iPhone Data Transfer, which is essential for large batch transfers or when organizing thousands of videos. It works on both Mac and PC machines, allowing users to transfer videos to and from your iPhone seamlessly.
It also supports bidirectional transfer of photos and music and, if you prefer having full control over your data, the software enables you to back up, export, and manage content including messages, contacts, notes, call history far beyond what iTunes or iCloud can offer.
Download and install the software on your either PC or Mac, then follow these steps to transfer videos from iPhone to external hard drive or flash drive on a computer.
Step 1. Open the program and connect both your iPhone and flash drive to your computer using working USB cables.

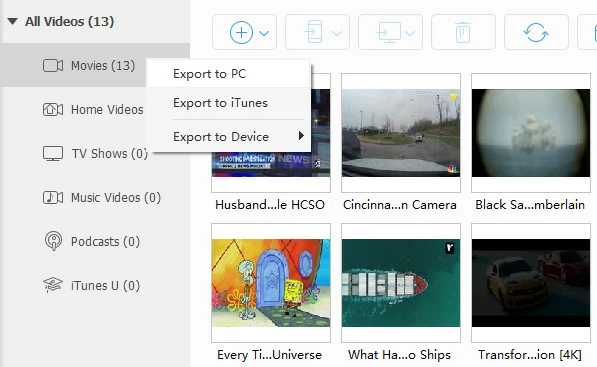
Step 2. Click Videos from the left sidebar. This will display your videos library, sorted by different categories such as Movies, Home Videos, Music Videos, TV Shows, Podcasts, etc.
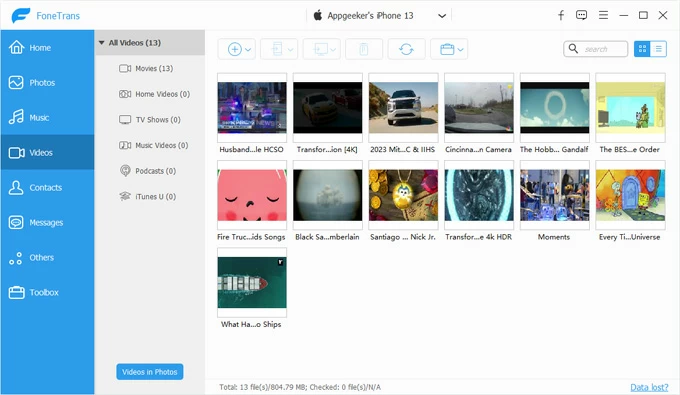
Step 3. Browse the list and check the videos you want to export. You can select single video, multiple videos, or select all for bulk export.
Click the Computer icon at the top menu, then select Export to PC.
When the file browser opens, select your flash drive on your computer as target destination.
Click Open to start the transfer.

Wait for Appgeeker iPhone Data Transfer to finish transferring your iPhone videos to an external hard drive or flash drive.
You're Done! Your iPhone videos are now safely stored on your USB flash drive.
Option 1: You can right-click on a specific album to export all videos there.
Option 2: After selecting your desired video file, you can use the right-click context menu to play, export, or delete it. Or check its meta information. You can even transfer your video to another Apple device, like iPad.

Need to import photos, videos, or songs into your iPhone for playback on the go? Try its drag-n-drop feature and click-to-add button on the top menu.
Related: How to Add Music to iPhone without iTunes
For Windows users, Microsoft integrates with a File Explorer that allows you to directly move iPhone videos to external hard drive, flash drive, or USB sticks. It doesn't include powerful features or flexible options, the workflows make sense, though.
Here's how to transfer photos and videos from iPhone to external hard drive or flash drive.
1. Connect your iPhone to the PC, unlock it and tap Trust This Computer.
2. Open File Explorer.
3. Go to This PC on the left sidebar, select Apple iPhone > Internal Storage > DCIM.
4. When your phone's media library opens, select the videos you want to transfer to external HDD.
5. Copy and paste them to your computer.

6. Plug your USB drive into the PC.
7. Move the videos to the flash drive.
If you're on a Mac machine, regardless of an iMac, Mac Mini, or MacBook, you can use the pre-installed Photos app to transfer your videos to USB drive from iPhone while connecting.
1. Plug your iPhone into the Mac using a cable.
2. On your Mac, open Photos app from the dock.
3. In the left sidebar, select Devices > [Your iPhone]. You'll now see all photos and videos stored in the Photos app on your iPhone.
4. Select what video you wish to offload.
5. Click Import Selected or Import All New Items (for transferring everything).
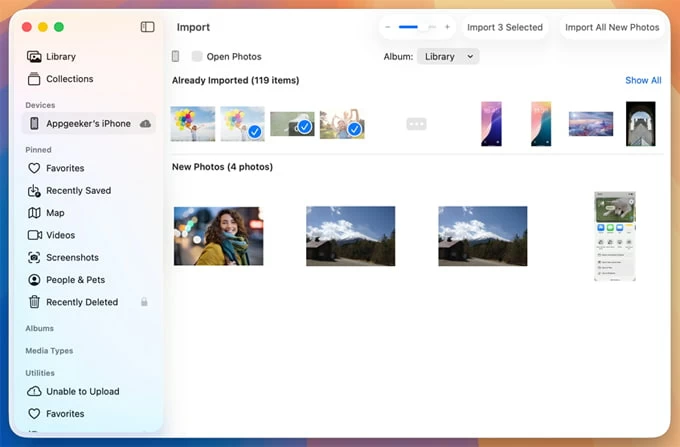
6. The videos will be copied into your Mac's Photos Library.
7. Go to the library, select the videos you just imported and export to a folder on your Mac. This gives you clean MP4/MOV files ready to copy.
8. Insert your USB flash drive into the Mac. It will appear in Finder's sidebar under Locations.
9. Open the folder where you exported the videos before, drag and drop the video files into the USB drive.
Wait for the transfer to finish.
Related: iMessages Missing on iPhone
This is useful when cables aren't available. You can upload your videos on the iPhone to iCloud server, then sync them with your computer. After that, you can export the videos to your flash drive or any other external disk.
To transfer videos from iPhone to external hard drive, plug in your storage drive to your computer, then do the following:
1. Upload videos to iCloud Photos.
Open Settings app on your iPhone, go to [Your Name] > iCloud > Photos. Turn on Sync This iPhone.
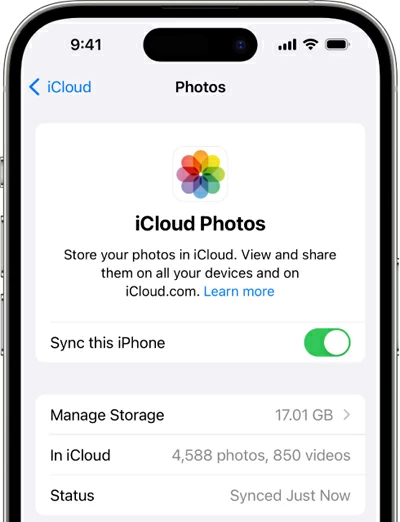
Wait for your videos to upload to iCloud. Upload time depends on Wi‑Fi speed and video size.
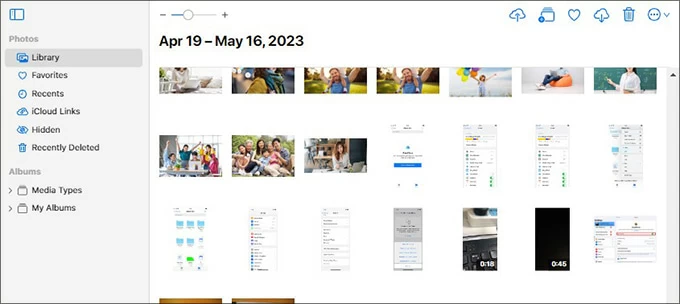
2. Go to iCloud.com in your browser, sign in with your Apple account.
3. Click Photos.
4. In the sidebar, click Videos.
5. Select the videos you want to download.
6. Click the Download icon (down arrow) at the upper right corner.
7. Choose Unmodified Original if prompted.
8. Select your flash drive from the computer, and specify a folder if needed.
9. Wait for it to download videos to your USB drive.
For maximum the success of transferring your iPhone videos to external hard drive or USB drive, there are something to be noted:
First of all, use exFAT for large video files, as FAT32 cannot handle files larger than 4GB.
Secondly, keep your iPhone charged. This can reduce the risk of transfers stopping if the battery gets too low.
If you're using a USB adapter to move videos between your iPhone and USB drive, please use high‑quality adapters. Cheap adapters often fail or disconnect.
Also, you should always avoid editing during transfer.
Related: How to Fix iPad Unavailable
1. Why does my flash drive not show up in the iPhone when connected?
Ensure the drive is formatted as exFAT or FAT32. Try a different adapter or restart the phone.
2. Why does my phone appear "Accessory Requires Too Much Power" alert?
Please plug a charger into the adapter, or use a Lightning to USB 3 Camera Adapter, or use a low-power flash drive instead.
3. Can I transfer videos directly from my iPhone to a flash drive without a computer?
iPhones support storage drive through Files app. You will need to prepare a compatible Lightning to USB, or USB-C to USB connector.
4. Do I need iTunes to transfer videos?
No. You can use a USB adapter to direct transfer of your videos, use Mac's built-in apps including Photos, Finder, or Image Capture/ or Windows's preinstalled apps like File Explorer or Photos. For large videos transfer, you can even use the dedicated tool like Appgeeker iPhone Data Transfer.
5. Why does my USB drive say "not enough space"?
Possible reasons:
Reformat to exFAT for large video files (this erases all data).
6. Can I transfer videos from iCloud directly to a USB drive?
Yes. Download videos from iCloud.com or iCloud for Windows, then drag them into your USB drive.
7. Can I delete videos from my iPhone after transferring them to USB?
Yes, but be careful: If iCloud Photos is enabled, deleting from iPhone deletes from iCloud too. If you want to keep them in iCloud, turn off iCloud Photos before deleting.


