
What to Do When the iPhone Is in Security Lockout

Need to transfer your video files from iPhone to Mac because the device gets the dreaded "Storage Almost Full" notification? Here're ways to get the job done.

You can move your videos from an iPhone to a Mac via wired or wireless methods.
Looking for a simple way to import video files to your Mac from iPhone, just like Android phones to Windows machine? You're not alone.
You've likely captured hours of 4K travel videos or downloaded lots of funny movies with your iPhone over the years. Perhaps you're getting ready to trade it in for the latest model, or you're just want to clean the space on the phone. No problem. You can move your videos from your iPhone to your Mac using several different methods.
This article will detail each method on how to transfer videos from iPhone to Mac, providing you with useful tips and tricks so that you can edit and process the videos transferred from your iPhone on Mac. For those who need a reliable and fast option to handle the transfer task, go with Appgeeker iPhone Data Transfer software, which let you move media files (videos, music, pictures) effortlessly to and from iPhone, no matter the size or number.
Choosing the right method to copy videos from your iPhone to Mac depends on factors like file size, speed, and whether you prefer a wired or wireless solution. Here's a quick breakdown:
A lightweight, often-overlooked utility that comes built in on every Mac. It's designed specifically for moving media files, including video files from iPhone to any folder or hard drive on Mac, rather than saving them in the Photos Library.
Some users reported that transferring videos from iPhone to MacBook Air / Pro / iMac using AirDrop has been unreliable, especially for large videos and when there are a huge number of media files in the waiting list.
With a USB cable to connect your iPhone into Mac, you can rely on Image Capture all the time to export your videos and photos, simple and easy. Here's how to do.
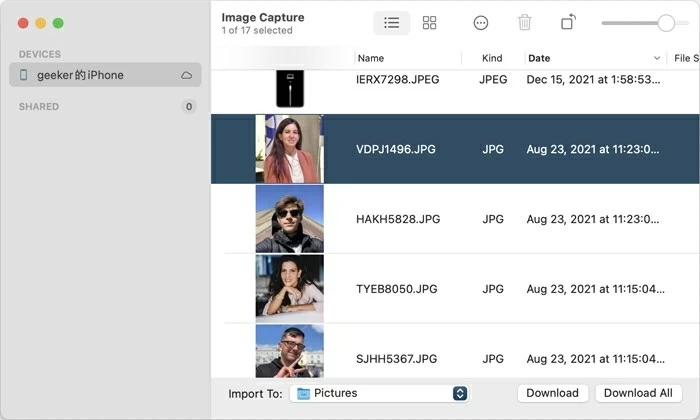
1. Unlock your iPhone and plug it into your Mac computer with a compatible USB cable. When prompted, you may need to trust the Mac to access your phone.
2. Open Image Capture app on your Mac.
3. Select your iPhone name in the "Devices" list on the left sidebar. And you'll view all the videos and photos stored on it.
4. Choose the videos you want to transfer. You can look for files with extensions like .MOV or .MP4 to find your videos quickly in the list. Note, to import media from your Hidden album to a Mac, ensure the album is unlocked on your iPhone.
5. Click Import To in the lower left to select the target folder for saving your videos. You can choose "Desktop," "Movies," or "Other" to pick a different location.
6. Hit Download button in the lower right corner to begin copying videos from iPhone to Mac local hard drive. You can also choose Download All to save all videos onto your Mac in one click.
Tip: You can go to "three dots" in the top-right corner, click "Delete after import" to clean your phone storage after the videos on your iPhone are downloaded to your Mac.
See also: How to sign out of Apple ID without password
Image Capture isn't just faster than AirDrop for importing videos on Mac, it's also significantly more reliable. It doesn't rely on Wi-Fi or Bluetooth, just a simple wired connection between your iPhone and Mac.
Pro:
Cons:
If you forget your iPhone passcode and your iPhone becomes unavailable, you can refer to How to fix iPhone Unavailable to solve this problem.
The Photos app preinstalled in both Mac and iPhone is designed to help Apple users organize and edit their photos and videos. Users can import video from their iPhone to their iMac or MacBook via a solid cable. It bypasses the unpredictability of Wi-Fi and gives you total control over what gets imported.
Steps to move videos from iPhone library to Mac:
1. Connect your iPhone to the Mac using a USB cable. If needed, tap "Trust" and enter passcode to establish a secure connection.
2. Open the Photos app on your Mac. If you checked the "Open Photos for this device" option before, the Photos app will open automatically when devices are successfully connected.
![]()
3. Locate "Devices" on the left sidebar and select your iPhone. Photos app will display an Import window with photos and videos that have not previously been imported from the phone. This might take a moment if you have a massive library.
4. At the top of the window, you'll see an option to Import to. You can select your main Library or create an album to save the imported videos
5. Selective or bulk importing. You can click on the specific video clips and then click Import Selected to transfer what you want, or click Import All New Items to move all videos and photos to your Mac.
Tip: you can sort by file size or capture date to make it easier to find what you're looking for.
The transferred video can be viewed in the Imports section, or go to Albums > My Albums list to locate the folder where you have stored the videos.
Pro:
Cons:
If you don't like the way Image Capture or Photos app does, you may try third-party solution like Appgeeker iPhone Data Transfer, a reputable tool that serves as a powerful alternative to Apple's native tools.
It offers a reliable, high-speed way to get gigabytes of data off your iPhone and onto your Mac without losing video quality. It doesn't force your videos into a proprietary library, allowing you to export videos directly into a specific folder on your Mac, external hard drive, another phone, or memory card.
With iPhone Data Transfer, you can achieve seamless transfer and management of multimedia files between iPhone and Mac, including videos, music, photos, and more.
Key features:
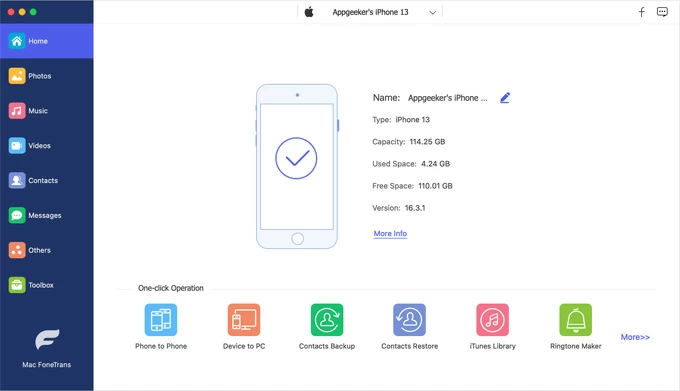
Here's how to save videos from an iPhone to a Mac using Appgeeker iPhone Data Transfer:
1. Launch the software on your desktop and connect your iPhone to your Mac. The home screen will show your iPhone information.
See also: How to transfer music to iPhone without iTunes
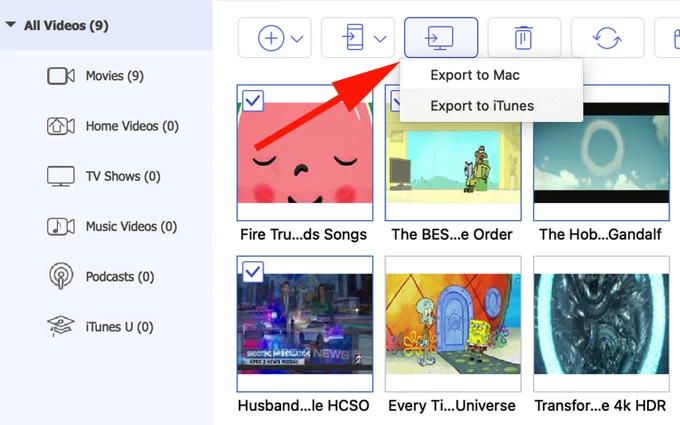
2. Select the "Videos" tab in the left sidebar. You'll see all videos from your iPhone in the right window, categorized as Movies, Music Videos, Home Videos, TV Shows, iTunes U, and Podcasts.
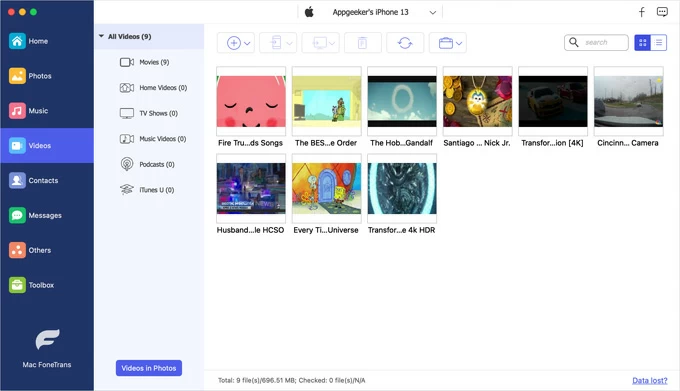
3. Pick the videos to transfer. Select videos by checking the small box next to each video. You can also check the box next to Type at the top to select all videos contained in a specific category to move into your Mac.
Note:
4. Click the "Computer" icon at the top taskbar and select "Export to Mac." At this point, you'll be asked to choose a folder on the Mac to save the videos.
Wait for the process to end and the transferred iPhone videos will be saved in the destination folder of your choice on Mac.
Want to download YouTube videos onto Mac, you can use Screen Recorder to record YouTube videos on your Mac first, and then transfer them through iPhone Data Transfer if you want to move between devices.
Pro:
Cons:
For those who don't have the right USB cable or want to wirelessly transfer a handful of videos to Mac from an iPhone, AirDrop remains king, especially when you want to quickly share small-sized videos between Apple devices. It's wireless, uses a private peer-to-peer network, and doesn't compress your files.
To use AirDrop to send videos from iPhone to Mac, the following conditions must be met:
Once everything is ready, follow the steps below to airdrop your videos from iPhone to Mac:
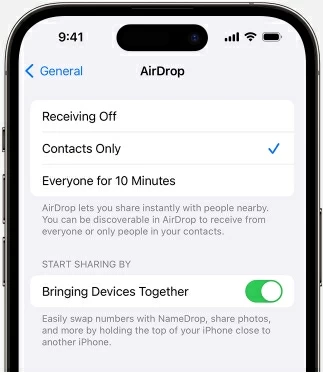
1. Head to Control Center on your iPhone, long tap "AirDrop" icon and set it to "Everyone for 10 Minutes" or "Contacts Only."
2. On your Mac, open Finder, click "Go" in the menu bar, and select "AirDrop." Ensure AirDrop is set to "Everyone" or "Contacts Only."
3. Open the Photos app on your iPhone and select the video you want to send to your Mac.
4. Tap the "Share icon" at the bottom left and select "AirDrop" in the menu that appears.
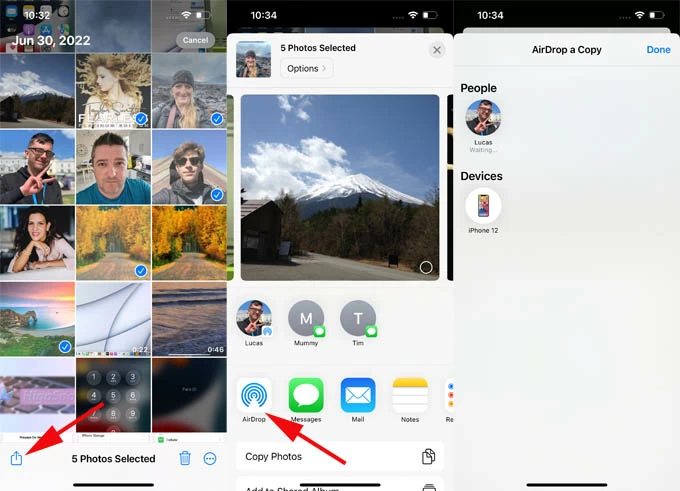
5. Choose your Mac as the receiving device in the AirDrop page.
6. Accept the transfer. On your Mac, click "Accept" in the pop-up prompt. The video will be moved to Mac instantly.
Keep in mind that the connection between your iPhone and Mac might time out if your phone screen goes to sleep. It's important to keep your device screen light up and avoid transferring videos over a few gigabytes.
Pro:
Cons:
See also: How to reset Screen Time passcode
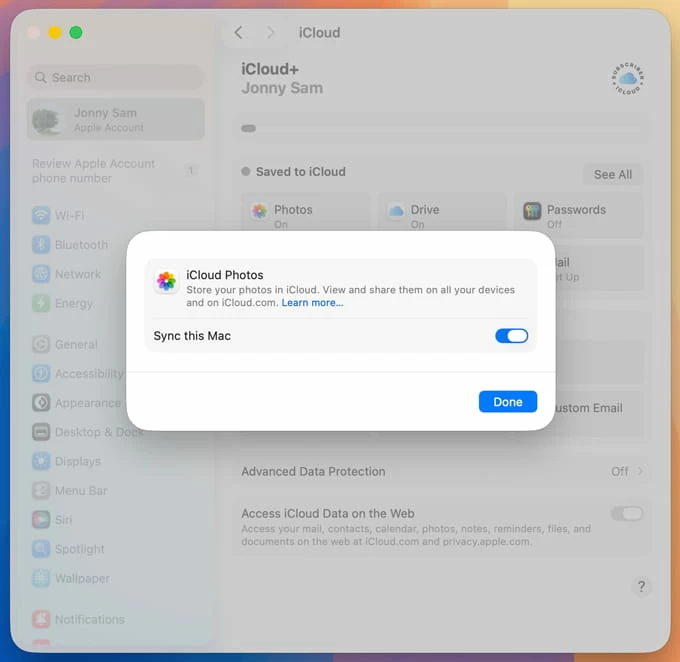
An iPhone with iCloud Photos enabled will automatically upload every photo and video you take to iCloud, making them accessible on your Mac without any manual effort. If you have a high-tier iCloud subscription (200GB or 2TB), iCloud would be a good option to sync your videos between iPhone and Mac.
Here're detailed steps to sync video from an iPhone to a Mac.
Step 1. Enable iCloud Photos on your iPhone.
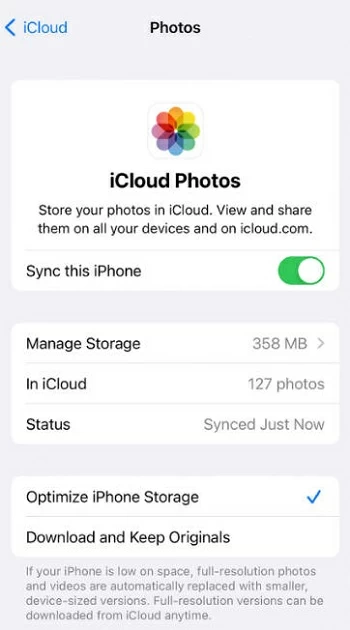
To turn on iCloud Photos on your iPhone, navigate to Settings > [your name] > iCloud > Photos, and switch the "Sync this iPhone" button to ON.
Step 2. Enable iCloud Photos on your Mac.
Note:
You must select the "Download Originals to this Mac" (go to Photos > Settings > iCloud) option to replace those placeholders with full-resolution source files, otherwise, you're just looking at a low-res thumbnail until you hit play.
Step 3. Access videos on Mac.
After syncing, run the Photos app on your Mac, and the videos from your iPhone should appear on your Mac.
Pro:
Cons:
See also: Text messages not showing up on iPhone
If you prefer more control over where your videos are stored, iCloud Drive is a great alternative to iCloud Photos. This method lets you upload specific videos to iCloud and access them on your Mac without syncing your entire Photos library.
1. Upload iPhone videos to iCloud Drive. On your iPhone, navigate to the video you need, and tap the "Share" icon. Select "Save to Files" and choose "iCloud Drive" as the destination.
2. Find transferred videos on Mac. On your Mac, open Finder and click on "iCloud Drive" in the sidebar. Locate the videos you uploaded and download them to your desired folder.
Conclusion
Transferring videos from your iPhone to your Mac doesn't have to be a daunting task. With the variety of methods available—ranging from wired transfers such as Photos app, Image Capture, Appgeeker iPhone Data Transfer to wireless transfers such as AirDrop, iCloud Photos, and iCloud Drive—you can choose the one that best fits your needs.
See also: How to transfer WhatsApp from Samsung to iPhone
Why the videos don't show up in the Photos app when trying to transfer?
To see your videos, ensure your iPhone is unlocked and you have tapped "Trust This Computer" on the device screen. If they still don't appear, the files may be stored in iCloud rather than locally. Finally, verify your Mac is updated, as older systems may not recognize newer High Efficiency (HEVC) video formats.
What is the fastest way to move large video files from iPhone to Mac?
A physical cable connection (USB-C or Lightning) remains the fastest and most reliable method to handle video transfer between your iPhone and Mac. You may connect both devices and then use the Image Capture app or Appgeeker iPhone Data Transfer. Wired transfer provides much higher data throughput than wireless methods like AirDrop or iCloud.
How can I move Live Photos as videos on Mac?
Select the photo on your Mac and go to File > Export > Export Unmodified Original. This will render out a .mov file of the original Live Photo.
Why does AirDrop keep failing for transferring my 4K videos to Mac?
Large movies (5GB+) may result in time out if there is any signal interference. In that case, a cable transfer or a specialized tool like Appgeeker iPhone Data Transfer is more stable.
Why do my 4K videos look blurry or pixelated after transferring?
This often happens when you use iCloud Photos to sync your videos between Mac and iPhone. To fix this, go to Photos > Settings, turn off "Optimize Mac Storage", and then enable "Download Originals to this Mac" to ensure the 4K file is saved without losing quality locally.
How can I ensure a continuous, uninterrupted transfer for large number of videos?
If you're importing a large number of videos from iPhone over to Mac, ensure you have disabled the phone's automatic shutdown feature, and you're suggested downloading your videos in smaller batches. Also, Using a physical USB cable remains the gold standard for transferring large and long video files.


