
How to transfer videos from iPhone to laptop

Need to transfer your iPhone 17 videos to your computer seamlessly? This post covers the native Apple way, the cloud way, and the third-party software way. Here's how.

If you're looking for a reliable way to transfer your videos, photos, and music to and from your iPhone 17, go with the reputable Appgeeker iPhone Data Transfer. It's a comprehensive media management suite that offers a high-speed, two-way transfer system that allows you to selectively export individual videos—including large 4K recordings and movies—directly to any folder on your PC or Mac without quality loss.
There are several ways to save your video files from an iPhone 17 to a computer, regardless of a PC or Mac.
If you're anything like me, you'll likely find your iPhone 17 storage reaching its limit sooner than expected, whether you've been capturing family memories or filming cinematic masterpieces.
The good news is that moving videos from iPhone 17 to a PC or Mac computer is straightforward. Maybe you want to clear space, move your footage into a professional editing suite, or back up the memories locally for playback later. Whatever the reason, there are several ways to get the job done. This guide will walk you through the most efficient methods to transfer videos from your iPhone 17 to your computer.
Before you begin the video transfer process, it's important to ensure there are sufficient storage on your computer's hard drive.
Since the transition to USB-C, copying videos from an iPhone 17 to a computer has become significantly faster. If you have a high-quality data cable, this is the most reliable way to move large videos without relying on Wi-Fi speeds. Both Microsoft and Apple offer the preinstalled Photos app to automatically organize those files by date and handles the connection interface for you.
Videos from iPhone 17 to PC Windows
1. Use a high-quality USB-C cable to connect your iPhone 17 to a USB port on your Windows 11 or 10 PC.
2. If you see a prompt asking "Trust This Computer?", tap Trust and enter your iPhone passcode to authorize the data exchange.
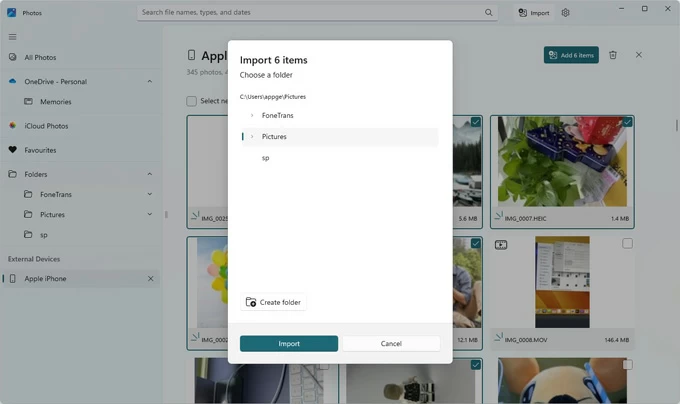
3. Open the Photos app from your Start menu or taskbar.
4. Click the Import icon (the box with a plus sign) located at the top right of the app window.
5. Select From a connected device from the dropdown menu. The app will take a moment to scan your iPhone 17 for media, including videos and photos.
Note: If your PC doesn't recognize the iPhone 17, ensure you have the latest version of the Apple Devices app (which replaced iTunes for file management on newer Windows builds) installed.
6. Click the checkmark on specific video thumbnails you wish to transfer, or click Select All if you want to download your entire library.
7. Click Change Destination if you want to save the videos somewhere other than the default Pictures folder on the computer.
8. Finally, click the Import [Number] items button at the bottom of the screen.
For those who're running a Mac machine, follow the steps below to transfer your iPhone 17 videos.
Videos from iPhone 17 to Mac
1. Plug your phone into your Mac using a USB-C cable.
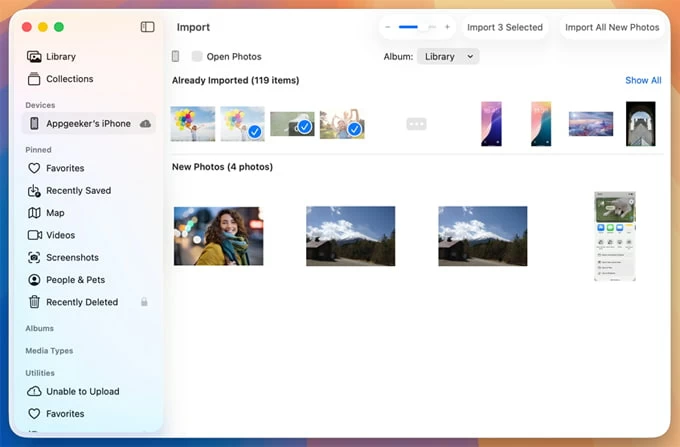
2. The Photos app in Mac computer usually opens automatically. If it doesn't, find it in your Applications folder or via Spotlight (Command + Space).
3. In the left-hand sidebar of the Photos app, look under the Devices section and click on your iPhone.
4. Give the app a moment to load all the media on your device. It will automatically separate Already Imported items from New ones.
5. Click on the videos you want to transfer. You can hold the Command key to select multiple individual clips.
6. At the top of the window, you can use the Import to dropdown menu to select a specific album to save your transferred videos if necessary.
7. Click the Import Selected button at the top right. If you want to export every new video and photo on the iPhone 17, click Import All New Items.
The Photos app on macOS would be the most seamless way to move videos to computer from your iPhone 17 if you want to handle the task in Apple's ecosystem.
Sometimes, the default Photos app on computer can be finicky—especially with Windows compatibility or complex file formats. If you want a one-click solution that manages everything in a clear interface, along with flexible controls, a professional media management tool like Appgeeker iPhone Data Transfer is a popular alternative.
The tool distinguishes itself by offering granular control over iPhone data that standard Apple software typically hides or complicates. It is widely considered the best solution for users who need to transfer pictures, music, and videos between iPhone and computer without syncing the entire library. It transforms the often restrictive iOS ecosystem into a flexible, accessible storage environment that feels as intuitive as using an external hard drive.
Its standout features include the ability to add or drag-drop files to iPhone, a quick transfer system for export files, and the unique ability to browse and export personal information (Contacts, Messages, Notes, etc.). It also offers advanced management tools, such as the ability to edit, move, create, delete media files on the phone, make custom ringtones, manage iCloud drive, and more.
To put videos from iPhone 17 to computer, follow these steps:
Step 1: Connect your iPhone 17
Use a USB cable to attach your phone with the computer. You can install this tool in either PC or Mac. Here we take a Windows 11 as example.
Launch the tool on your computer. You should get the basic info about the device.

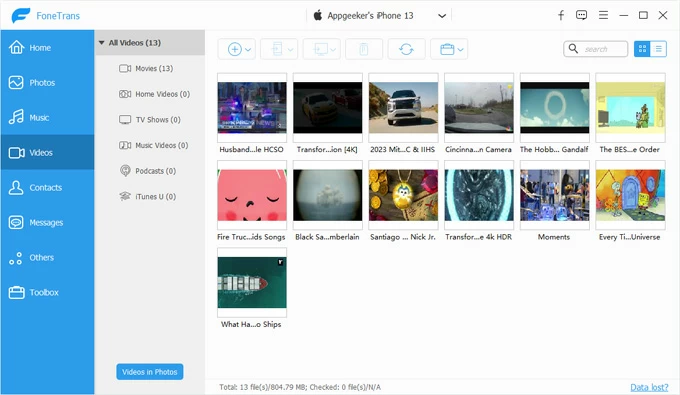
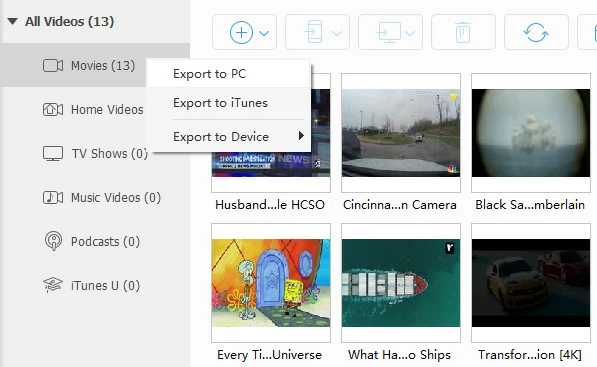
Step 2: Open media library
In the left sidebar of the tool, click Videos. It will take a few seconds to display your video footage. It filters out all items into different categories (Movies, TV Shows, Music Videos, Home Videos, etc.) to help you quickly locate what you want.
Step 3: Save iPhone 17 videos to computer
Browse the thumbnails and select the videos you want to move, then click the Export to PC button located in the top toolbar. (For Mac version, here you should see Export to Mac)
A window will appear, asking where you want the videos saved. Select the folder on your computer and click OK.

Once finished, you can click Open Folder on the interface to immediately view your iPhone 17 videos on your computer's hard drive.
You can also one-click to export a full album of videos. (i.e. right-click on "Movies" album, or right-click on "All Videos" title.
Already an iCloud subscriber? You can make use of its iCloud Photos feature to sync your videos on iPhone with your computer. This is the most seamless method because it happens automatically in the background. Once set up, any video you record on your iPhone 17 will eventually appear on your computer without you having to click a single button.
How to wirelessly transfer videos from an iPhone 17 to a PC or Mac.
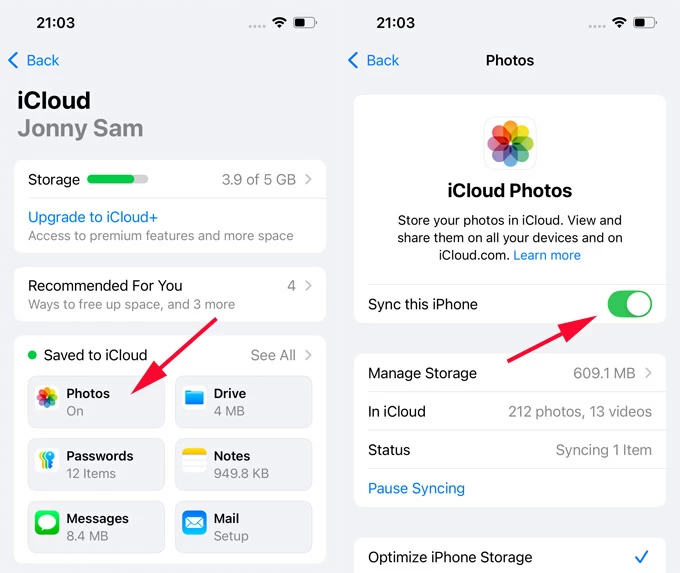
1. On your iPhone 17, go to Settings > Photos, ensure iCloud Photos is toggled ON.
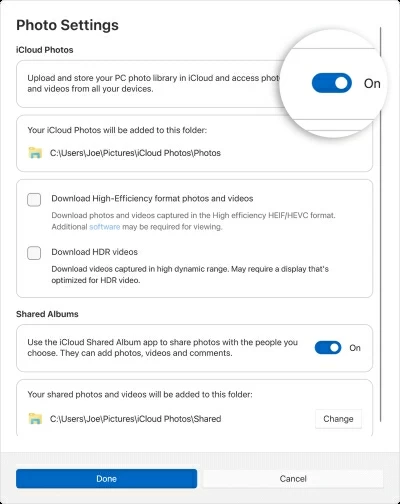
2. On your PC, download iCloud for Windows, sign in with the same account, and check the Photos box there.
3. If you're on a Mac, go to System Settings > [Your Name] > iCloud > Photos and turn it on.
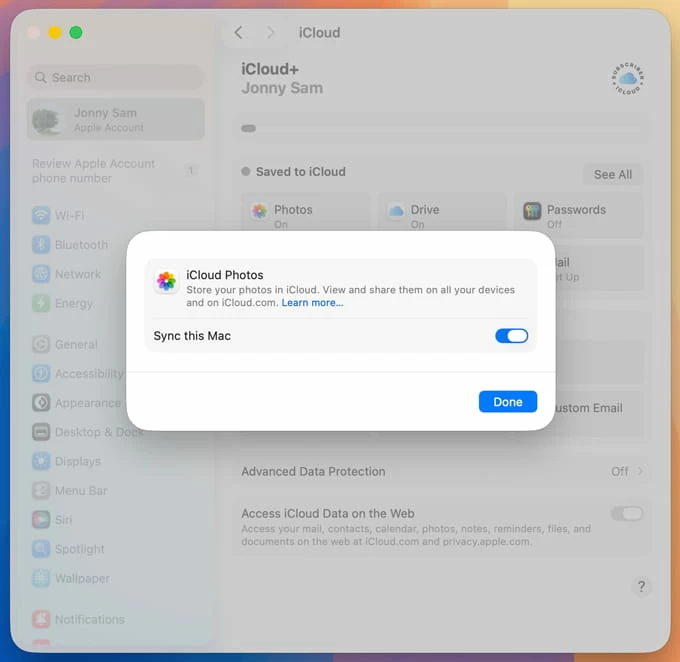
Once synced, your videos will appear in the Photos app on your Mac, or in the iCloud Photos folder in Windows File Explorer on your computer.
If you aren't an iCloud user or the free 5GB plan has been exhausted, you can use third-party cloud apps. This is particularly useful if you need to send a video to someone else's computer.
1. Install, and open a mainstream cloud service (Google Drive, Dropbox, OneDrive) app on your iPhone 17.
2. Tap the + (Plus) icon (or similar button) and select Upload.
3. Choose Photos and Videos.
4. Upload the videos from your iPhone 17 library and wait for it to finish.
5. On your computer, log in to the cloud service's website with the same credentials.
6. Download the videos files to your computer local drive.
If you only have one or two videos on iPhone 17 to move and you are using a computer that's running macOS, AirDrop is often the fastest method. It doesn't require cables and preserves the original quality of the video.
1. Open the Photos app on your iPhone 17.
2. Tap the video you want to send.
3. Tap the Share icon.
4. Tap AirDrop.
5. Select your Mac from the list of available devices.
6. On your Mac, a notification will appear. Click Accept.
For very large 4K ProRes files, AirDrop can occasionally time out if the connection is interrupted. To get a more seamless experience of transfer for large video files, we recommend the wired method mentioned above.
Transferring video footage from your iPhone 17 to a computer doesn't have to be a headache. By choosing the right tool for the job, you can keep your creative workflow moving and your storage space under control.
Which method should you choose? For speed and large files, it's advisable to use a USB-C with the dedicated tool like Appgeeker iPhone Data Transfer, or the default Photos app. For convenience and small clips, AirDrop will do a great wireless transfer. For users that have a paid iCloud+ subscription, enabling iCloud Photos always lets you set it and forget it.
FAQs about transferring videos
Will transferring videos reduce the quality?
No, if you use AirDrop or a USB cable to copy videos to computer from iPhone 17, the file is moved bit-for-bit without compression. For use of iCloud, ensure you have Download and Keep Originals selected to transfer the original video.
How do I transfer 4K ProRes videos?
We strongly recommend the USB-C cable method. A cable that supports USB 3 speeds (up to 10Gbps) always guarantee the fastest results.
Can I transfer iPhone 17 videos directly to an external hard drive?
Yes. You can connect both your iPhone 17 and your hard drive, then use Appgeeker iPhone Data Transfer: select the video(s), click Export to PC (or Mac) at the top menu, pick your external HDD as destination folder when prompted. You can also plug a USB-C SSD directly into the phone and move files via the Files app.


