How to transfer photos from iPhone to PC without iTunes

Phone screens have become our default photo albums, but this guide allows saving your iPhone 14 pictures on a laptop and still keep your daily shooting workflow fast and light.

The fastest and most reliable method to move pictures from iPhone 14 to laptop is via direct USB connection.
If your iPhone 14 storage ever fills up with a huge number of photos and video clips, transferring them to a laptop could solve your space issues—if you choose the right method to handle the massive file sizes. The transfer process migrates original, uncompressed pictures from your iPhone 14 over to a laptop's hard drive, where they can be organized into permanent folders.
It's important to note that the photo transfer method differs from your laptop type. Both Windows and macOS come with Photos apps that let you transfer photos from your iPhone 14 to laptop using a USB cable, while Windows based laptop enables manually dragging and dropping your iPhone 14 photos into a laptop folder. There are also popular cloud services out there available for syncing pictures across devices silently in the background, but the drawback to it is that it forces you into a monthly subscription once you exceed the free storage it offers.
Additionally, the third-party reputable tools like Appgeeker iPhone Data Transfer gives you complete, granular control over your images. You can preview your entire camera roll, browse by albums, and download individual or all photos locally. It also allows you to drag-and-drop massive batches of media files (pictures, videos, songs) directly to your device.
Table of Contents
For those using a Windows laptop, your primary native options rely on a standard USB connection via File Explorer or the built-in Windows Photos app. If you prefer a wireless pipeline, Apple's official iCloud for Windows client bridge provides seamless background syncing.
The most straightforward way to move your photos from an iPhone 14 to a laptop without installing third-party utilities is by utilizing the standard Lightning-to-USB cable that came with your device. Once connected, Windows File Explorer can treat your device as an external storage drive, allowing you to copy images from your iPhone 14 and paste onto laptop hard drive.
Before your Windows laptop can access your phone's storage media, you must tap "Trust" and unlock with passcode when prompted.
1. Open a new File Explorer window on your laptop, or press Win + E to launch it.
2. Look at the left-hand navigation pane and click on This PC.
3. Under the Devices and drives section, double-click on the icon labeled Apple iPhone.
4. Double-click on Internal Storage, followed by the root folder named DCIM.
5. Double-click any of the DCIM subfolders to view your images.
6. To transfer specific photos to laptop, copy the images you want, next, navigate to a dedicated folder on your computer, and paste them.

See also: Factory reset iPhone without passcode
If digging through nested DCIM system folders feels tedious, the Windows Photos app that's natively installed on the laptop provides an automated asset manager that scans, categorizes, and imports your iPhone 14 pictures in a single workflow.
To transfer pictures on iPhone 14 to laptop, follow these steps:
1. Plug your iPhone 14 into your laptop using your USB cable.
2. Open the Windows Start Menu, search for Photos, and launch the application.
3. Once opened, click the Import button at the top-right corner of the interface.
4. Select From a connected device from the drop-down menu. The app will scan your iPhone's storage and compile an index of every photo and video file stored on the device.
5. By default, it checks every new image it detects that hasn't been imported during previous sessions. You can manually choose what photos to be transferred.
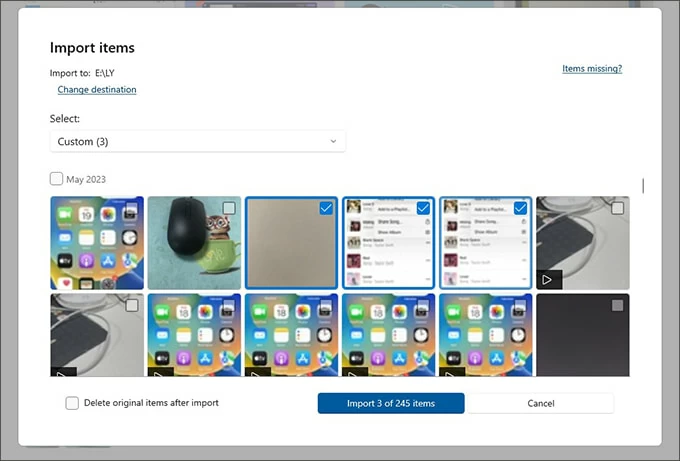
6. Click the final Import [X] of [Y] items button.
You can also toggle the Delete original items after importing option at the bottom left if your primary goal is freeing up physical storage on your device.
The application will begin moving iPhone 14 photos to your laptop automatically.
If you dislike the way File Explorer or Photos app offers, Appgeeker iPhone Data Transfer is a dedicated third-party utility suite designed specifically to transfer your media files (photos, videos, music, ringtones, podcasts, etc.) to and from Apple iPhones/iPads.
As for pictures, the tool automatically categorizes your phone's photo library. You can instantly view, select, and export your data organized neatly by specific albums, Media types (Live Photos, Selfies, Places, Downloads, Screenshots), Date taken.
More importantly, Appgeeker iPhone Data Transfer establishes a highly stable connection while transferring massive batches of media files without timing out. It works well on both Mac and PC.
Here is the exact step-by-step process to get your iPhone 14 photos transferred to laptop smoothly.
1. Launch the tool on your Windows laptop and connect your iPhone 14 using a cable.

2. In the main menu dashboard in the left sidebar, click on the Photos icon. Wait for the tool to read and cache your device's photo library, cataloging them by dates and albums.
Browse through your media. You can click Camera Roll or choose specific albums (like Live Photos, Bursts, Imports, or custom folders) from the center pane.

3. Select individual photos by checking the small boxes next to the items, or choose Check All at the top.
Click the Export to PC button in the top toolbar. A dialog box will appear. Here you can choose where you want to save the images.

Click OK in the dialog box. Appgeeker iPhone Data Transfer will start importing pictures from your iPhone 14 into the folder you specify on the laptop;
By the way, if you want to add photos, videos, or songs to your phone, you can simply drag and drop them onto the device.
See also: Text messages not showing up on iPhone
For users who want their iPhone 14 pictures to appear on their laptop without messing with physical cables, Apple provides an official cloud bridging utility designed explicitly for the Windows environment.
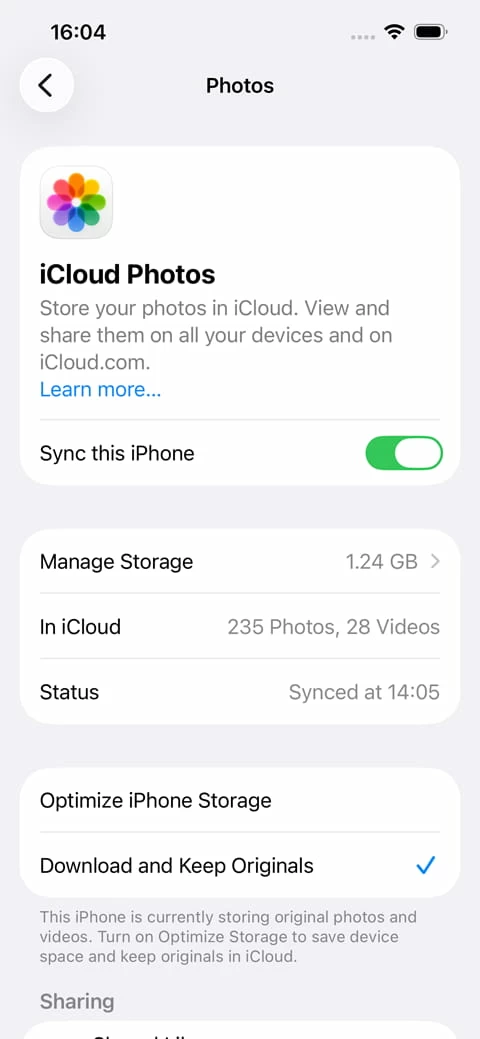
1. Launch the Settings app on your iPhone 14.
2. Tap your Apple ID Profile Name > iCloud > Photos. Turn on the toggle switch labeled Sync this iPhone.
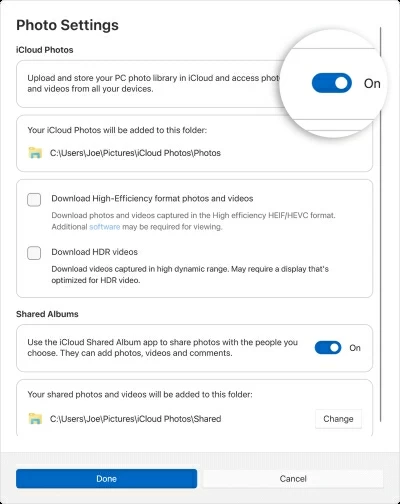
3. On your laptop, download and install iCloud for Windows client from Microsoft Store.
4. Launch it, and sign in with the same Apple Account.
5. In the configuration window, check the box directly next to Photos, then enable iCloud Photos option.
Open File Explorer on the laptop. You will see a new root directory entry labeled iCloud Photos. You can now click it to view your cloud-hosted images from iPhone 14.
If your laptop is an Apple MacBook running macOS, you don't need to fiddle with any drivers or cloud configuration steps. Apple's ecosystem makes everything ready for handling photos transfer across Apple devices when necessary.
If you're trying to transfer a handful of pictures or videos between your iPhone 14 and MacBook, AirDrop is the absolute best tool. It ensures that when you send a Live Photo, it arrives on the other device as a fully functional Live Photo, retaining the video snippet. It also handles massive Apple ProRAW or ProRes video files without breaking a sweat.
1. First, ensure that Bluetooth and Wi-Fi are active on both your iPhone 14 and your MacBook.
2. On your Mac, open a Finder window, select AirDrop from the sidebar, and set your visibility status to Everyone or Contacts Only.
3. On your iPhone 14, open the Photos app and select the pictures you want to share.
4. Tap the Share button in the bottom-left corner.
5. Select AirDrop from the share matrix sheet, then select your MacBook from there.
6. When a notification will pop up on your laptop screen; click Accept.
For transferring massive libraries of several thousand photos, a wired connection using the Image Capture tool is faster and more reliable than wireless options. Here's how to copy photos from an iPhone 14 to a MacBook laptop.
1. Connect your device.
2. Open Image Capture app from Application folder.
3. In Image Capture window, select your iPhone from the Devices list on the left side.
4. Before doing transfer, click Import To drop-down menu at the bottom of the screen. From there choose a target directory to save your images.
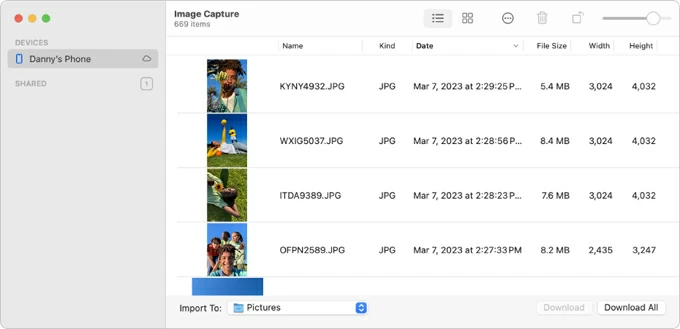
5. Click Download All to pull every photo off the iPhone 14; or, highlight specific pictures and click the individual Download button.
See also: How to transfer music from Mac to iPhone
1. Plug your iPhone 14 into your MacBook using a compatible USB or USB-C cable.
2. Launch the Photos app on your MacBook, and then click your phone name at the left-hand sidebar under the Devices section.
3. At the top of the window, head to Import to dropdown menu, select where you want the iPhone 14 pictures to be stored. You can choose to select an existing album or create a new folder.
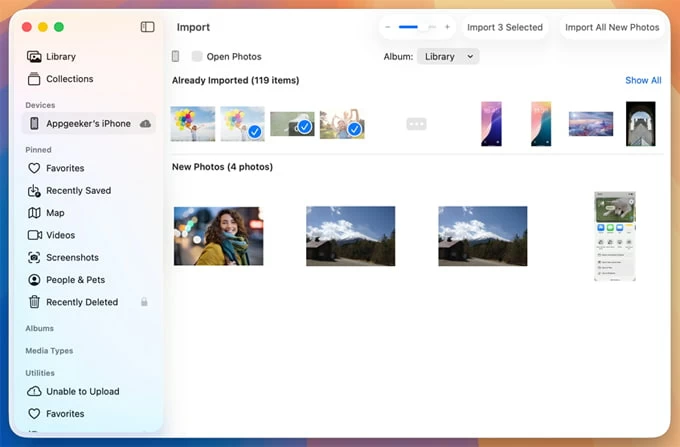
4. Click on individual images you need, then click the Import [X] Selected button at the top right.
5. To transfer everything new, click the Import All New Photos button.
If you can see thumbnails of your photos on your laptop but the high-resolution files refuse to download, copy, or appear sharp, it is almost always caused by Apple's cloud storage optimization.
If you have iCloud Photos turned on alongside the "Optimize iPhone Storage" setting, your iPhone deletes the massive, full-resolution image files from your local phone storage whenever it needs space. It replaces them with lightweight, low-resolution thumbnail previews.
Because the actual high-res files live on Apple's servers and not on your physical phone, a laptop plugging in via a USB cable can't see or pull them. To get around this, you must either download the originals back to your phone first or bypass the cable entirely by logging into iCloud.com on your laptop's browser to download the library directly from the web.