
How to wipe iPad without passcode


From built-in Apple shortcuts and classic desktop imports to advanced third-party managers, here is the complete guide to move your videos on iPhone SE to a computer.

Running out of local storage on your iPhone SE? There are several ways to import your videos to a Mac or Windows PC.
Whether you are using the classic first-generation model, the popular 2020 version, or the modern 5G-enabled third-generation iPhone SE, you have a camera capable of capturing stunning high-definition and 4K video. However, high-quality video files consume vast amounts of local storage. A few minutes of 4K footage can easily swallow gigabytes of data, quickly exhausting the base storage limits of your device.
When your iPhone SE starts flashing storage warnings, or when you simply want to archive your memories safely, the best solution is to move those heavy video assets over to your computer. Depending on whether your computer runs macOS or Windows, and whether you prefer official Apple methods or flexible third-party power tools, you have several reliable paths forward.
This comprehensive guide details every major technique to help you transfer iPhone SE videos to your computer (PC & Mac), including a deep dive into the highly versatile file transfer tool named Appgeeker iPhone Data Transfer.
If your main computer is a Mac, you are working within Apple's integrated software ecosystem. This makes moving large video files remarkably fluid, giving you multiple built-in choices that require absolutely zero third-party software installations.
For transferring individual video clips, short recordings, or a small handful of files to your Mac, AirDrop is by far the most convenient tool. It uses a combination of Bluetooth and point-to-point Wi-Fi to establish a direct, high-speed connection between your iPhone SE and your Mac.
Here's how to send your videos from an iPhone SE to a Mac:
1. On your iPhone SE, open the Photos app and navigate to the Videos album.
2. Tap the video you want to send. If you want to send multiple videos, tap Select in the top right corner and choose the specific videos you wish to transfer.
3. Tap the Share button (the square icon with an upward arrow) in the bottom-left corner to open sharing menu.
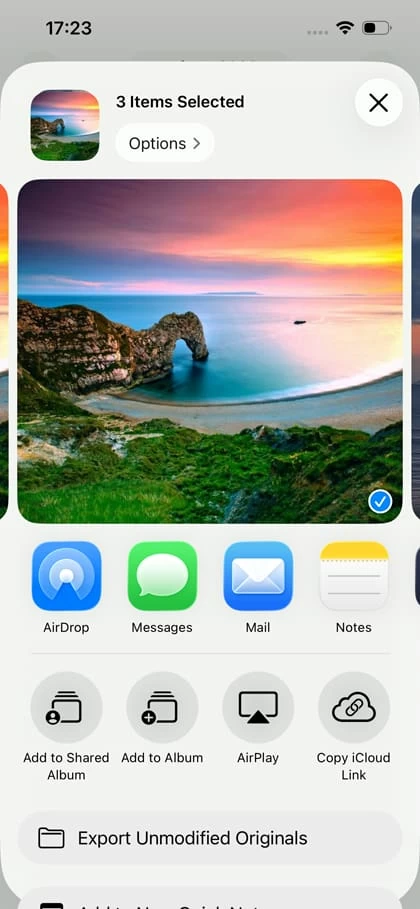
4. Select AirDrop from the share sheet row.
5. Tap your Mac's name or user avatar from the list of nearby devices.
6. A pop-up notification will appear on your Mac screen. Click Accept. The files will automatically download straight to your Mac's Downloads folder.
Later, open Finder and click Downloads in the sidebar to find your video(s).
Note: For moving massive 4K movie files or dozens of videos on iPhone SE to Mac at once, AirDrop can occasionally time out or drain your device battery. Also, make sure your phone screen doesn't lock or go to sleep mid-transfer. For heavy workloads, stick to a wired connection.
Related: How to add music to iPhone without iTunes
If you prefer a structured library system or want to transfer your video files stored on iPhone SE with a physical cable, using he native macOS Photos app ensures stability and zero data compression.
Follow the tips below to get those videos from iPhone SE into your Mac's Photos library.
1. Use a physical Lightning-to-USB cable to connect your iPhone SE directly to your Mac.
2. If prompted with an on-screen alert asking Trust This Computer?, tap Trust and enter your device passcode to unlock it.
3. On your Mac, the native Photos app should automatically open. If it doesn't, open it manually from Dock or Applications folder.
4. Look at the left-hand sidebar of the Photos application window. Under the Devices section, select your iPhone SE.
5. At the top of the main window pane, click the Import To drop-down menu and choose a specific album or folder destination to store your imported videos from iPhone SE.
6. Select the videos you want from the list, then click Import Selected, or simply click Import All New Videos at the top right corner to export all videos and photos you have captured since your last connection.
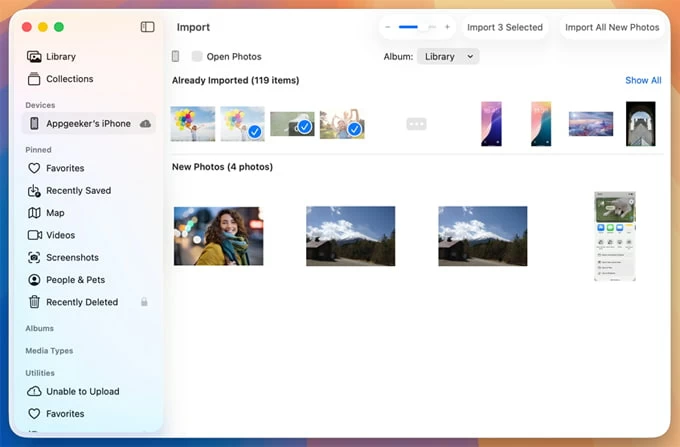
Once the transfer finishes, a prompt may ask if you want to Delete Items from your phone or Keep Items. If you want to free up phone storage, click delete—but only do this if you are sure the videos play fine on your Mac!
Many users do not want their personal iPhone videos automatically sucked into their permanent Mac Photos library. If you want to interact with your iPhone SE like a standard external flash drive and drag videos straight into custom desktop folders, Apple's built-in Image Capture utility is the ultimate secret weapon.
To import videos to Mac from iPhone SE via Image Capture, follow these steps:
1. Connect your iPhone SE to your Mac.
2. Launch Image Capture. You can find it quickly by pressing Cmd + Space to open Spotlight search, typing "Image Capture," and pressing Enter.
3. Select your iPhone SE under the Devices list on the left side of the app.
4. Use the list view to sort your files by Type so all your video formats (such as .MOV or .MP4) are clustered together.
5. At the bottom of the window, next to the text Import To, choose your destination path. You can choose from Desktop, Movies, or an external hard drive.
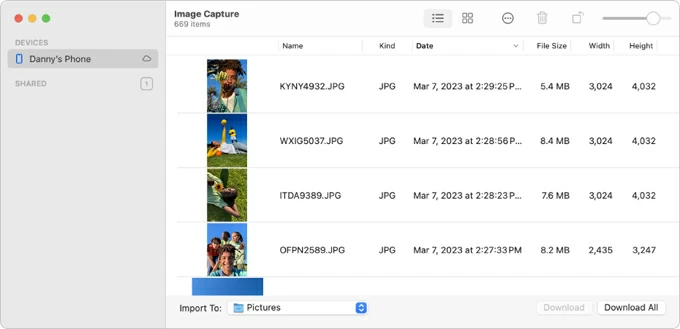
6. Highlight your chosen files and click the Download button, or click Download All.
Image Capture completely bypasses the Photos app ecosystem, meaning your files go exactly where you want them in the Finder without bloating an internal library.
Related: How to get into locked iPhone
Moving files from iOS to Windows can sometimes feel like bridging a digital divide, but Microsoft and Apple have streamlined these connections significantly over recent years.
Windows File Explorer can treat the iPhone SE media library as a digital camera using the Media Transfer Protocol (MTP). This allows you to explore the raw files inside the phone's storage partition without installing any helper software.
To transfer videos from iPhone SE on PC:
1. Plug your iPhone SE into a USB port on your PC using a reliable cable.
2. Unlock the phone screen and tap Allow when the pop-up asks if you want to let it access your photos and videos.
3. Open File Explorer on your Windows computer.
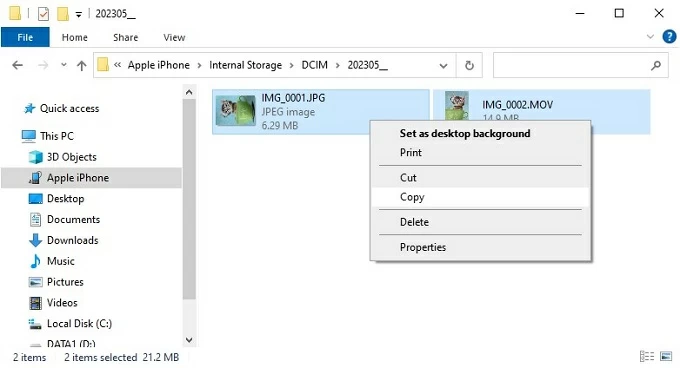
4. Click on This PC in the left navigation sidebar. Under the Devices and drives section, double-click your Apple iPhone.
5. Click through internal storage > DCIM folder.
6. Inside, you will see one or more folders labeled with numbers and letters (e.g., 100APPLE, 101APPLE).
7. Open these folders to find video files you want to save into PC.
8. Select the videos, right-click and choose Copy, then navigate to your local Windows PC destination folder and select Paste.
Related: How to transfer WhatsApp messages from Samsung to iPhone
For a more automated, visually guided ingestion process on a PC, Windows 10 and Windows 11 feature an integrated Photos app that can pull video files off iPhone SE to computer or external media drives effortlessly.
1. Wire your iPhone SE to the PC, unlock the phone, and grant permission to give the PC access to your media.
2. Open the Windows Photos app via your Start Menu.
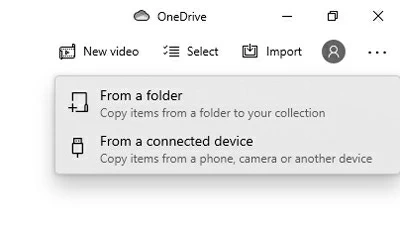
3. Look for the Import button in the top-right corner of the interface and click it. Select From a connected device.
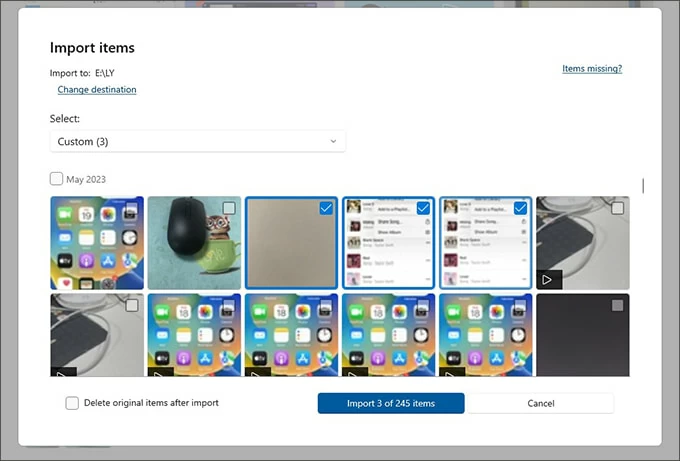
4. The application will scan your phone for media files, including photos and videos. Once the scan finishes, a grid view will populate.
5. You can filter the files or use the app checkboxes to select individual videos.
6. Click Change destination if you want to alter where the files save, then click Import [X] of [Y] items.
If the Photos app throws an error or gets stuck during the transfer process, it is almost always caused by the phone locking itself mid-transfer. To fix this, temporarily change your phone's screen timeout to "Never" while transferring.
While official native methods get the job done, they often come with classic Apple limitations: you can experience unexpected disconnect errors mid-transfer, sync lock-outs, or confusing file format conversions. If you want granular control over your music, photos, and videos transfer for iPhone SE, Appgeeker iPhone Data Transfer is widely considered the gold standard of iOS management tools for both macOS and Windows.
Why choose Appgeeker iPhone Data Transfer over official routes?
Step-by-step guide to putting videos from iPhone SE to computer with Appgeeker iPhone Data Transfer.
1. Download the software tool from the link above. Install it on your Mac or Windows PC, and launch it.
2. Connect your iPhone SE to the desktop utilizing a USB cable. Complete the security handshake by entering your passcode on the phone screen to unlock communication permissions.
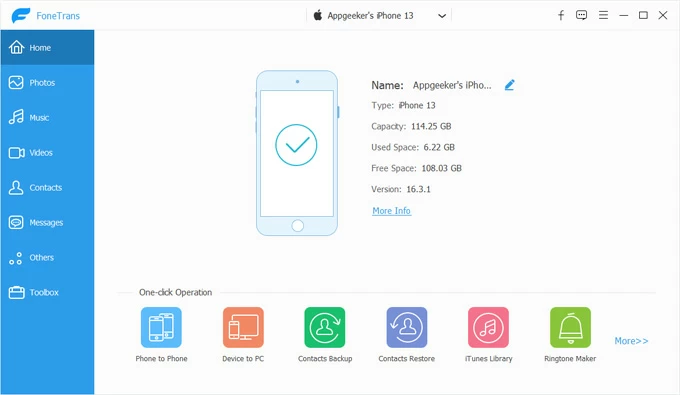
3. From the left sidebar, click the Videos tab. It will take a few seconds to load your phone media library. As you see in the screenshot below, all video clips are sorted by different categories (Movies, Home Videos, TV Shows, Podcasts, etc.) automatically.
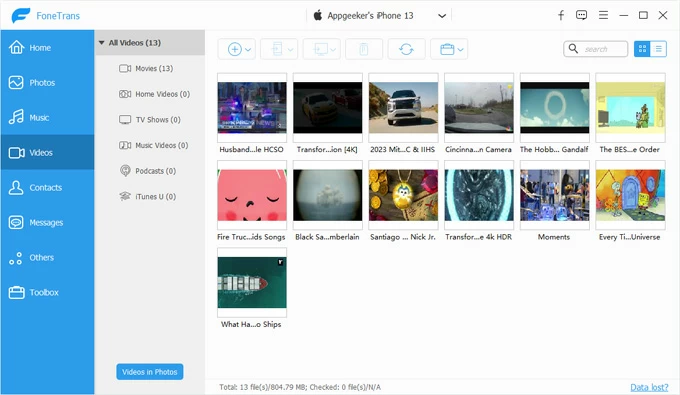
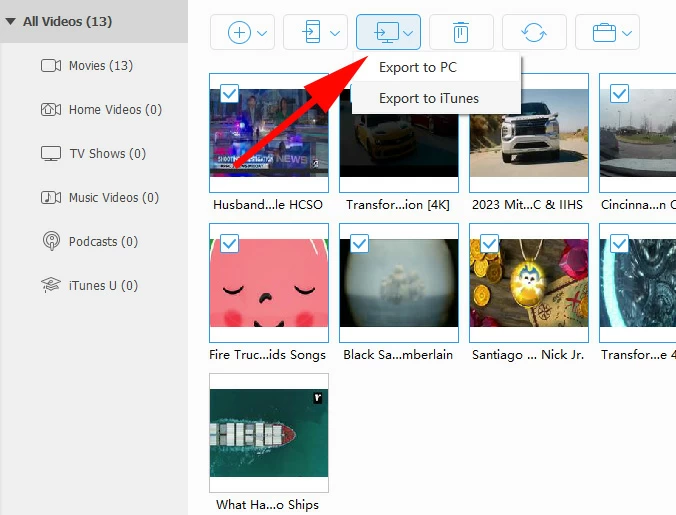
4. Highlight the specific video clips you wish to offload. Click the "Export to PC" button situated along the top toolbar. A Windows folder browser will appear. Select the exact folder on your computer where you want the videos to go, then click "OK" to begin the transfer. A progress bar will show until the export is complete.
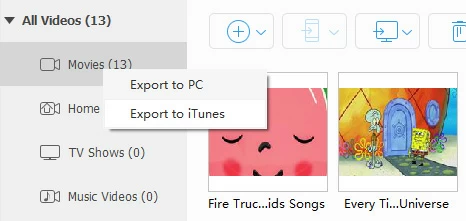
For those who just want to download all videos inside a specific album, right-click on that album in the center pane, from the context menu, click "Export to PC."
Mac users will go with a similar procedure to import videos and photos from iPhone SE into iMac, MacBook, or Mac Mini.
Related: iMessages disappeared on iPhone
If you want a solution that doesn't involve cables or nearby desktop connections, Apple's cloud synchronization serves as an elegant intermediary for syncing photos and videos between iPhone SE and computer.
1. On your iPhone SE, open Settings, tap your name at the top, and go to iCloud > Photos.
2. Toggle on the option for Sync this iPhone. Your videos will automatically upload to the cloud whenever your device is connected to Wi-Fi and power.
3. To view videos on a computer:
On a Mac: Turn on iCloud Photos within system preferences, and the files will automatically materialize in your Mac's native Photos application.
On a Windows PC: Open any modern web browser, navigate to iCloud.com, sign in with your Apple ID, click the Photos icon, select your videos, and click the cloud download icon at the top of the page. Alternatively, download the official iCloud for Windows app from the Microsoft Store to sync everything directly into Windows File Explorer.
Warning: Apple provides only 5GB of free iCloud space. Since high-definition mobile videos can cross that threshold in minutes, you may need a paid iCloud subscription tier to rely on this method safely.