
How to transfer files from laptop to iPhone

Try to move pictures off your iPhone onto computer because there is no enough memory space to use? Here are 7 practical methods to download your iPhone pictures locally.

To download pictures from iPhone to computer:
For most users, the Windows PC (or Mac) remains the primary hub for long-term storage, photo editing, and physical backups. You might find yourself searching for how to transfer photos from iPhone to computer because you want to clear space on your device or simply ensure your family photos are backed up in more than one location.
What is the most reliable, step-by-step method to get photos from iPhone to computer? It depends on how many of images to transfer and whether you want a wired or wireless path. This article will discuss 7 most commonly used ways for photos transfer. Let's dive in.
To successfully transfer iPhone photos to computer, you don't need third-party software. Windows provides two excellent built-in paths. Specifically, you're allowed to use the Photos app for an organized import and File Explorer for a manual, direct move.
The Windows Photos app is the intended official way to transfer pictures from iPhone to computer with USB. It is designed to scan your device, identify new photos you haven't imported yet, and organize them into folders by date.
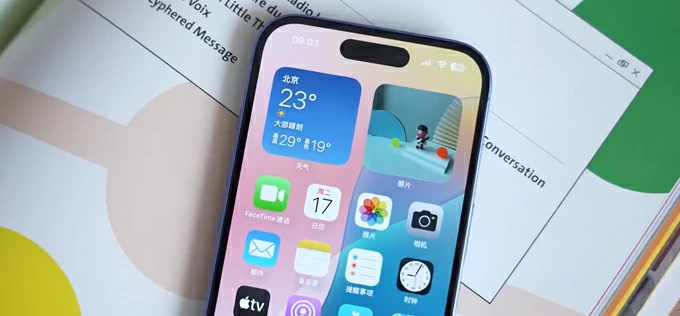
1. Unlock your iPhone with your passcode, Face ID, or Touch ID.
2. Connect the device into your computer with a Lightning or USB-C cable. If you see a prompt on your iPhone asking to "Trust This Computer?", tap Trust and enter your passcode.
3. On your PC, click the Start button and type "Photos" in search box to open the app.
4. Click the Import button at the upper right corner and select From a connected device. Choose your iPhone from the list of connected devices.
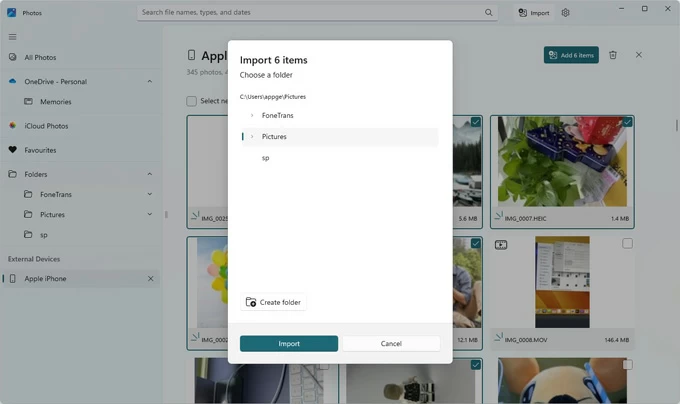
5. The app will scan your iPhone for media. This may take a minute if you have thousands of photos and videos.
6. Once finished, you can choose to Import all items to upload all your photos from iPhone to computer or use Select items to import pictures individually.
7. Click Import. The photos will typically be saved in your computer's Pictures folder by default. You can specify a new location on hard drive to store them.
This is the best way to save pictures from iPhone to computer if you only want specific albums. One good thing about Photos app is it handles the organization for you and ensures that you don't accidentally import duplicates of photos you already moved last time.
See also: How to transfer music from Mac to iPhone
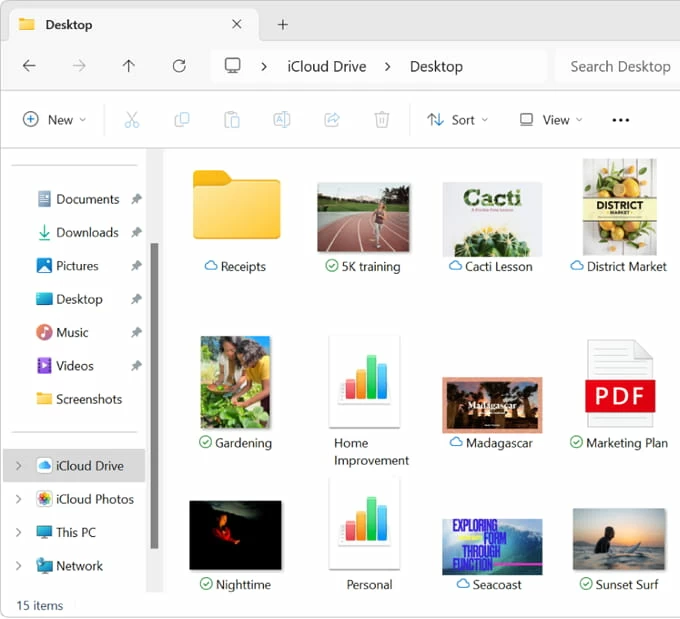
Prefer a more old school approach and want to move pictures from iPhone to computer exactly like you would with a USB flash drive — drag and drop? All you have to do is allow the computer access to your iPhone with File Explorer, find the photos in the folder of your phone's library, then drag and drop them to the directory you want on the computer. No extra apps or steps involved.
Unlike Windows built-in Photos app, File Explorer gives you total control over where the files go and doesn't rely on the Photos app database.
Here're steps on how to download photos from iPhone to computer with USB using File Explorer.
1. Plug in your iPhone to computer with a cable that supports data transfer, File Explorer should open up automatically. If not, launch it manually.
2. On the left-hand sidebar, click This PC. You should see your iPhone listed under Devices and drives.
3. Double-click the iPhone icon, then double-click Internal Storage, followed by the DCIM folder.
4. Inside DCIM, you will see folders labeled "100APPLE," "101APPLE," etc. This is where your device stores your media.

5. You can now browse these folders to get pictures from iPhone to computer. Simply drag the items from the folder and drop them to your desired folder. Alternatively, Select the photos you want, right-click and select Copy, then navigate to your computer's hard drive and select Paste.
File Explorer is perfect for those who want to put pictures from iPhone to computer into specific, custom-named folders.
See also: How to recover passcode on iPhone
Troubleshooting Common Issues
Even when you know how to send photos from iPhone to computer, things can occasionally go sideways. Here are the most frequent fixes for common issues:
The "Device is Unreachable" Error
If you get an error saying the device is unreachable, go to Settings > Photos. Scroll to the bottom and under "Transfer to Mac or PC," change the setting from "Automatic" to "Keep Originals." This prevents the iPhone from trying to convert the files while they are being transferred, which often causes the connection to drop.
Doesn't Recognize the iPhone
If you can't even begin to save pictures from iPhone to computer because the phone won't show up, do the following fixes:
Missing Photos
If you notice some photos aren't showing up when you try to download photos from iPhone, the most common reason is the "Optimize iPhone Storage" setting. Go to Settings > Photos and switch to select "Download and Keep Originals."
If you're looking for a more simple and stable solution to transfer a big batch of photos and videos from an iPhone to a computer, you may use a third-party dedicated file transfer tool, something like Appgeeker iPhone Data Transfer. It's an all-in-one data management suite that offering seamless cross-platform transfers amongst iPhone, iPad, and computer (Mac/ PC).
Compared with the default Windows Photos app or File Explorer, the tool provides a highly visual, interactive window specifically designed to make photo management much more intuitive. It uses a clean, grid-based interface that mirrors the organization on your iPhone.
The process is simple: install it on your Mac or Windows computer, connect the phone, select the pictures from the library, click Export to PC (or Mac), and you're good to go. You can pretty much transfer any file to and from iPhone.
Follow these steps to move photos from iPhone to computer:
Step 1: Connect the iPhone to computer
Launch the tool on your computer and connect your iPhone using a Lightning or USB-C cable.

Step 2: Access the iPhone library
On the main dashboard, click on the Photos icon. This will open a categorized view of your entire library. The tool maintains your existing device organization by sorting photos into categories like Live Photos, Videos, Places, Bursts, Screenshots, and Download.

Step 3: Export photos to computer
To get pictures to computer from iPhone, browse through your albums (e.g., "Burst" or "Screenshot"), select the specific photos, and click the Export to PC button at the top menu.
In the opening dialog box, select where to save photos on the PC.

After that, the progress bar will show the real-time speed of the transfer. Once finished, you can click "View Files" to see your organized library on your hard drive.
You can also right-click context menu to send pictures from iPhone to computer.

Alternatively, if you want to move everything on the library to your computer, use the "Device to PC" shortcut on the bottom of home screen.

See also: Recently Deleted photos album missing on iPhone
Do you use iCloud Photos? If so, you can install iCloud for Windows on your computer, sign in with the same Apple account. Your iPhone photos will appear in the Windows Photos app just like they were taken on the PC. iCloud Drive integrates directly into the Windows File Explorer sidebar, functioning similarly to OneDrive or Dropbox.
Here's how to sync photos from iPhone to computer via iCloud.
1. Download iCloud for Windows directly from the Microsoft Store. This version is optimized for Windows 10/ 11 and receives automatic updates.
2. Sign in with your Apple Account. If you have two-factor authentication, you will receive a code on your iPhone to verify the PC.
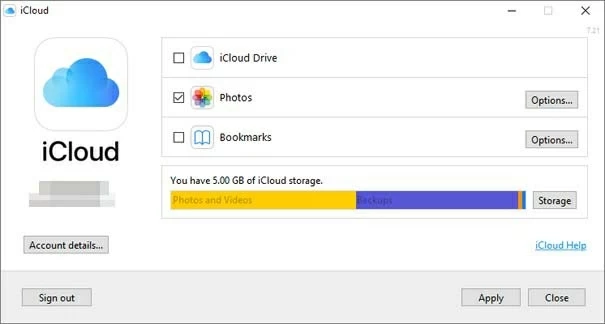
3. In the iCloud app, check the box for Photos. Click Options to ensure iCloud Photos is enabled.
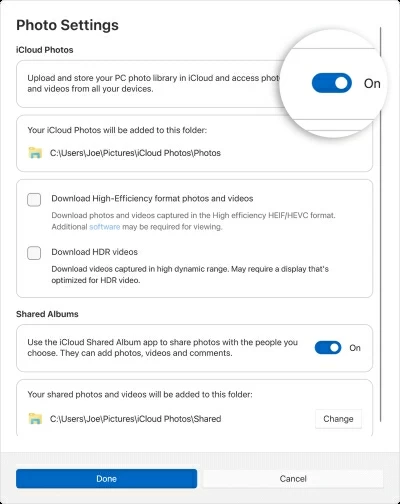
4. Open the Photos app. You will see a prompt regarding iCloud integration. Once accepted, your library will begin to populate.
5. To make your photos accessible to other apps, you can find the iCloud Photos folder in your Windows File Explorer and pin it to Quick Access.
Wish to transfer photos from iPhone to Mac computer? Image Capture is your best friend because it ignores the Library philosophy entirely. It treats your iPhone as a professional digital camera, giving you a list of files and a destination path.
1. Connect your iPhone to your Mac.
2. Open Image Capture.
3. Look under the Devices or Shared list in the sidebar and click on your device.
4. At the bottom of the window, click the Import To dropdown. Select Other... to navigate to your specific folder or external SSD on the machine.
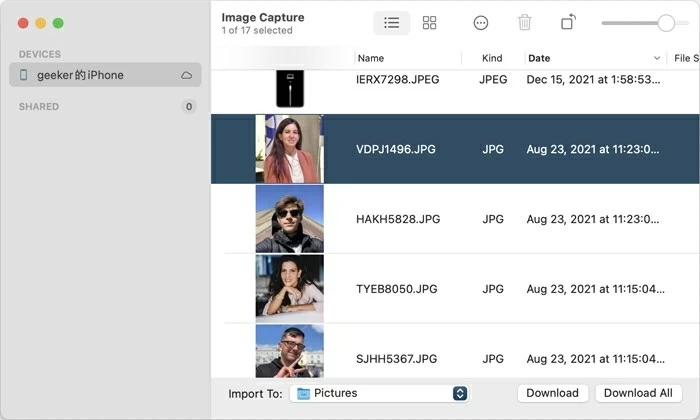
5. Command-click the specific photos you need and then click Download; or simply click Download All in the bottom right corner if you want to import all items.
Wait for it to finish importing pictures from your iPhone to your Mac computer.
Disconnect your phone when everything is okay.
See also: How to turn off Screen Time without passcode
Over the last few years, Apple has redesigned this portal to be a virtual computer within a browser window, providing nearly all the functionality of the native Photos app. Without installing extra software on your computer, you can select images and download them directly to the Downloads folder as a standard file transfer.
To transfer pictures from iPhone to computer, do the following:
1. Open Safari, Chrome, or Edge on your either Mac or Windows computer and navigate to iCloud.com webpage.
2. Sign in with your Apple Account that's registered on iPhone.
3. Click on the Photos icon within the browser dashboard.
4. Browse through your library. You can see your Memories and specific albums just as they appear on your iPhone. The web interface retains your device's album structure, including Favorites, Hidden, and Recently Deleted.
5. Select the photos you need, then click the Download button.
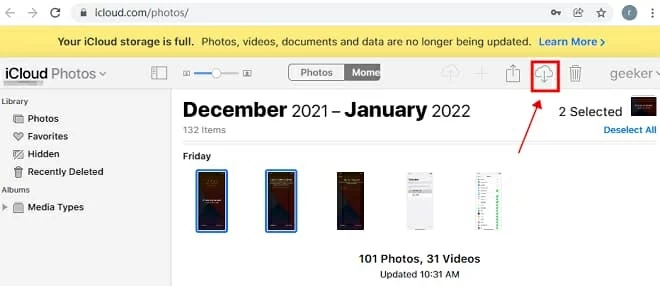
Once the download is complete, simply sign out of the website and close the browser tab. Your data remains on your iPhone and in the cloud, but the computer is left clean.
By choosing a major cloud-base provider like Google, Microsoft, or Dropbox, you can upload your iPhone photos to the provider's cloud server, and download on your computer later. And some of them work on both PC and Mac and even Chromebooks.
Here we take Google Photos as example for uploading photos from iPhone to computer:
Back up iPhone photos to the cloud
Before the computer can access your photos, they must be uploaded from your iPhone to the Google servers.
1. Download the Google Photos app from the App Store and sign in with your Google Account.
2. Tap your profile icon and select Google Photos settings > Backup. Toggle the switch to On.
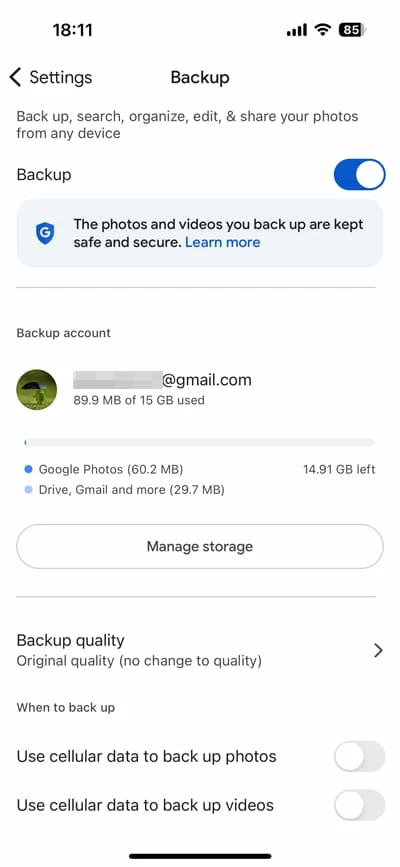
3. Select Original quality if you want to preserve the full resolution on your computer.
4. Wait for sync.
See also: How to transfer WhatsApp to new iPhone
Accessing Google Photos on your computer
If you have a massive library and don't want to manually download pictures from iPhone to your computer through a browser, use the Google Photos for desktop application.
1. Install Google Photos for desktop from the official Google website on your computer.
2. Open the app, log in with the same Google Account used on your iPhone.
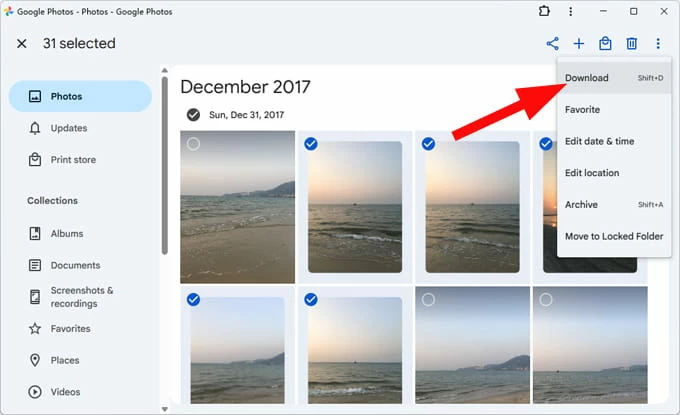
3. Your Google Photos library will appear, and your iPhone photos will be organized by year and month.
4. Select the pictures you want to import into your computer, tap the three dots menu at the upper right corner.
5. Click Download.


