How to Stop Screen Recording on Mac


Platforms
Developed for both Windows & Mac users

This article provides a step-to-step guide on how to capture audio from Discord using OBS and offers an alternative solution for users who find OBS too complex to use.

Discord is a popular communication platform that is widely used for chatting, voice calling, and streaming game playing. While it is an excellent tool for staying connected with others, it doesn't have a built-in feature for recording audio.
To solve this problem, you can choose OBS (Open Broadcaster Software) to record audio from Discord. However, sometimes you may experience difficulty in configuring OBS to work with Discord, or encounter technical difficulties that prevent you from recording audio successfully.
In this article, we'll provide you with a comprehensive guide on how to record Discord audio with OBS. If you find it hard to use OBS to record Discord audio, there's a third-party tool AppGeeker Screen Recorder available that can serve as a great alternative.
Table of Contents
OBS Studio is a free and open-source software compatible with Windows (10, 11), macOS (10.13 and later), and Linux. You can use OBS to capture sound from a wide range of sources, including microphones, external audio devices, and virtual audio sources like Discord.
Let's start on how to add Discord audio to OBS.
1. Install OBS: First, download and launch the application on your computer.
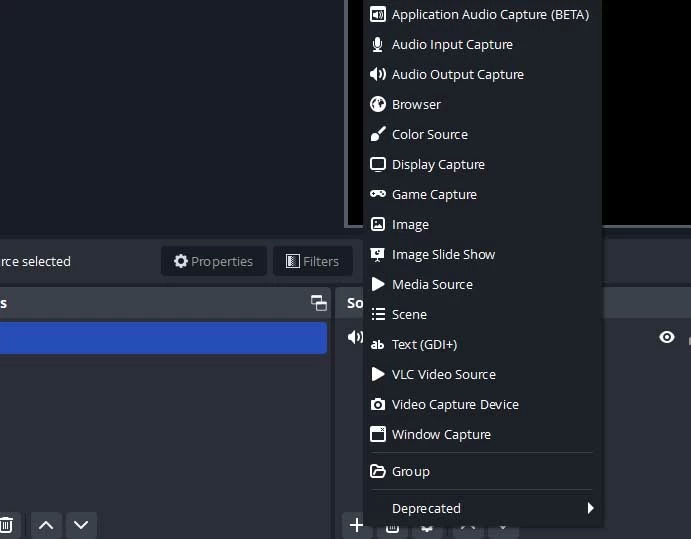
2. Add a source: In OBS, click on the "+" icon under the "Sources" section to add a new source. Choose "Audio Output Capture" and click "Add Source". In the next window, give your source a name and hit "OK."
Read more: How to record a song on your computer
3. Choose your audio device: Under "Device," select your headphones or other audio devices that you want to use to capture Discord audio. Then hit "OK" to continue.
4. Adjust the audio settings: Go to Control > Settings > Output to change your recording quality, path, format, etc.
5. Open Discord: Once you have configured your audio settings, you can now launch Discord and enter a voice channel that you would like to record.
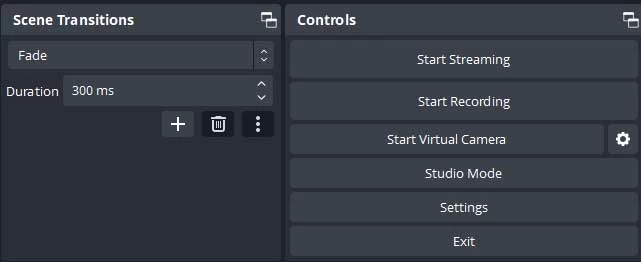
6. Start recording: Go back to OBS and click on the "Start Recording" option to begin recording your Discord audio.
7. Adjust the audio properties: You can use the volume slider located in "Audio Mixer" to adjust the output volume, and click the loudspeaker icon next to it to enable or disable recording your microphone sound.
8. Stop recording: Hit "Stop Recording" located on "Controls" to end capturing your Discord audio with OBS.
9. Preview and record: Head on File > Show Recordings to find your Discord audio recordings.
If you're looking for a simpler solution to record Discord audio without time limitation, a third-party tool AppGeeker Screen Recorder has you covered.
This user-friendly screen and audio recording software lets you easily capture audio from Discord, along with any sound playing on your computer. Besides, it offers advanced features like microphone enhancement and noise cancellation, which means you are able to record high-quality microphone sound when capturing audio in Discord.
This software also has many other customized audio recording functions, such as scheduling the size of the audio file, setting the audio recording keyhots, and changing the audio quality (lossless, highest, high, middle). Once you've finished the Discord audio recording process, you can split it into segments and export it in different audio formats (MP3, M4A, WMA, etc).
1. Open the software and select "Audio Recorder" mode.

2. Next, choose the audio source by toggling on "System Sound" or "Microphone" depending on your needs.
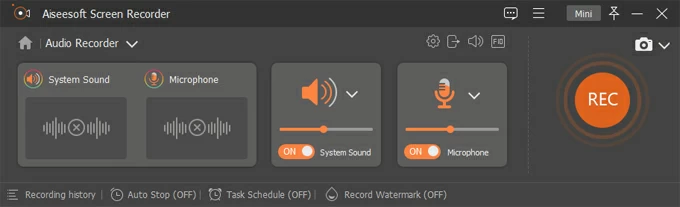
3. Open Discord and join a server or chat you want to capture audio.
4. Return to Screen Recorder, and click the "REC" button to start recording audio in Discord.
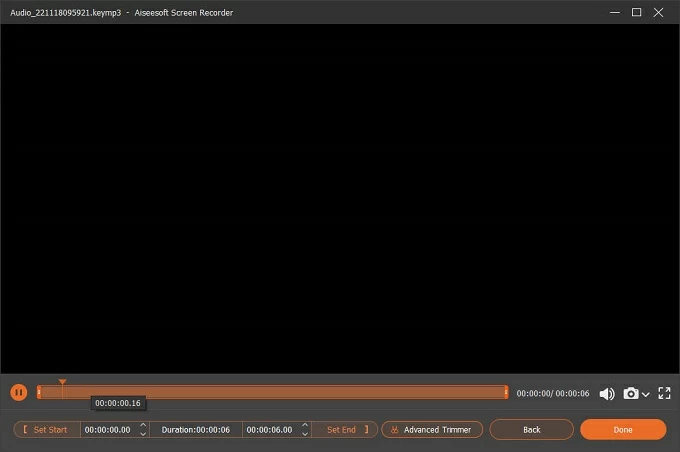
5. Stop recording by hitting the "Stop" icon in the toolbar when you're done.

6. Click on "Done" to save the recording file on your computer.
How to stream OBS to Discord?
1. Download and install OBS Virtualcam Plugin in the folder located in OBS.
2. Open OBS and go to "Tools" in the top menu and select "Virtualcam", then click on "Start."
3. Launch Discord and hit "Settings" by clicking the gear icon.
4. Select "Video" from the left sidebar and choose "OBS Virtual Camera" as the camera input.
5. Start a video call or join a voice channel in Discord, and your OBS scene will be broadcasted as the camera input.
How to make microphone sound louder on Discord?
There're two easy-to-follow ways to make your microphone audio louder in Discord. You can adjust the input sensitivity in Discord settings or increase the microphone volume in your computer's sound settings.
Don't miss: How to capture audio from computer
How to fix OBS cannot pick up Discord audio issue?
You may also want to know: How to stream Netflix on Discord

