
How to Record Windows PC Internal Sound

If you love music but can't download your favorite songs in some apps, then this ultimate guide on how to record songs on your computer will make life much easier for you.

In this guide, you will learn the following:

Both Windows and Mac have built-in sound capture tools that can be used to record songs on your computer.
Have you ever heard a song on a website or app that particularly moved you, and when you tried to download it, you found out that you couldn't save the song, probably due to copyright or other permission issues? Isn't this a particular pity? Fortunately, you can record the song and save it on your computer so that you can enjoy the beautiful music anytime.
In fact, it is not difficult to record a song because your computer has its own audio recording program, which will save you a lot of effort. However, the computer comes with recording tools that offer limited functions, so you can also record songs with the help of professional sound-capturing tools that allow you get benefits from tons of other features, including editing, cutting, mixing, and producing your content.
Read Later: How to record screen with audio on Windows
This article will show you the various ways to make songs record on your computer, whether it is a Windows or Mac system. Let's get started!
Jump to the key parts:
How to record a song on your computer using AppGeeker Screen Recorder
How to record a song on computer with built-in tool
Record songs coming from computer via Audacity
The Audio Recorder from AppGeeker Screen Recorder is one of the best recorders for songs and a great way to improve the quality of your computer's sound capturing without the need for an additional voice recording plug-in. It requires downloading AppGeeker Screen Recorder software, giving users access to the Audio Recorder feature, which includes recording system sounds as well as microphone sounds.
The software will automatically adjust everything to produce top-notch output results. And even a total beginner has no problem getting started due to its user-friendly interface. Moreover, advanced algorithms are used to lessen microphone noise while improving audio quality. Considering these highly beneficial features, you can use the AppGeeker Screen recorder without thinking twice.
Additional Features:
Steps to record songs on your computer with AppGeeker Screen Recorder:
1. After downloading and installing AppGeeker Screen Recorder on your computer, launch it.

2. Open Audio Recorder on your computer and choose the audio source. The screen will show two options: System Sound and Microphone.
If you want to record your favorite songs on your computer, you can choose to enable only System Sound; if you want to record your own voice together, you can enable both options.
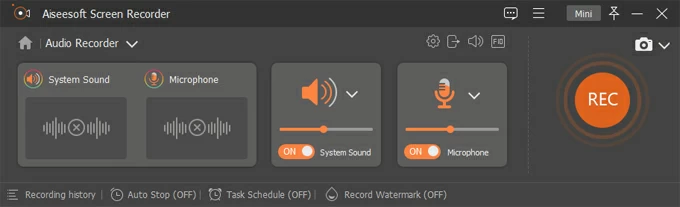
Tip: The Microphone give you the option to remove noise or enhance the microphone to improve the quality of the song.
3. Play the song on the web or apps, then click the REC button on the right side of the software. Then the song you selected will be recorded on your computer.
4. You can pause and resume recording using the pause button on the floating bar. You may also choose the time you want the recording to finish automatically by clicking the clock icon. To halt recording, click the red square.

After the recording, you can use the Advanced Trimmer option to edit the audio. With different options such as Fast Split, Trim, Add Segment and other features, you can customize your recordings as well. Then, click Done to save the soundtrack to your computer.
Virtually all computers, whether Windows or Mac, have built-in programs to help you record your songs. And you can always easily use your computer's default recording tool for free. While perhaps they are the easiest way to record audio on computer, they only provide the most basic functionality for recording a song. Let's explore these programs for more information.
Using the Voice Recorder app, anyone may quickly and easily record songs, music, and other types of content on Windows. And its simple and straightforward user interface is a great start for naive people who don't want to spend on premium software.
Some flattering features of Voice Recorder are as follows:
Steps to record music on computer (Voice Recorder/ Sound Recorder for Windows):
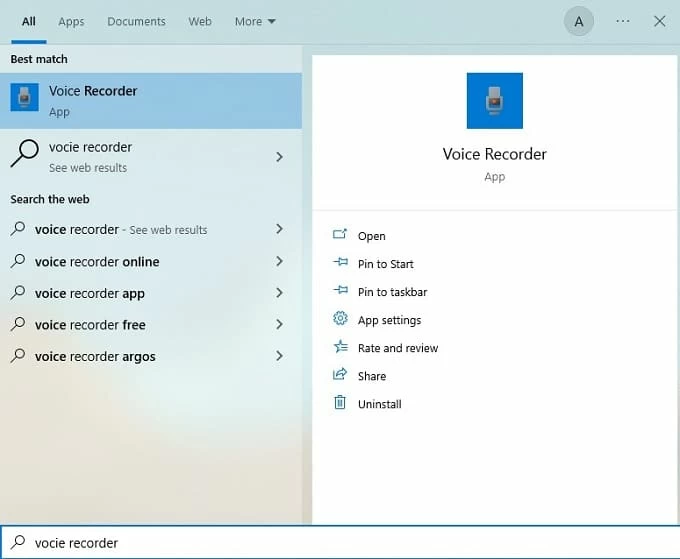
1. Click the Start menu button in the bottom left corner of your screen and type Sound Recorder/Voice Recorder, which will launch a small window.
Tip: If you are using Windows 10, open the Voice Recorder; if you are using Windows 11, open the Sound Recorder.
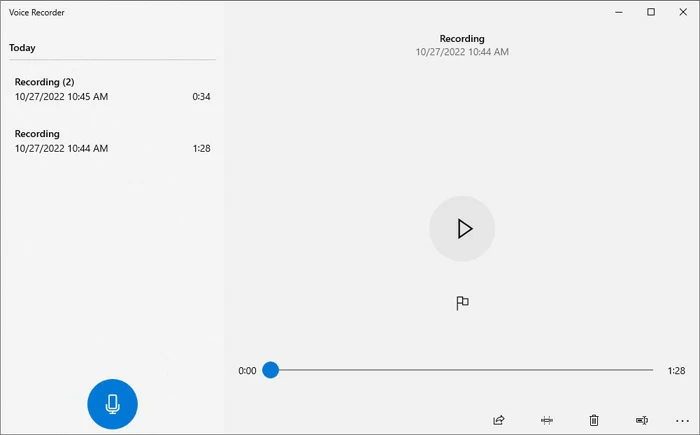
2. To start recording sound or voice, click on microphone icon.
3. Select Stop recording to save it in M4A format when you are done. Then you can click Play to preview your recording result. You can also use different additional functions, such as trimming and renaming, to customize the recordings.
Note:
QuickTime Player is a built-in tool for macOS users that lets them record music on their computers just like Windows users. The file you save with QuickTime will be an MP4 file, which is compatible with a wide range of gadgets, including the iPad, iPhone, iTunes, Windows, and the majority of smartphones.
Steps to record a song on your computer (for Mac):
1. After launching QuickTime, search for the File menu and choose New Audio Recording.
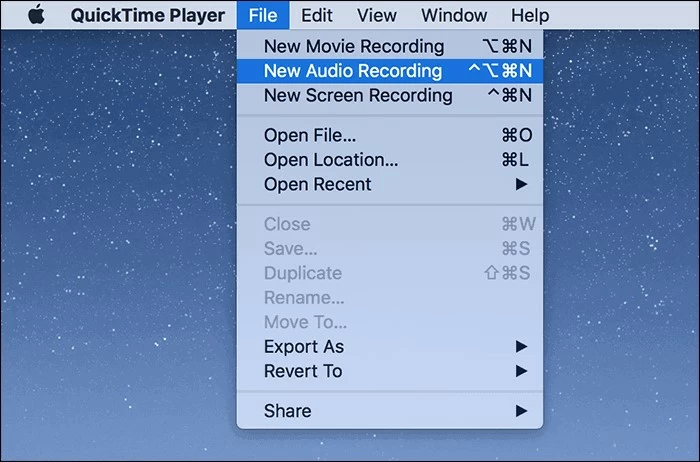
2. Using the arrow next to the red Record button, you can modify the recording's settings before beginning to record.
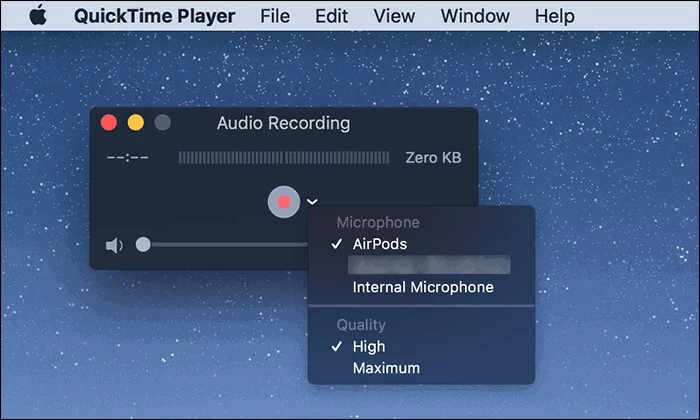
Note:
3. Click the Record button to use your microphone for recording. Press the button once again to end it when you are done. Then click File > Export, after entering the file name in the new window, you can save your recording.

Audacity is an open-source and free application that allows you to record songs from a computer for free while also providing the availability of many advanced features. Because of this, experts who are familiar with mastering Audacity prefer it over other high-end audio recorders and editors. Once you know how to use Audacity, recording songs on your Windows or Mac will become pretty simple.
Considering the differences between the capture process on Mac and Windows, you might need clarification. To prevent inconvenience, we have gathered a separate guide for each operating system.
Read More: You can find more details on how to record audio with Audacity by clicking here.
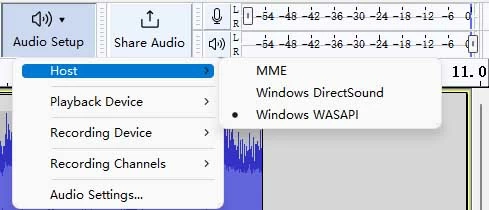
For Windows:
For Mac:
Note:
To record Mac playback straight into Audacity, you'll need to either utilize additional software or set up a loopback connection from the audio output to the independent audio input accessible on the Mac.
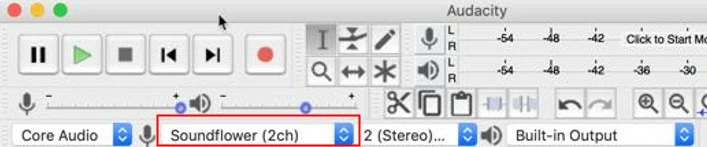
Keep this in mind: Mac needs Soundflower configuration, while Windows needs to select Windows WASAPI in Audacity.
Conclusion
So, this was all about how to record a song on your computer. With this ultimate guide, you can record a song on a computer, whether it has a Mac or Windows programming system. Read the above guide carefully and start recording music quickly and without spending a fortune.
How to record the desktop using VLC Media Player [Full Guide]


