How to Record YouTube Videos

Trying to figure out how to record gameplay on Nintendo Switch? This comprehensive guide offers you a detailed walkthrough of screen recording Switch gameplay.

You have two ways to screen record Nintendo Switch:

Use the built-in gameplay recorder, or a capture card and recording program to capture your gameplay on Switch.
With a portable design and impressive diversity of games, Nintendo Switch is an extraordinary gaming console that gamers worldwide have fallen in love with. If you're one of the players, you may probably want to record Switch to share your victories with your friends, or analyze your gameplay to improve your skills, or create gaming tutorial for your YouTube channel.
Whatever your purposes, recording gameplay on Switch can help you complete different tasks. With the inbuilt Capture Button, or a capture card and a third-party Switch recorder, you can record on Nintendo Switch in a few simple steps.
Keep reading and you'll learn how to screen record on Switch in great detail.
If you also play Minecraft on desktop, you might be interested in recording Minecraft gameplay on your PC.
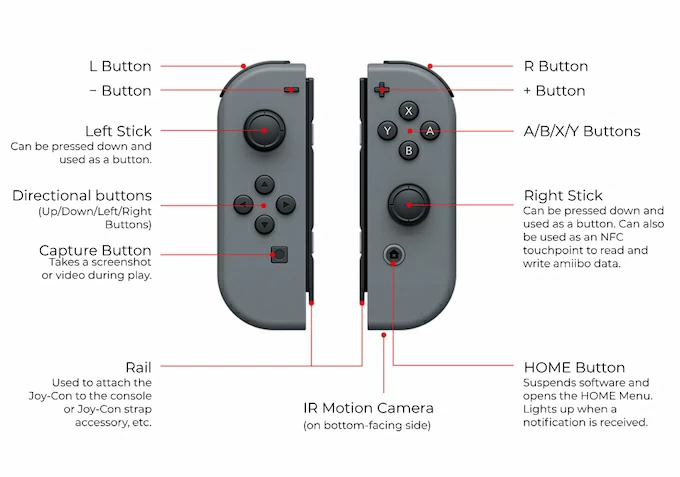
The Switch native Capture Button allows you to record Nintendo Switch gameplay without the need for a capture card. You can even take screenshots or edit your gameplay recordings directly in the gaming console.
But in this way, you can only record up to 30 seconds. Moreover, you may not be able to capture exactly what you want, as only the 30s gameplay before you pressed the button is recorded, not what happens after the button is pressed.
Here you'll find out how to record gameplay on your Switch with the integrated Capture button.
Step 1: Start playing a game on your Nintendo Switch.
Step 2: Long-press the Capture Button on the left Joy-Con to start recording. It's a square button below the Directional Buttons. Then a Saving... message will show up on the upper left corner to remind that your recorded Switch video is being processed.
Step 3: Review the video in the Album. Go to the Home Menu and locate Album, then you will see all your screenshots and videos.
Note:
You cannot record on your Switch for over 30 seconds if you capture the gameplay video through the inbuilt button. In this case, you may wonder how to record gameplay on your Nintendo Switch without time limit. Luckily, it can be done efficiently with a capture card, a third-party Switch capturing app and some other components.
Related: How to stream Switch on Discord
What is a capture card for Nintendo Switch?
A capture card is a device that allows you to stream and record Switch gameplay footage from your console to a computer or other device. And there're various capture cards available for you, which differ from each other for factors like video resolution, frame rate, etc.
However, a capture card is unable to encode the raw data. Essentially acts as an intermediary between your Switch and the computer, it mainly helps capture the gameplay output on Switch and convert it into a digital format that can be saved or shared on a PC.
How to screen record on Nintendo Switch for over 30s? Make sure that you've prepared these things in prior - a Switch console, a Dock, a capture card, a HDMI cable, and a PC or laptop.
After the preparations, you can start recording on your Switch with the following guide then.
Before recording your Switch on PC, you need to first link the Switch console to your computer via a capture card and HDMI cable. Take the steps below to make the connection.
After the connection between your Switch and your computer, you can begin to record the Switch gameplay on PC through a professional but easy-to-use Switch recording program, the AppGeeker Screen Recorder. With this tool, all the Switch games can be recorded in high quality for over 30s or even longer without any limitations. You can even capture your webcam in the gameplay recording, too.
In this incredible recorder, you're able to decide the video quality, with options of Lossless, Highest, High, Middle, and so on. And output formats like MP4, MOV, WMV, etc. are also available for you to choose from. What's more, you can schedule recording for your Switch gameplay, and trim the recordings directly in the software for making short clips of your excellent gameplay moments. Additionally, it also supports recording just a portion or the entire screen of the game.
Step 1. Launch the AppGeeker Screen Recorder
Open the AppGeeker Screen Recorder on your desktop and select Game Recorder.

Step 2. Select the Switch gameplay window
In the first box from the left, click on the down-arrow, and choose the Switch window.
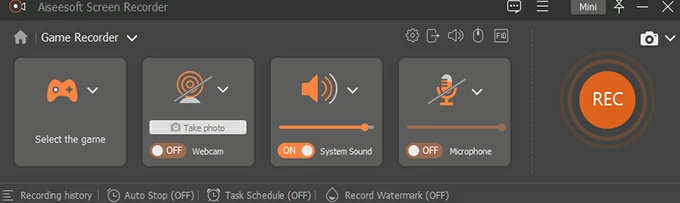
Step 3. Customize the settings for recording Switch gameplay
Based on your needs, turn on or off Webcam, System Sound and Microphone.
Step 4. Start the Switch gameplay recording
Click the REC button on the right to start the recording. When you want to finish it, hit the Stop button on the floating bar.
![]()
Step 5. Export and share the recording
In the preview window, click Done on the bottom-right corner to output the gameplay recording. You can also share it with others by sending the video file.
Tip: This excellent capturing tool can also be used to record screen with audio on PC or Mac, covering the content of YouTube videos, meetings, streaming services like Netflix, and so on.
1. How to record Nintendo Switch gameplay without a capture card?
You can take the following steps to complete the task:
2. Can you screen record Switch gameplay more than 30s?
You can record a Switch video longer than 30 seconds if you use a capture card and a desktop recording software like the AppGeeker Screen Recorder.
3. How can I take a screenshot from a Nintendo Switch recording?
Step 1. In the Home Menu, select Album and then All Screenshots and Videos.
Step 2. Choose a video.
Step 3. Press Y on the right Joy-Con to pause the video when you want to screenshot.
Step 4. Click Editing and Posting > Save as Screenshot to screenshot from the recording.