
How to Record Computer Audio Using QuickTime Player

If you're curious about how to capture audio while recording your screen, this article will give you answers by using Windows 10 built-in tools and third-party software.


Whether you want to record screen with system's sound or microphone, the Xbox Game Bar has you covered.
There are many reasons why people might want to record their screens. Maybe they're trying to show a friend how to do something on their computer or capture footage for a video tutorial. And recording the Windows 10 screen with audio allows gamers or YouTubers to show off their skills while providing commentary that viewers may find entertaining or informative.
Read More: How to screen record with audio on Mac
Whatever the reason, there are several ways to record your screen. Windows 10 has built-in screen recording capabilities to record screen with audio. Although it's free and easy to use, the resulting recordings may not be as high-quality as those captured with a dedicated software solution. Plus, it also has other drawbacks, making it a less-than-ideal option.
In this article, we will discuss different ways in which you can use to record your screen on a Windows 10 PC along with audio.
Table of Contents
The Xbox Game Bar is a built-in feature in Microsoft that lets you record and share your gaming moments. It provides an overlay of features, such as screen recording and audio capture, that you can access while playing your favorite games. It can also be used to record any other non-game programs for Windows 10 and Windows 11.
To use the Xbox Game Bar to record your screen on your Windows 10 PC with audio, you will first need to enable the Xbox Game Bar. The complete steps to screen recording with Game Bar are as follows:
1. Open Settings from the Start Menu and select Gaming > Xbox Game Bar.
2. Select the "Enable Xbox Game Bar for things like recording game clips" option and make sure it is enabled.
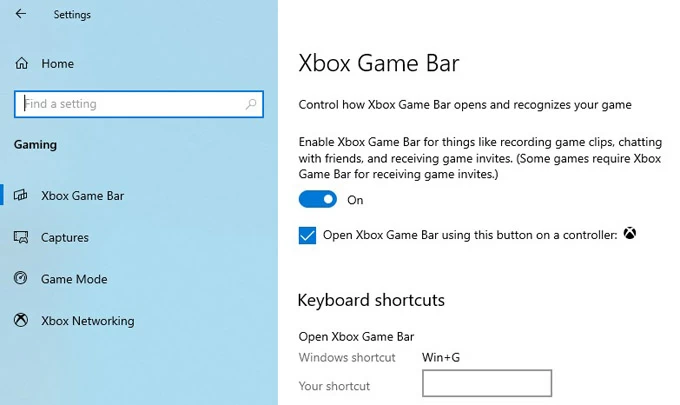
Head to Settings > Gaming > Xbox Game Bar, and then enable Xbox Game Bar feature.
3. Press the Windows logo key + G to open the widget and click on the gear icon at the end of the widget taskbar.

Press the Windows logo key + G to open the Xbox Game Bar widget.
4. To activate all audio recording features, locate the AUDIO TO RECORD section of Capturing and select the "All" option so that you can capture both game sounds and internal system sounds as well as microphone sounds.
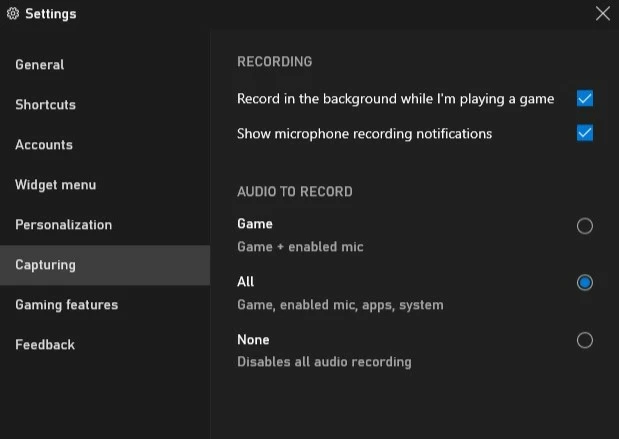
Select the All option in the AUDIO TO RECORD section of Capturing.
1. Open the game or program you want to record.
2. Press the Windows logo key + Alt + R to start recording the screen, the sound of the game or the running window will also be captured.
Press the Windows logo key + Alt + R to start automatic screen recording.
3. To record the microphone, press the Windows logo key + Alt + M to open the microphone option; or click the microphone icon in the recording display bar to allow Game Bar to capture the sound from the microphone.

Press the Windows logo key + Alt + M to record the microphone sound.
4. Press the Windows logo key + G to redisplay the Game Bar's taskbar. Then click the Audio option, and in the pop-up window, you can adjust the volume level during recording in both the MIX and VOICE sections, including internal and external audio sources.
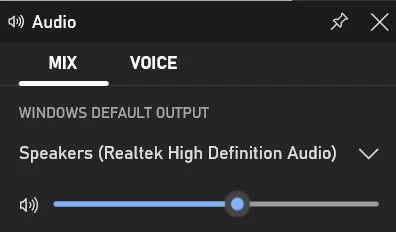
You can adjust the volume level in the Audio section.
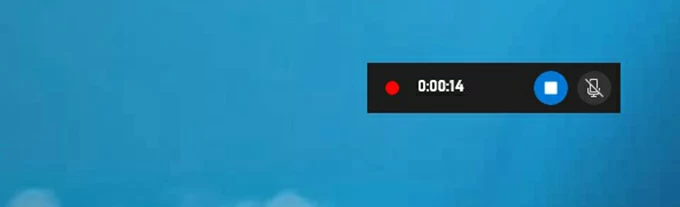
5. Once you have finished recording your screen and audio, press the Windows logo key + Alt + R or the "Stop recording" button on the recording progress bar on the screen to save it.
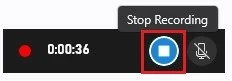
Click the blue icon to end the recording.
6. Click "Game clip recorded" to preview your recorded video. And your recording will be saved in the Captures folder located in the Videos Folder.

Click the "Game clip recorded" window to preview the recording effect.
The Xbox Game Bar has a few configurations you can customize to fit your preferences. You can change the resolution, frames per second, and audio quality of your recordings. You can also choose to turn on the microphone by default when recording the screen or choose to record only the game's audio.
Besides, you can choose what notifications show up in the game bar and configure other settings like how many recent clips to show in the game bar, whether or not you want to see a preview of your recordings, and more.
These configuration options can be accessed by navigating to Settings > Gaming > Captures.
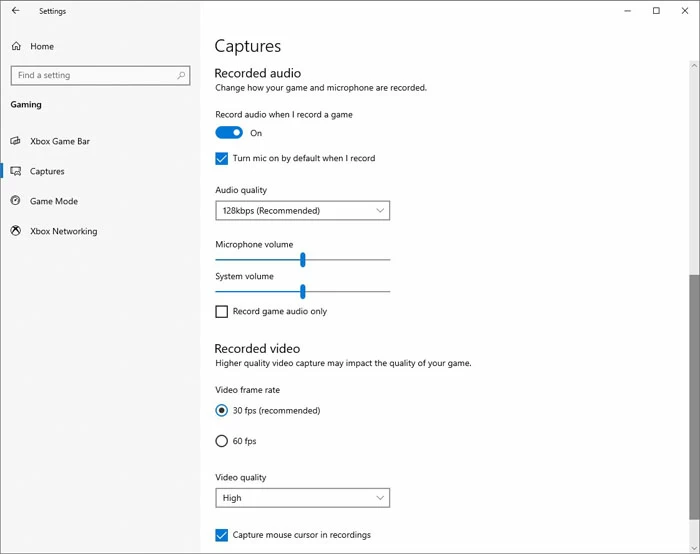
Change the recording parameters in the Recorded audio and Recorded video sections of Captures.
Advantages:
Disadvantages:
AppGeeker Screen Recorder is the all-in-one solution for your screen and audio recording needs. And AppGeeker Screen Recorder is a great tool if you want easy access and control of what's happening on your Windows 10.
You can record videos from the desktop or webcam or both, as well as audio using either system resources or mic voice recordings—making this an excellent app for gamers who need quality capture footage; YouTubers looking forward to more engaging content; streamers wanting to ensure perfect lip-sync while broadcasting lives online via Twitch TV; teachers who need quality YouTube videos for their online classes and students who want to record their lectures, presentations or even class notes, etc.
Here are the steps to make a screen record with audio on a Windows 10 computer using the AppGeeker Screen Recorder:
1. First, download and install the application. Then, click "Video Recorder" from the main menu.

2. After that, you need to select the recording area and the audio source. You can choose "Full" (record the entire screen) or "Custom" (select a custom area).

3. Next, you need to adjust the audio source. You can capture the audio you want by toggling the Microphone and System Sound switches and dragging the dots to adjust the volume level. Also you can click the down arrow next to the microphone to select "Microphone noise cancellation" option to improve the quality of the audio.
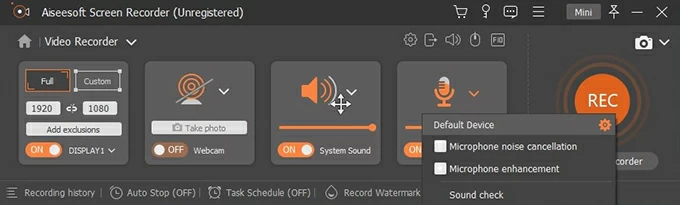
Tip: You can then play with other basic settings by clicking the gear icon in the top right corner to ensure everything is set accordingly.
4. Open what you want to record on your computer and click the "REC" button on the right to start recording your screen.
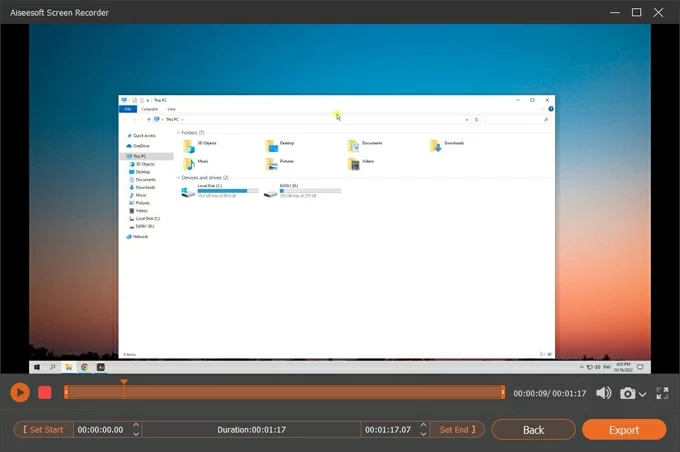
5. Press the "Stop" button (the red square) to end the recording. Once finished, you can preview, trim, or edit the file before exporting it to your computer.
OBS, or Open Broadcaster Software, is an incredibly powerful and versatile streaming tool and video recorder on Windows 10. It's perfect for screen recordings with audio, live streaming, video tutorials, and much more. OBS provides a wide variety of features for video production, such as custom resolution selection, video quality settings, audio mixer control, and scene transitions. And it is available for free for Windows, macOS and Linux operating systems.
1. Download and install OBS on your Windows 10 PC. Run the program once it is installed.
2. After launching the program, you will notice two boxes at the bottom left: Scenes and Sources. The application comes with a default Scene. If it does not, click "+" under Scenes.
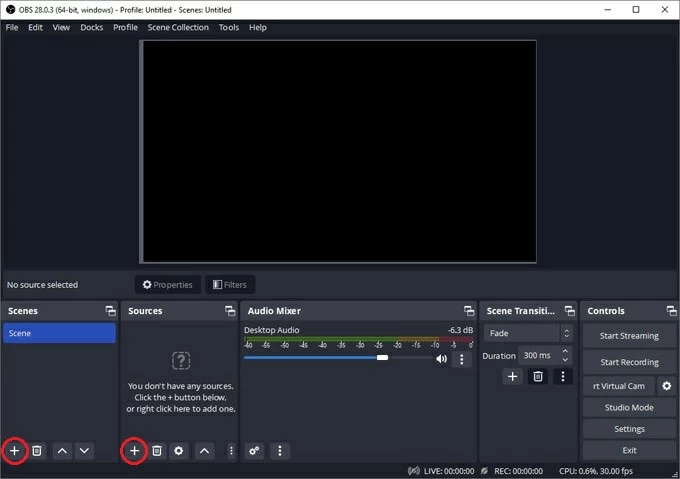
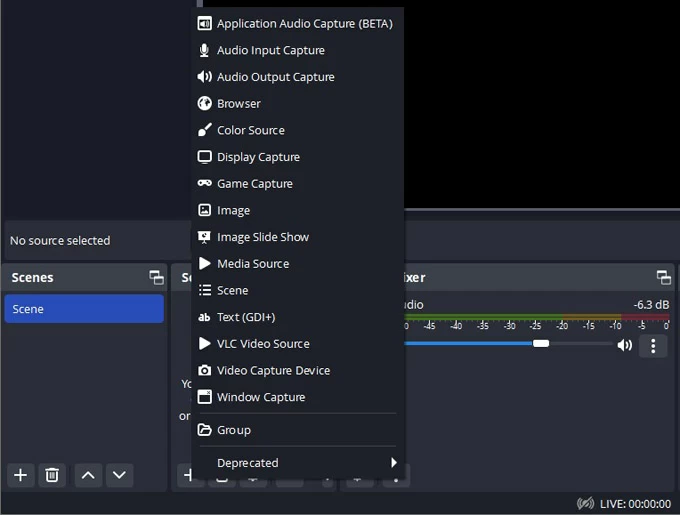
3. Now, you need to navigate to the Sources tab right next to the Scenes tab. Click "+" under Sources, and select "Display Capture." A popup will appear. Provide a new name for the file and click "OK" when done.
Tip: You can also change or customize other configurations to get the effect you want by going to Controls > Settings.
4. To capture audio from your system, click on "+" in the Sources panel and select "Audio Output Capture." Then create a name for your audio source and click OK. Next, select the audio device you want to record from in the Properties window.
5. If you want to record sound from a microphone, click the "+" icon in the Sources panel again and select "Audio Input Capture." Then select the recording device after naming it.
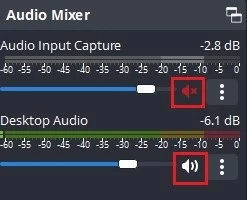
6. Once you have selected all the audio sources, you can adjust the audio level in the Audio Mixer panel or mute any sound you don't want.
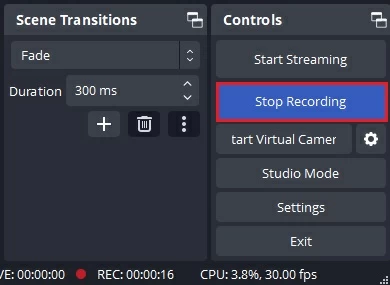
7. When everything is ready, click "Start Recording" on the rightmost Controls panel to begin recording your screen.
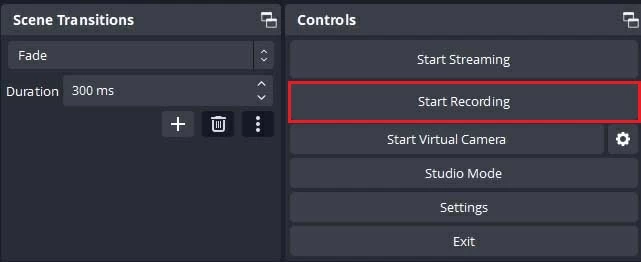
8. Once you finish recording, click "Stop Recording", and the video will be saved in the destination folder that you specified earlier.
Pros of OBS:
Cons of OBS:
VLC is well known as a free and open-source media player, capable of seamless compatibility with all files and screens. But in fact, VLC can also be used as a recording software, providing screen recording and audio recording services.
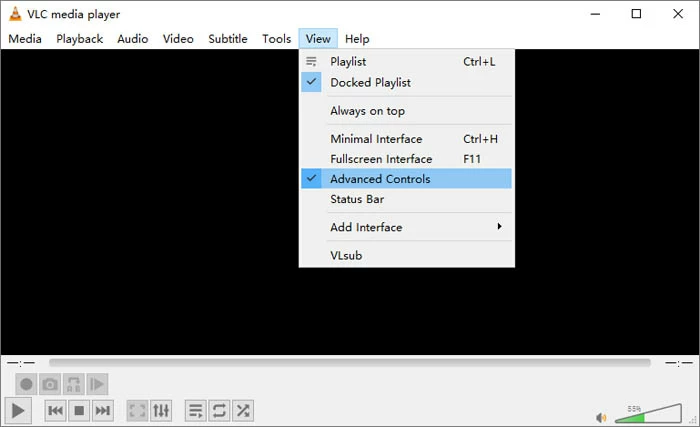
1. Launch VLC on your PC and then select "Advanced Controls" from the options given in the View tab.
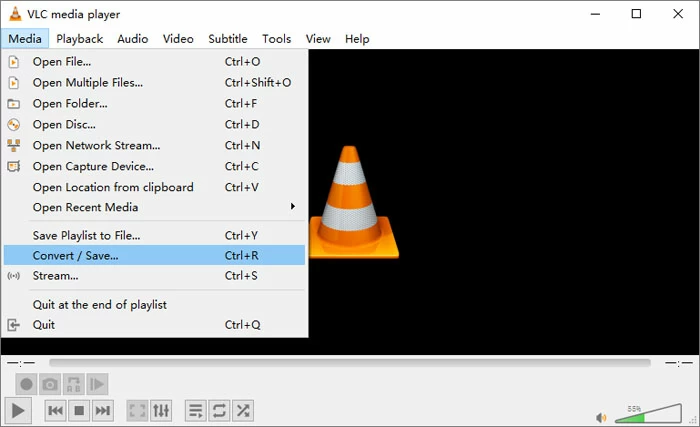
2. Head to the Media tab and then select the "Open Capture Device" option.
3. Click on the "Capture Device" option in the pop-up Open Media window and select "Desktop" as the capture mode.
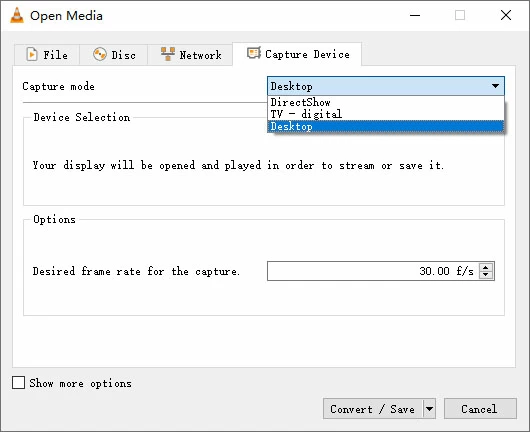
4. Set your desired frame rate in "Desired frame rate for capture."
5. To add audio, check "Show more options." And you will need to finish recording the video in advance.
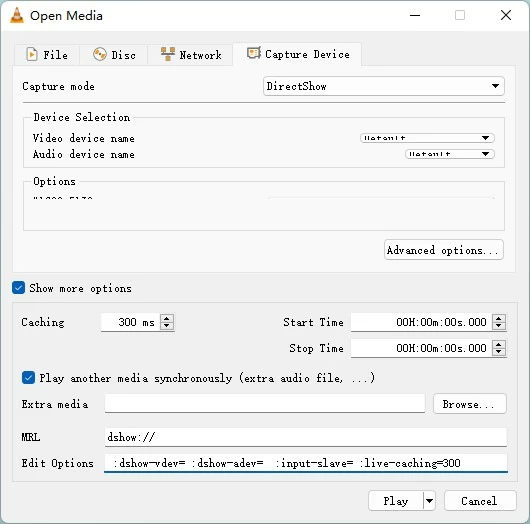
6. Select Play another media synchronously > Browse to add the prepared audio, then click the arrow next to Play in the bottom right corner of the window and select "Convert."
7. In the Convert window, click on the "Create a New Profile" icon at the end of the Profile option.
8. After selecting "Encapsulation," enter the file name and select "MP4/MOV" option. Click "Video Codec" and check "Video," then select "H-264" in the Codec of Encoding Parameters.
9. When you return to the Convert window automatically, click "Browse" to select the folder where you want to save the recording.
10. After selecting the target folder, click the "Start" icon to start recording. When the content you need to record is finished, click the "Stop" button to save the recording to your destination folder.
1. Does Windows 10 has a screen recorder with audio?
Yes. Windows 10 has its own screen recorder, the Xbox Game Bar. You can use it to record your games or other activities on your PC. However, Game Bar has limitations in that it cannot record desktop and File Explorer activities, and it can only record the activity of one running software or program at a time.
2. How do I record screen and audio on Windows 10 for free?
Using the built-in Xbox Game Bar, you can make a screen record with audio on Windows 10 for free. Launch the Game Bar using the Windows logo Key + G and then press the Start Recording button to record your screen with audio. Or you can press Windows logo key + Alt + R to start recording automatically and use Windows logo key + Alt + M to capture the microphone sound.
3. How do I record my screen with mic and audio on Windows?
If you want to record the screen with microphone and internal audio on Windows 10 or Windows 11, you can press Windows logo key + G to use the built-in Windows screen recording tool and turn on the Microphone option at the Capture widget to capture sound from the microphone.
You can also use the AppGeeker Screen Recorder to record screen and audio at the same time. Select the Video Recorder option and then enable System sound and Microphone as the audio source for the screen video.
4. How can I record my PC screen with audio?
You can use Xbox Game Bar coming with Win 10/11 PC, or third-party software such as AppGeeker Screen Record or OBS to record your PC's screen with audio. If you have Xbox Game Bar enabled, press Windows + Alt + R key to record the screen and computer sound directly, and turn on the microphone in the recording display bar.
Or you can launch third-party software, such as AppGeeker Screen Recorder or OBS or VLC, to capture system sound and microphone voice while recording your PC screen. The detailed tutorial steps have been described above.


