How to Record Screen with Audio on Mac

Trying to figure out the best way to screenshot on your Dell? This full guide will show you how to take a screenshot on any dell desktop and laptop with ease.


It is easier than you think to screenshot on a Dell laptop or desktop.
As the world becomes more digitally oriented, capturing snapshots from computer has become a crucial tool for many users. And when it comes to taking a screenshot on a Dell, the process is really straightforward and can be done using the Print Screen key.
In this article, we will provide a comprehensive guide on how to screenshot on Dell laptop and desktop using the built-in tool or screenshot software for Dell PC, allowing you to choose the best method that suits your needs. Among them, AppGeeker Screen Recorder helps you screenshot on your Dell laptop and annotate and edit them simultaneously.
Also read: How to Record Desktop on Windows 10
Tip: Generally speaking, the methods on how to take a screenshot on Dell devices are also applicable to other brands of laptops and desktop computers.
Table of Contents
A screen capture, also known as a screenshot, screencap or snapshot, is the process of capturing a still image of your computer screen. It is a useful tool for improving efficiency and effective communication at work. The captured screenshots are automatically stored in your computer's clipboard memory, ready for further processing or sharing.
If you are a loyal Dell device user, then read on to learn how to screenshot on a Dell laptop or desktop computer quickly.
Read more: How to Record Screen and Audio on Your Computer
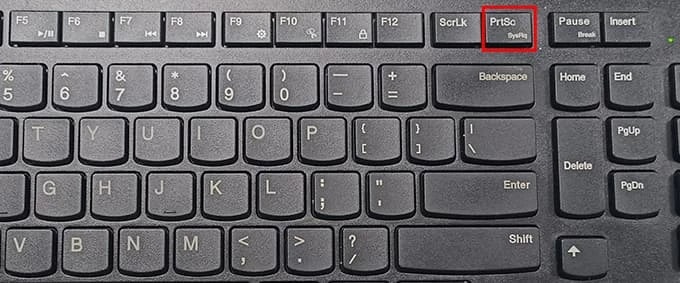
One of the most convenient ways to screenshot on a Dell computer is to use the "Print Screen" key, which is available on most standard keyboards. The Print Screen key can be used directly to capture screenshots on Dell laptops and computers running any version of Windows, including Windows 8, Windows 8.1, Windows 10 and Windows 11.
The Print Screen key's location and tag may vary depending on the model of the Dell computer being used. It may be labeled PrintScreen, PrntScrn, PrntScr, PrtScn, PrtScr, PrtSc, and is usually located in the top right corner of the keyboard. On some Dell laptops, you can find it on the F10 key or near the Delete key.
By combining the Print Screen key with other keys, you have three optional types of screenshots. The following guidance will use the abbreviation PrtSc to refer to the Print Screen key to describe how to take a screenshot on Dell.
1. Full-screen capture: Press the "Windows logo + PrtSc" keys to capture a screenshot of the entire computer screen, including all open windows and applications.
2. Active windows capture: Simply press the "PrtSc" key on your keyboard to capture all active windows without the taskbar or other extraneous screen content.
3. Single window capture: Click the active window you want to take a snapshot, and then press the "Alt + PrtSc" keys to do this task.
Note:
Related read: How to Screen Record on Any Laptop
Generally, if you do not proceed to the step of saving the screenshot on your Dell, your screenshot will not be stored as an image file.
The screenshot you take is automatically saved to the clipboard. To save the screenshot as a new file, you can open an image editing software such as Paint or Photoshop, and paste the screenshot from the clipboard using the "Ctrl" and "V" keys. Then, you can edit, crop, or keep the screenshot as needed on Dell.
Using the Print Screen key requires you to consider your Dell computer model and remember the different key combinations, while with the help of AppGeeker Screen Recorder you can screenshot on Dell desktop computer or laptop with one click, no matter what model you have.
AppGeeker Screen Recorder goes beyond the typical process of capturing only the visible portion of the screen and has the ability to capture the entire length of a webpage. Moreover, it enables you to edit and annotate the captured screenshots on your Dell PC, and then supports saving them directly to a folder on your computer in a variety of formats.
Here is how to snapshot on a Dell:
Step 1. Run Screen Recorder on the Dell and select "Video Recorder" tab.

Step 2. Click the "camera icon" in the upper right corner to make a screenshot.

Step 3. Drag your mouse to select the screenshot area. You can also use the toolbar to add arrows, text, shapes or other annotations, or select the "Scrolling Window" option to snapshot the contents of multiple pages.

Step 4. If you are satisfied with the screenshot you captured, click "Copy" or "Save" to complete the screenshot task.
Read later: How to Record Screen with Audio on Windows
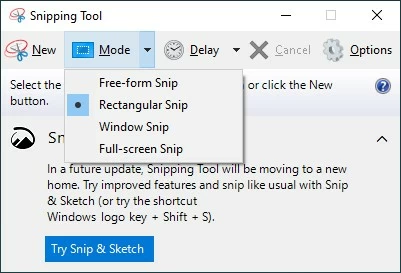
In fact, Dell devices running Windows have a built-in screenshot software that allows you to take screenshots of various screen shapes, called the Snipping Tool. To take a screenshot on a Dell computer using Snipping Tool, follow these steps:
1. Click on the Start menu, and type "Snipping Tool" in the search bar.
2. Open the Snipping Tool app that appears in the search results.
Tip: Windows 10 or above can use the "Windows logo + Shift + S" shortcuts to launch Snipping Tool to take a screenshot on your Dell.
3. Click on "New" and select a snip mode. The Snipping Tool offers four different options for taking Dell screenshots in the Mode tab:
4. Use the cursor to select the area of the screen you want to capture.
After selecting the area, the screenshot will appear in the Snipping Tool window. You can then save the captured screenshot to your Dell computer as an image file or copy and paste it into another application.