
How to Record Computer Audio Using QuickTime Player

If you want to record both video and audio of a PowerPoint presentations, then read on and this article will give you a comprehensive guide.

Almost every business and educational environment requires the use of PowerPoint presentations that allow you to interact with your audience through images rather than simple verbal dialogue, conveying information and doing more in an easy-to-understand way.
These benefits are further enhanced when you add audio to your PowerPoint presentation video. And by recording a video of your PowerPoint presentation accompanied by audio narration, you'll be better able to get your points across to each audience, and even have them re-watch the recorded videos to gain new understanding if needed.

It's not difficult to record video and audio of a presentation using PowerPoint's recording function.
Regardless of the purpose, recording your own or someone else's PowerPoint presentation as a video, including capturing the audio of the speaker as well as the slide show, can be very helpful in revisiting the main points of the presentation later.
Although PowerPoint has a built-in feature that allows users to record audio and video while playing slideshows, it doesn't apply to all software versions. But you can try the AppGeeker Screen Recorder, which is compatible with multi-platform, to video record yourself presenting a PowerPoint with audio. And we'll cover all these methods in this article!
Read more: How to screen record with audio on Windows 10
Table of Contents
A PowerPoint presentation is a series of slides that you can use to present and discuss different topics and their important content. Whether you are running a Windows or Mac computer, Microsoft PowerPoint provides various options to customize the presentation.
To record a presentation video with audio on PowerPoint, you can take advantage of a built-in feature that comes with Microsoft PowerPoint called Record Slide Show, which is available in Microsoft 365 (Windows and Mac), PowerPoint 2013-2019, and PowerPoint 2019 for Mac.
Read later: How to record video on Windows 11
Step 1. Launch your PowerPoint presentation and open the slide you want to record.
Step 2. Click Record Slide Show under the Slide Show box. And two options will be given, "Record from Beginning" and "Record from Current Slide."
If you wish to commence a presentation at the start, select "Record from Beginning." If you'd like to record from a particular slide, pick the "Record from Current Slide" option.
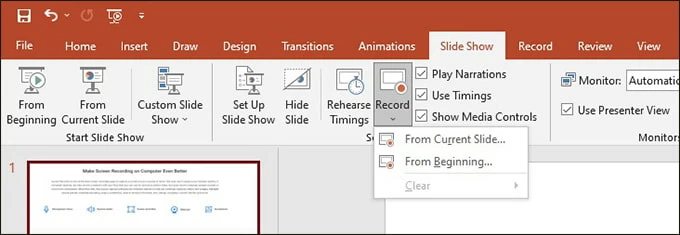
Tip: If you have the Record option in the upper right corner of PowerPoint window, you can also click Record to start recording a presentation from PowerPoint with audio and video.
Step 3. Adjust your video and audio parameters in the Settings option of the recording toolbar. The camera and microphone options are turned on by default.
To record only audio in the presentation, click the camera icon to turn it off. If you have multiple audio input devices to choose from, click on Settings in the upper left corner to select your microphone device to record narrations, which will be captured along with the video recording.
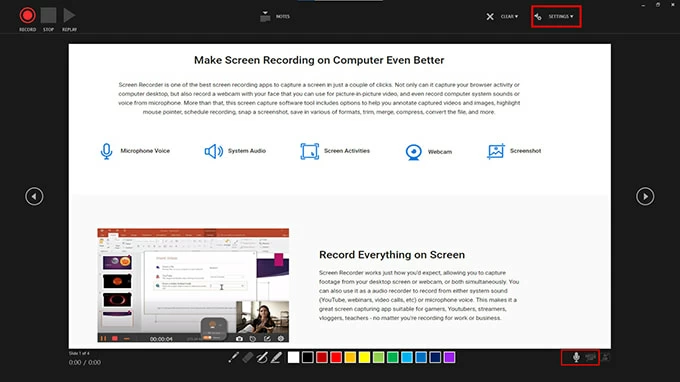
If you choose to record yourself and audio presentation in a PowerPoint video, you can adjust the size, position and format of the camera according to your personal needs while turning on the camera, and even choose whether to blur the background to match your slide recording.
In some versions, the camera and microphone options can also be found in the bottom right corner of the recording screen, where you can toggle between capturing or muting the audio.
Step 4. Use the Record, Pause, and Resume options to control your presentation video. Click the red round Record button and start speaking after the three-second countdown.

As you narrate and present your slides, you can use annotation tools such as Pens, Highlighters, etc., or add notes to highlight the key points of your video.
Note:
Step 5. When the current slide show and presentation are finished, click the Stop button to stop the PowerPoint recording. Then hit the Play/Replay icon to preview the recorded content of your current slide.

If you are not satisfied with the recorded audio in the presentation, you can click the Clear option to delete or re-record the audio content of the current slide or all slides.
![]()
Step 6. Once you exit the slideshow recording with Esc key, or click on End Show, you will see a small picture in the bottom right corner of the slideshow that will be applied to all the slides you recorded. The picture is an audio icon or a still image that allows you to adjust the audio volume, start and pause audio/video in its control bar by clicking on it.
![]()
Also see: How to screen record with audio on Mac
When you are done with PowerPoint presentations and you are satisfied with the recorded video and audio, then you can convert your PowerPoint presentations to a video and save it on your computer. Follow the below steps to make PowerPoint presentation video recordings with audio on Mac or Windows PC.

For Windows:
For Mac:
Once the presentation has been exported, be sure to watch the resulting video to ensure that the recorded audio has been embedded in each slide. If all the results meet your expectations, then you have successfully made a PowerPoint presentation recording with video and audio.
The ability to record a slideshow with audio and video in PowerPoint is not accessible in every software version. Therefore, it's best to record a PowerPoint presentation that includes both audio and video with the help of a recording tool. This section will cover how to use AppGeeker Screen Recorder, a software with high compatibility, to record your PowerPoint presentations.
The AppGeeker Screen Recorder offers top-notch recording with features to customize the screen recording area, detect webcam, and capture sound from inside and outside the computer. Not only can it customize the video recording area, quality, output format, etc., but it also has the ability to reduce microphone noise during recording to create a lossless audio recording, which is one of its outstanding features. In addition, you can also take advantage of its advanced built-in editing and trimming tools, making your videos look more professional!
Download and install the program on your PC or Mac. Open your PowerPoint presentation and run the program, then select the Video Recorder option in the left corner of the display screen.

You can change the parameters in four options: Display, Webcam, System Sound, Microphone.
To capture your recording region, the Full option can help you record the whole screen while Custom gives you the option to set the recording area at will. You can also choose whether to turn on the Webcam to record yourself in the PowerPoint presentation video. If your PowerPoint has audio that needs to be shown, enable System Sound to capture internal audio.

Turn the Microphone switch to the ON mode so that you can record your voice as you give your presentation. Simply slide the volume adjuster under the microphone icon from left to right to adjust the sound level. And by clicking on the inverted triangle icon next to the Microphone, you can choose to enhance the microphone sound or reduce the noise of the audio.
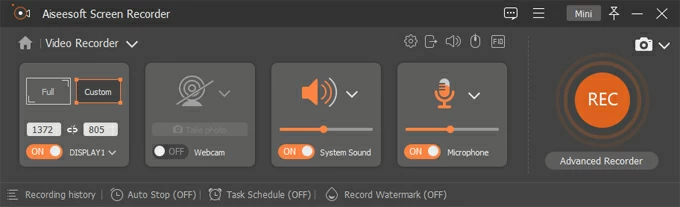
Once you have finished configuring your video settings, click the REC button on the right to start recording the narration and video of your presentation.
![]()
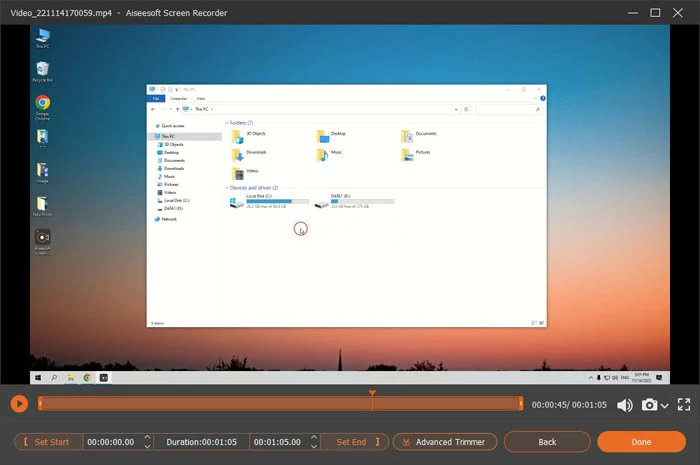
When you're done, simply click the red square Stop button to end the recording. Then you can preview and trim your video, or click Done to get a high-quality presentation PowerPoint video recording with audio.
Also read: How to record sound from computer
There are some other software programs that you can use to record PowerPoint presentations that contain both audio and video, such as Camtasia.
Camtasia includes a PowerPoint Add-ins toolbar that allows you to start and control your recordings directly in PowerPoint, without having to switch between applications. Find Camtasia Add-in under the Add-ins tab of your presentation and enable it. You can toggle the microphone on to record narration, or choose whether to turn on the camera for recording. After you stop recording the presentation, you can edit the footage in Camtasia. But note that it doesn't have a lot of powerful editing tools.
1. Can I record a presentation in PowerPoint?
Absolutely. Microsoft PowerPoint comes with the ability to record slide show presentations. Click the Slide Show tab on the PowerPoint home page, then select Record Slide Show and choose to record your presentation from the current slide or from the beginning.
2. How to record audio and video in PowerPoint at the same time?
Go to Slide Show > Record Slide Show on PowerPoint. Choose from two given options to enter the recording mode. Toggle the microphone and camera on and off in the drop-down options of the recording toolbar.
To record video and audio in PowerPoint, make sure the microphone is available, if not, click the microphone icon once. And if you want to record yourself in the PowerPoint presentation video, click the camera button to toggle it on. Then click Record to start capturing your narration and slide presentation in PowerPoint at the same time.
3. How to record audio with presentation?
To capture your narration during the presentation, you need to turn on the microphone option. If you are in recording mode, you can find the microphone icon in the bottom right corner to make sure it is active. If you have more than one audio device to choose from, go to Settings in the upper left corner of the recording screen and adjust your audio device.
The 20 Best Screen Recorder for Windows and Mac: Free & Paid


