Transferring Music from Old iPhone to New iPhone


Apple releases iOS update regularly to introduce new features and help users fix some sorts of security flaw as well as other software issues on their iPhone. For example, the iOS 11 (announced in 2017) went public to fix the crackling issues in the process of phone calls and bring more fancy features into the device such as augmented reality, new control center and the like. You can update to the latest version wirelessly or through iTunes, but keep in mind that there is a need to make more space for the iOS update.
Many iPhone users report that certain data is missing after iOS update is performed. It is gut-wrenching that years of efforts including snapshots, messages, contacts and other files has turned into the moment of frustration. If you are lucky to back up your iPhone previously (it is always imperative to do so preceding iOS update), getting the lost file back via iTunes or iCloud is feasible. If not, you should remain clam and don't anything that will make the current situation worse.
The first course of action for a successful recovery of the lost data from iPhone after iOS update is not to write any content to the space. This is to salvage your data to the largest extent. When the content gets lost/ deleted after iOS update, iPhone thinks the space is available and can be used. So to speak, any operation like file saving, installation of apps or file download from the internet may probably overwrite the lost stuff for good.
Thanks to Appgeeker iOS Data Recovery, getting lost files on your iPhone due to an iOS update is possible and easy. This program employs advanced recovery algorithms to do a deep scan of your iPhone and extract all the lost data files. It lets you preview the full information for every singer data type and check the items before a full recovery.
With it, you are able to recover almost everything, including contacts, messages, notes, reminders, call history, voice memos, Safari bookmarks, Whatsapp conversation, and other files from iPhone. If you have backed up your iPhone with iTunes or with iCloud prior to updating to latest iOS, you can also restore the iPhone data selectively from iTunes backup or iCloud backup with this software.
Here's three options and choose the one that is to your satisfaction.
Step 1: Run the software
Run the program. Select the "Recover from iOS Device" mode on the main interface. Then, build a stable connection between iPhone and computer via USB cable.
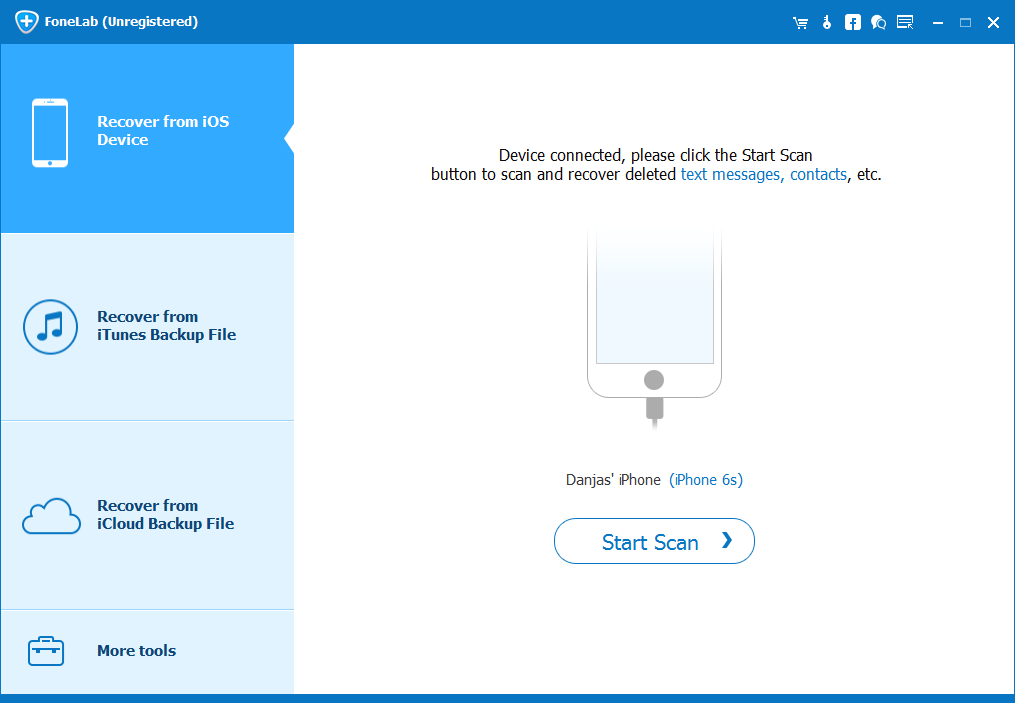
Step 2: Scan the iPhone for lost stuff
Press Start Scan button to perform a deep scan of your iPhone for lost content.
When the scan process is complete, you will get a screen as below, where the contents are listed on the left.
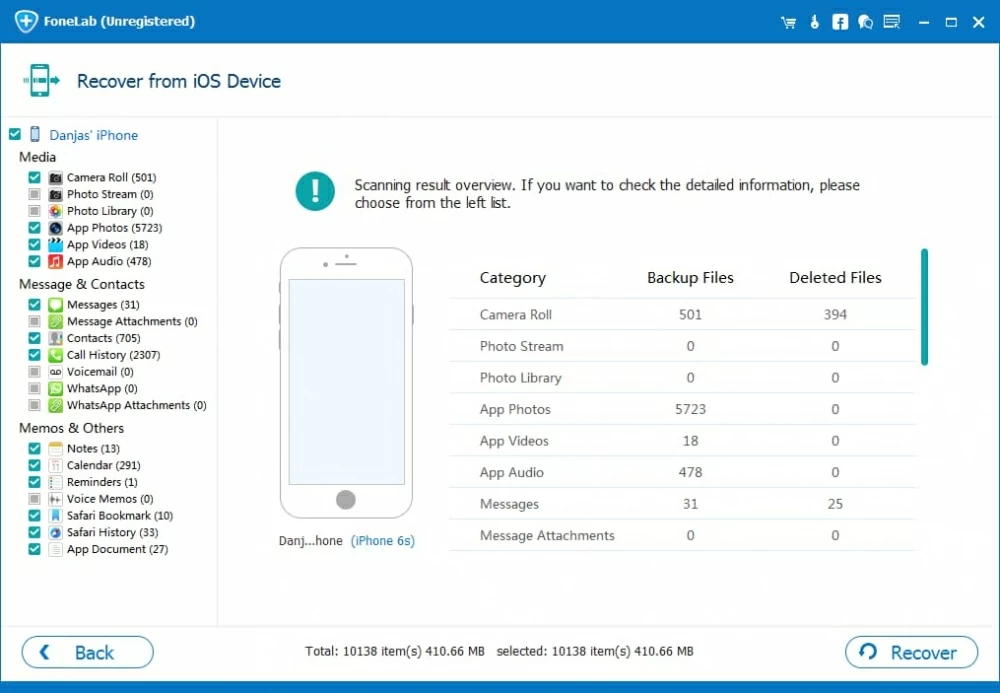
Step 3: Choose the data you want to restore
On the left part, you can click the specific category to preview all the items on the right pane.
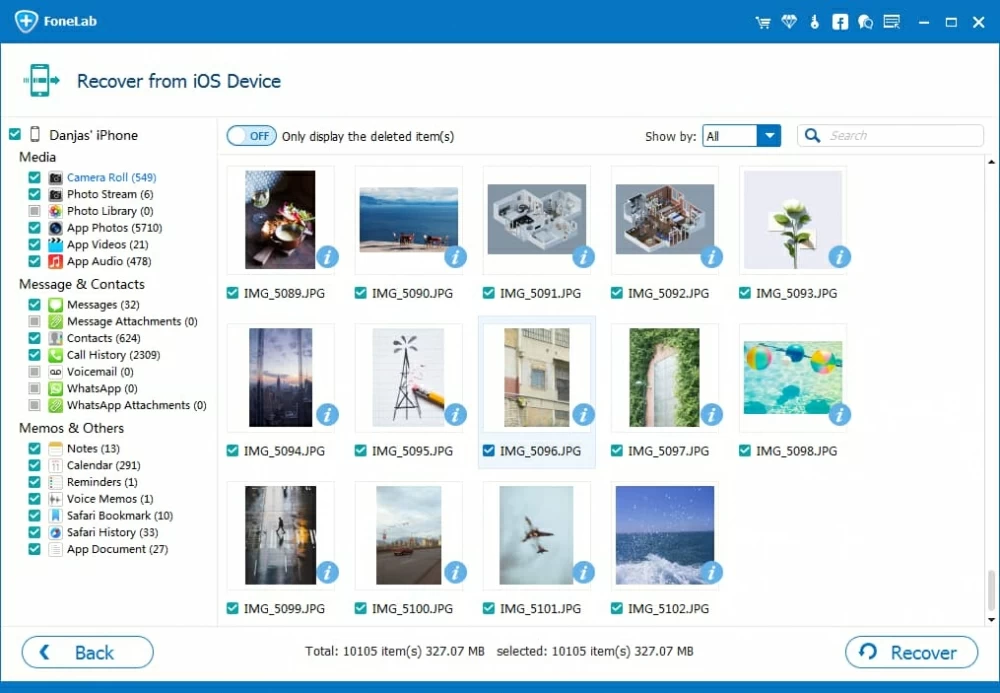
Next, choose what files you wish to recover. For example, if you want to recover lost pictures from iPhone, simply click the "Camera Roll" category and check the images you need one by one.
The same can be done with other data like contacts, messages, call history, reminders, etc.
Step 4: Save the selected content to the computer
Press Recover button at the bottom right side. This will bring up a dialog box, asking you to select a place to save the restored data.

After that, press Recover button again to start recovering the lost content of iPhone and save to the chosen folder on the computer.
Hot Article: How to Sync Tracks on Mac to iPhone without Using iTunes
If you already have made regular backups for your iPhone with iTunes on your computer, you still have a big chance to get all your lost data back from iPhone after iOS update. Here's how to do.
Step 1: Select an iTunes backup file on computer
Click on the "Recover from iTunes Backup File" mode on the main interface and it will search for iTunes backup files you made in this computer and automatically load them on the interface.
If you've change the default location of backup files, you need to click the Select button below the chart to find them out.
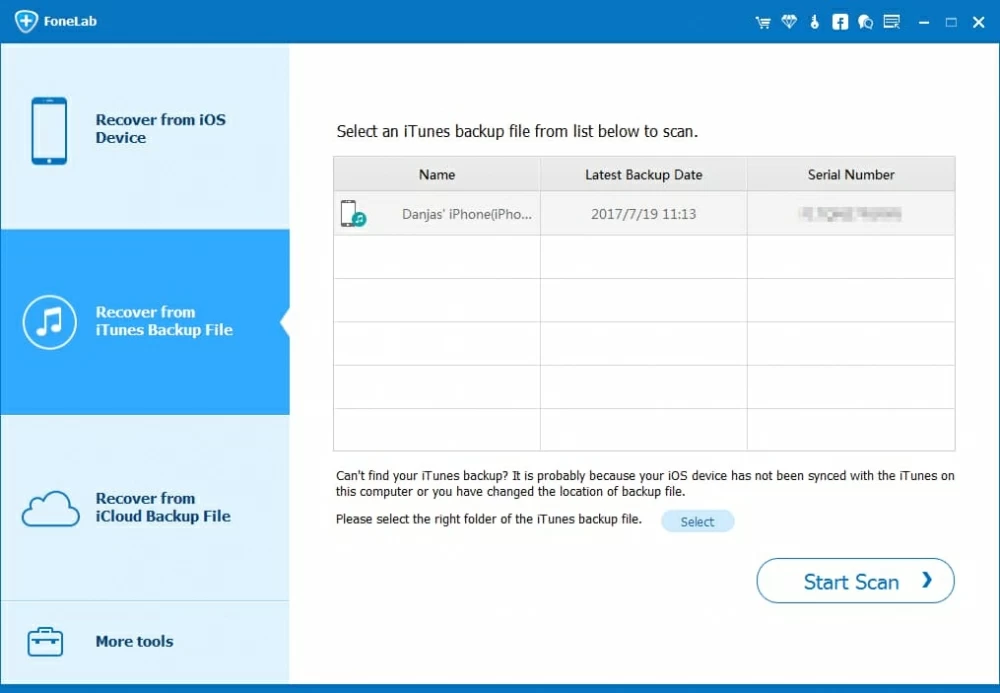
Step 2: Choose an iTunes backup to scan
From the iTunes backup list, select which one you'd like to retrieve lost stuff from, and then click the Start Scan button.
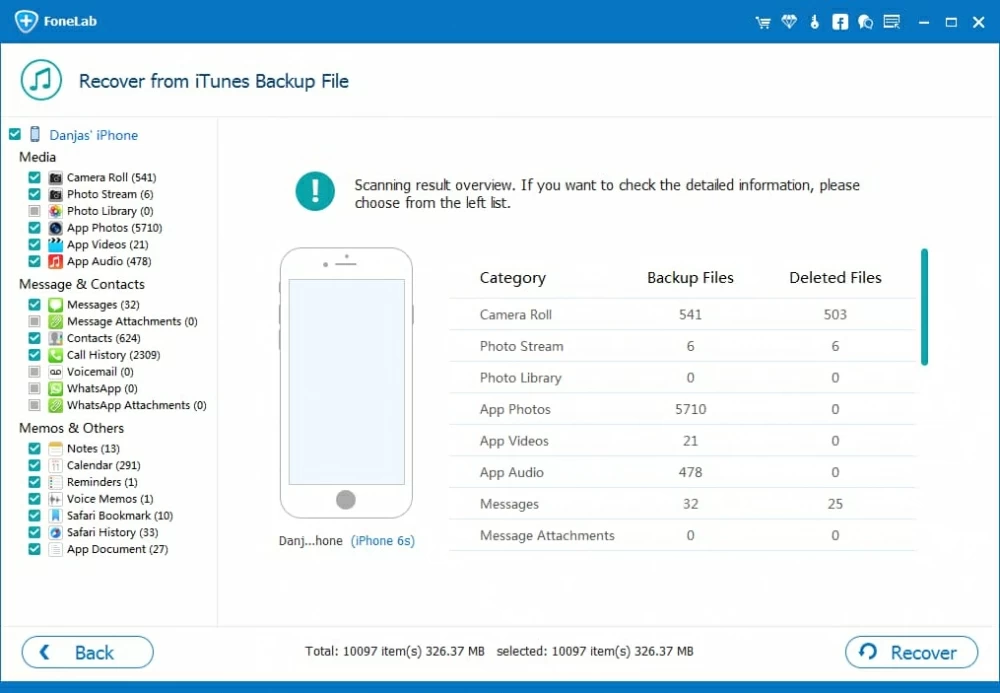
Now, this iPhone data recovery tool will run a deep scan through the selected backup for all files.
When it completes, you will get into an overview window, where all found files including photos, contacts, text messages and more are categorized on the left sidebar.
Step 3: Select lost files and restore them
A nifty thing of this iPhone data recovery software is that it allows you to choose which specific files within the backup you'd like to extract.
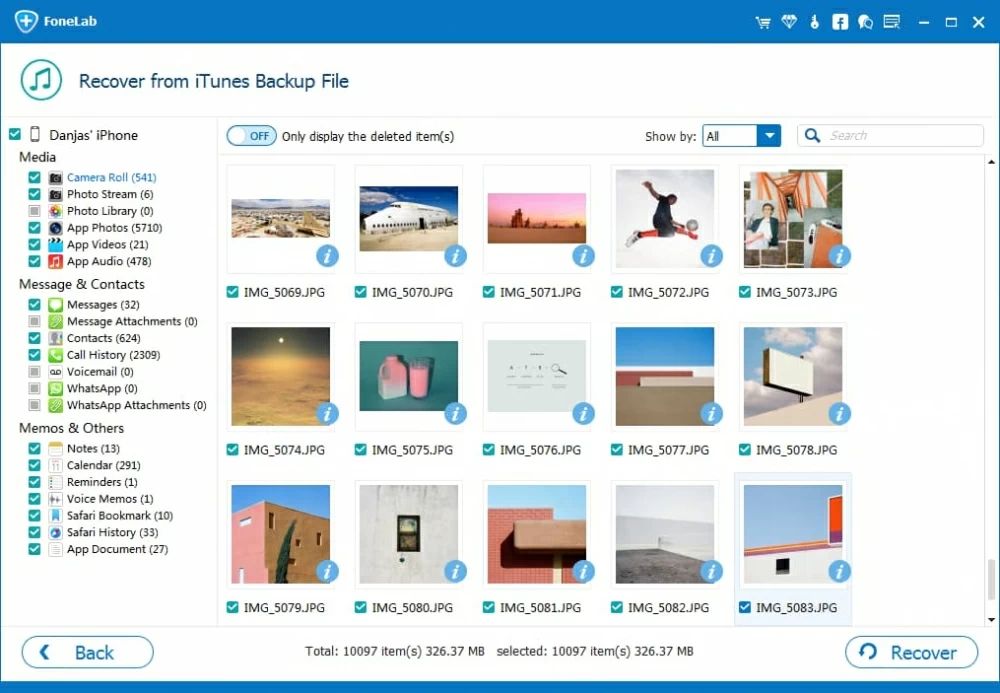
Select what data file you want to recover from the list by checking the boxes corresponding to each file, and then press the Recover button at the lower-right corner of the interface. This will pop up a dialog box, from where you'll have to appoint a local path for the output files.
After that, the last thing you need to do is hit the Recover button again to fire up the recovering process. The program will get all lost files you've selected retrieved and saved to the computer.
You're done!
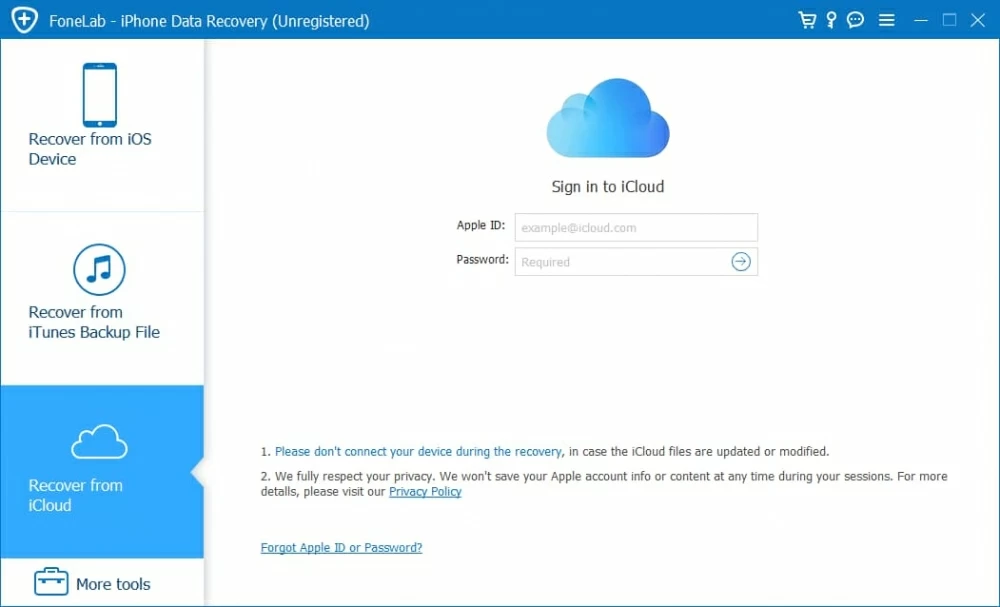
Step 1: Log in to iCloud account
Click "Recover from iCloud Backup File" mode and then you can see the following login window. Sign in with your iCloud account, so the program can have access to all iCloud backup files.
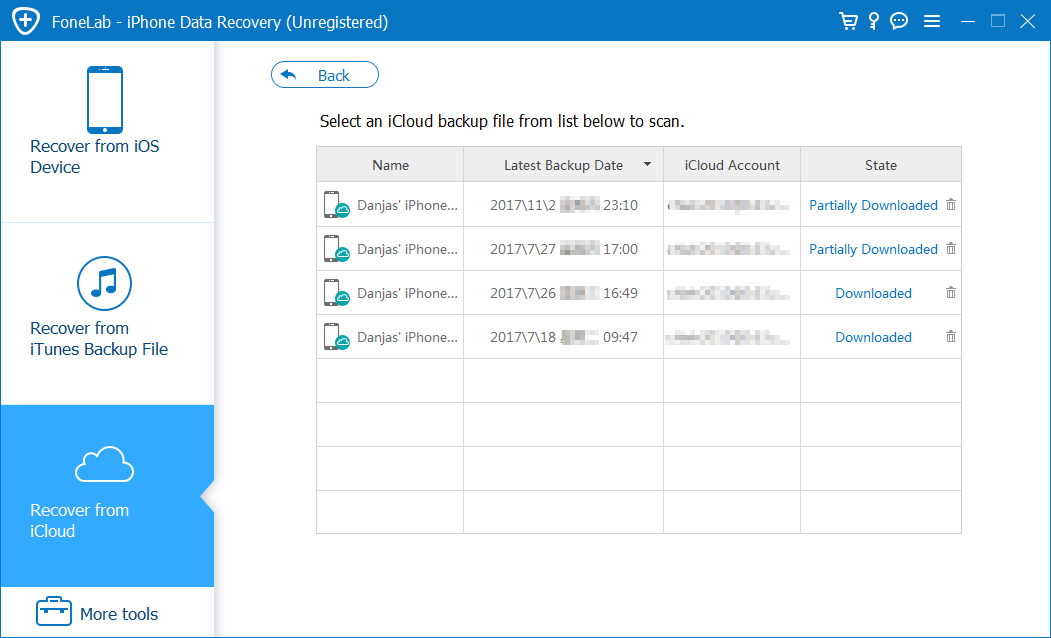
Step 2: Start downloading iCloud backup file
Once logged in, the program will automatically list all backup files under this iCloud account, among which choose the most relevant backup and press the Download button.
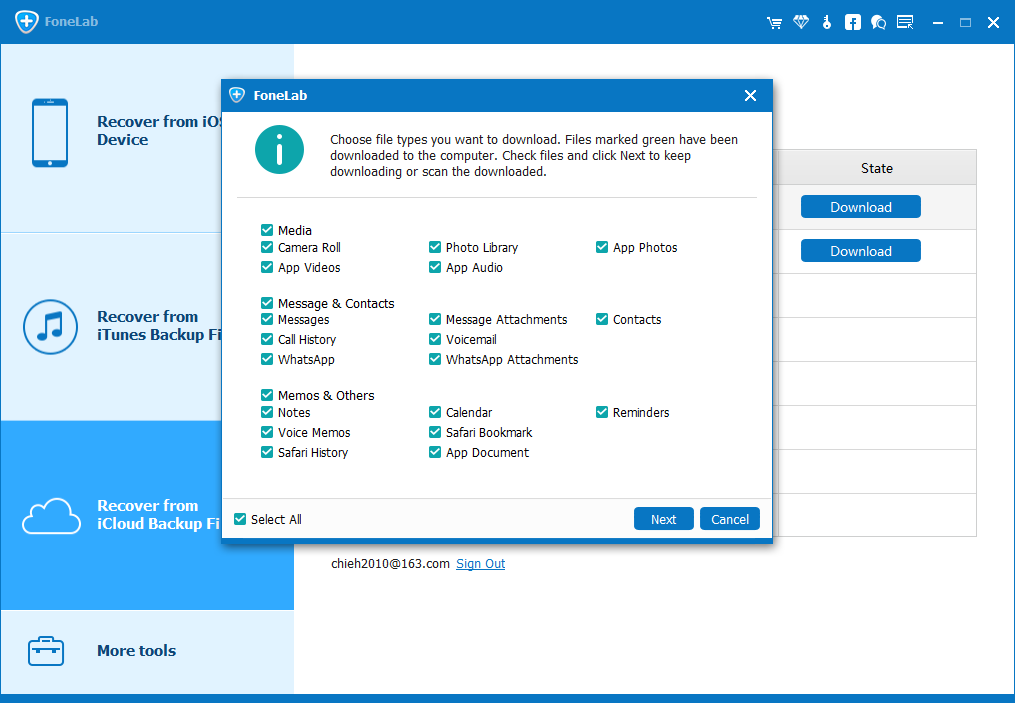
At this point, a dialog window pops up, asking you select what data files you want to download from the backup. You can either tick the category one by one or tick the "Select All" option located on the lower left corner to select all of data. Then press the Next button.
The program will start downloading your selected files. This may take some time, depending on how much data you've backed up and how large these files are.
Step 3: Select deleted files of iPhone and recover them to the computer
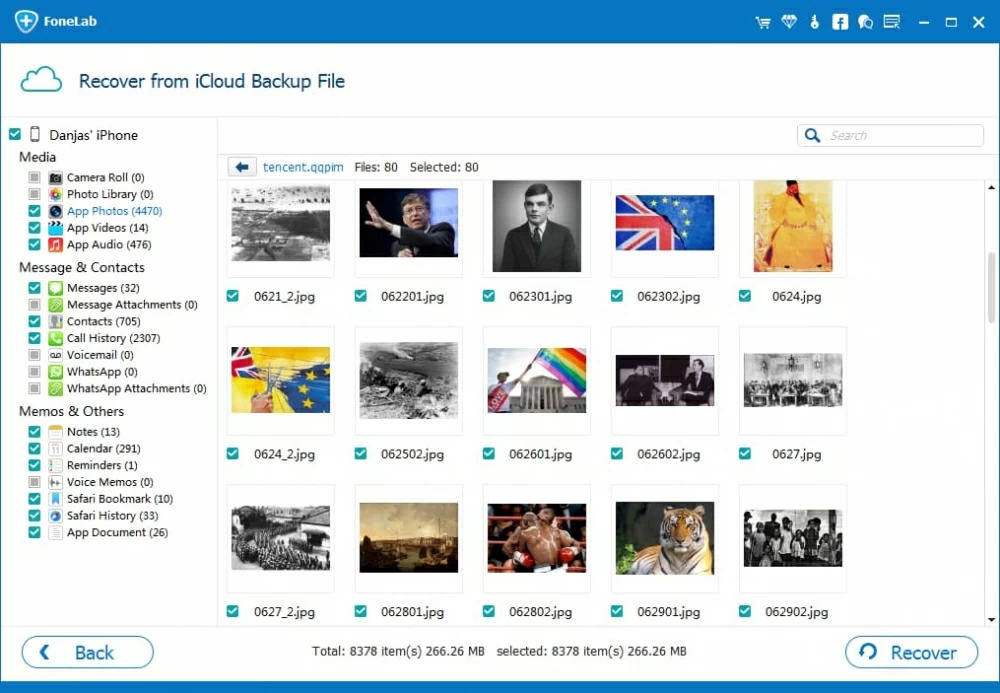
Once downloaded, you're enable to preview all the found stuff on the interface.
Next, select what data files you want to restore by clicking the category and ticking items it contains.
Next, click on the Recover button at the lower right corner, and choose the desired location for the lost files in the pop-up window.
Next, hit the Recover button again and this utility will start the recovery process.
After the data recovery process is over, you can view the files on the computer, and transfer them back to your device if required.
That's it!