
How to Get Deleted Voice Memos from iPad Air, Mini, Pro


Background Information about iOS Update
iPad is the fancy device to work and play with, but it is common that this Apple product suffer from some kinds of bugs or glitches at times. More often, countless iPad users wait for the latest iOS update to be announced, which will greatly improve the overall performance of the tablet so that you can get things done more efficiently and easily. For example, the iOS 11 released in 2017 came out with many premium features like new Files app, multitasking or the capability of Drag and Drop.
There are a few steps to take before iOS update is implemented. As the process of installing the update will take a lot of space, those who has limited storage on iPad might need to delete some files and uninstall the less-used apps prior to the update process. However, this is temporary. When the iOS update is finished, you can reinstall the apps. If you want to play it safe, please back up your iPad before upgrading process begins.
The Pain in the Wake of iOS Update
Unfortunately, iOS update will lead to data loss now and again, which most iPad users can't live with, especially for those who often use their tablet to save the important information. To bring back the deleted iPad content, one of the contingency plans is to restore from iTunes or iCloud backup. If no backup is available or iTunes doesn't restore properly, here comes the plan B: restore the lost stuff from iPad directly.
If you realize some files are missing after you go through with iOS update, stop the use of iPad immediately. This is meant to increase the chance of a successful data recovery. From the device's point of view, the lost stuff is no longer useful and the space containing the original content is viewed as free for new files. However, as long as the lost data files hasn't been overwritten yet, you can get it back from iPad with a reliable third-party tool. Appgeeker iOS Date Recovery is our tool of choice.
This utility allows users to recover lost data of iPad with three ways (iDevice, iTunes and iCloud) and each one includes recovery of the deleted photos, contacts, notes, reminders and other files after iOS update. It lets you browser through the specific contents of every file and select what you need for recovery.
As follows, three recovery plans have been put forward to retrieve the lost data on iPad for the aftermath of iOS update. Choose the one as you need.
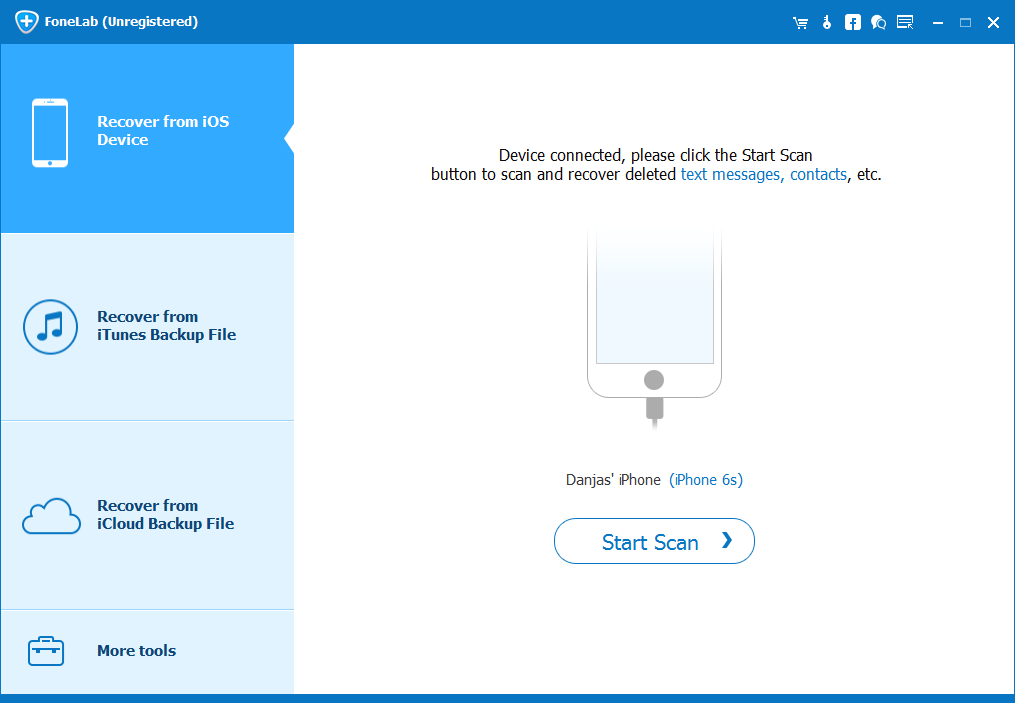
Step 1: Set up a connection
Open up the program on the computer and its primary interface will look like this. Then, go with the "Recover from iOS Device" mode.
Now, you will need to plug your iPad into the computer through the use of USB cable.
Step 2: Access the lost data on iPad
Once connected, click the Start Scan button in the interface to start scanning your iPad for lost files.
When the scan is finished, you will see a list of files that have been extracted on the left pane.
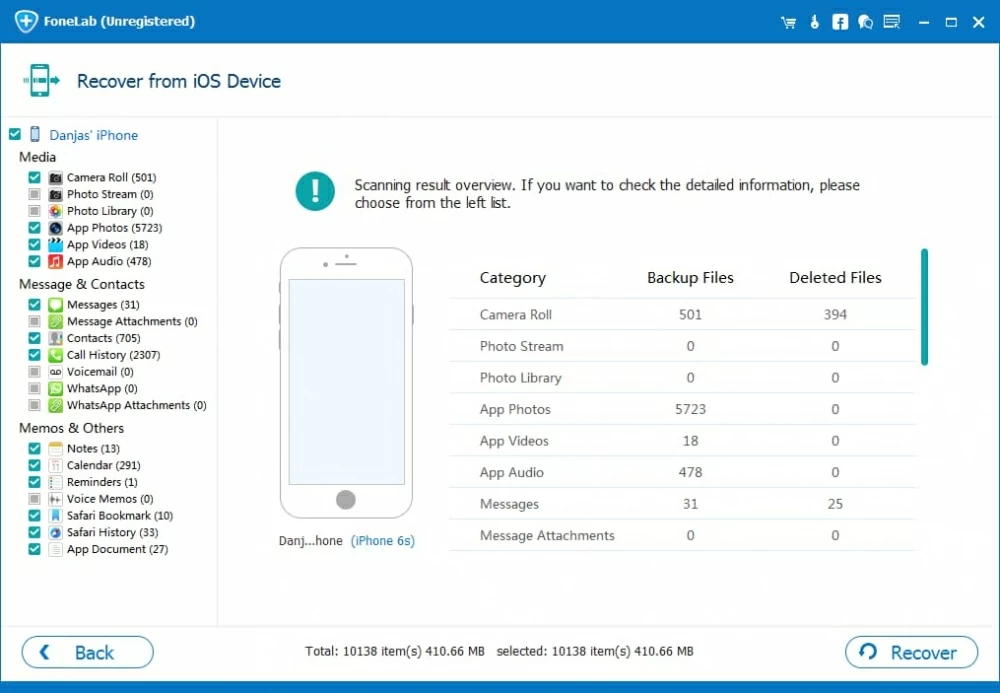
Step 3: pick the files to be recovered
On the left part, click on the particular category and you will get a list of files it includes. For example, if you would like to restore deleted notes from iPad, just click the "Notes" category and then choose notes files by checking the boxes next to each file name on the expanding list in the middle pane.
Since the software supports recovery of multiple files at one time, you can do the same with other stuff such as photos, reminders, iMessages, etc.
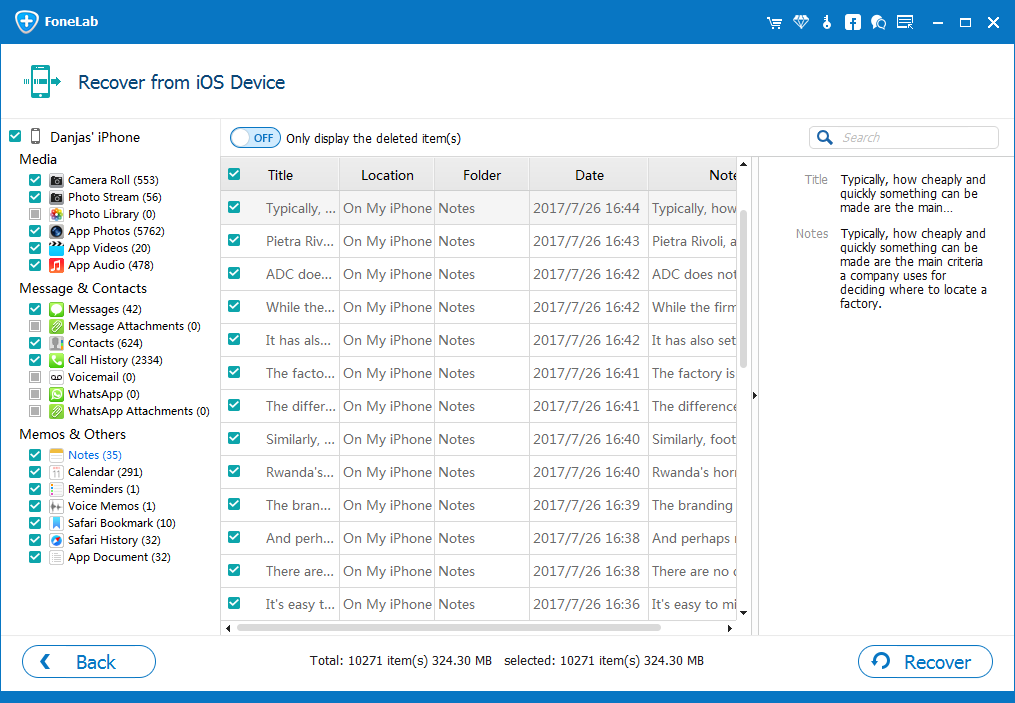
Step 4: Get the select data to the computer
Finally, click the Recover button at the lower right corner. The software will remind you to select a folder to store the recovered stuff from iPad in the pop-up dialog box.

After you choose a path, hit the Recover button again to begin the recovery process.
That's it!
If you have the iPad (Air, Mini, Pro) backed up with iTunes before you made an iOS update, you can extract content from the backups with this program, and then move them back to your iPad if necessary. Here's how to.
Step 1: Select iTunes recovery mode
On the main interface, select the 2nd "Recover from iTunes Backup File" mode.
This program will start searching for backups you've created on the computer and display them in the right pane of the window.
If you've synced several different iOS devices with Apple iTunes on this computer, you'll be virtually shown with more than one backups on the list below. If the backup is encrypted, it will load with a LOCK image icon, then you need to input the password to access it.
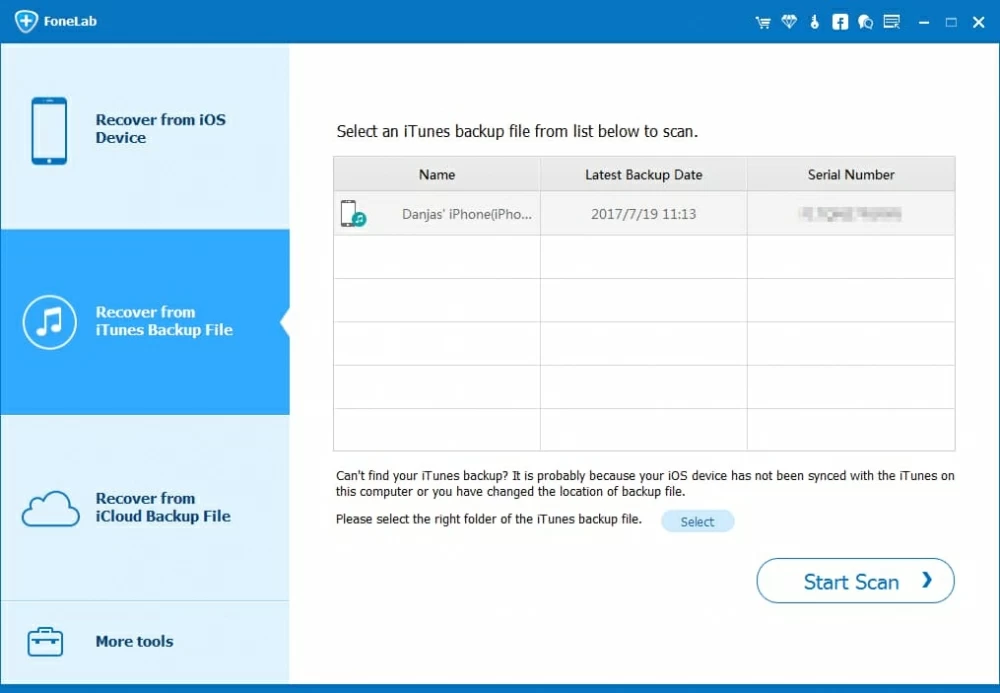
Step 2: Pick a backup to be scanned
Choose one backup which you wish to restore your lost files from and then press the Start Scan button. The program will begin analyzing the backup and finally loads all the available data files it detects on the interface.
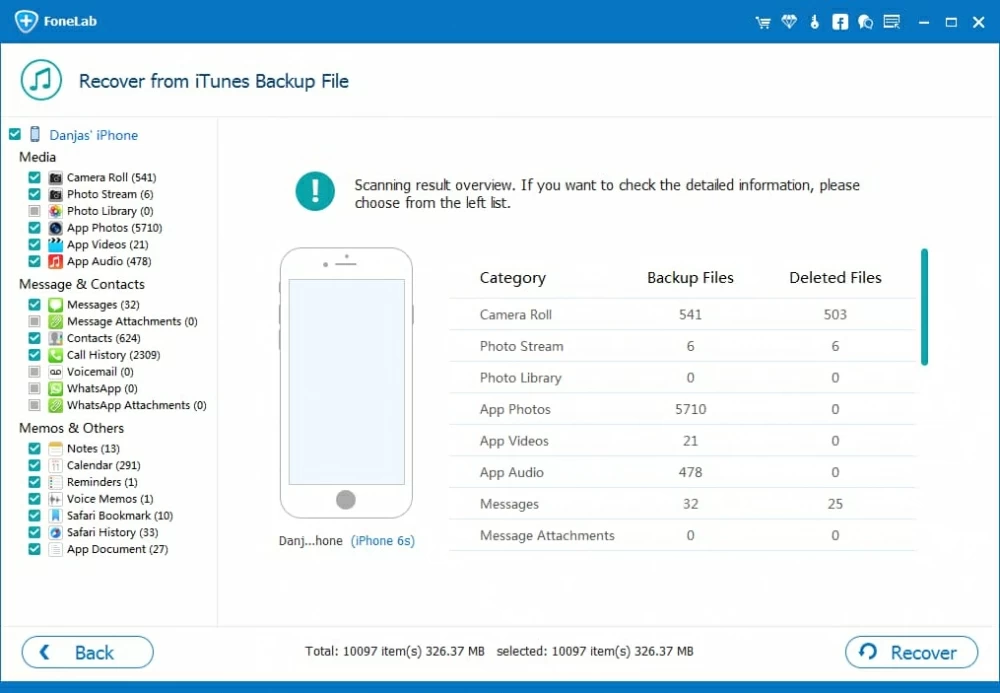
Step 3: Select what lost data file to be recovered for iPad
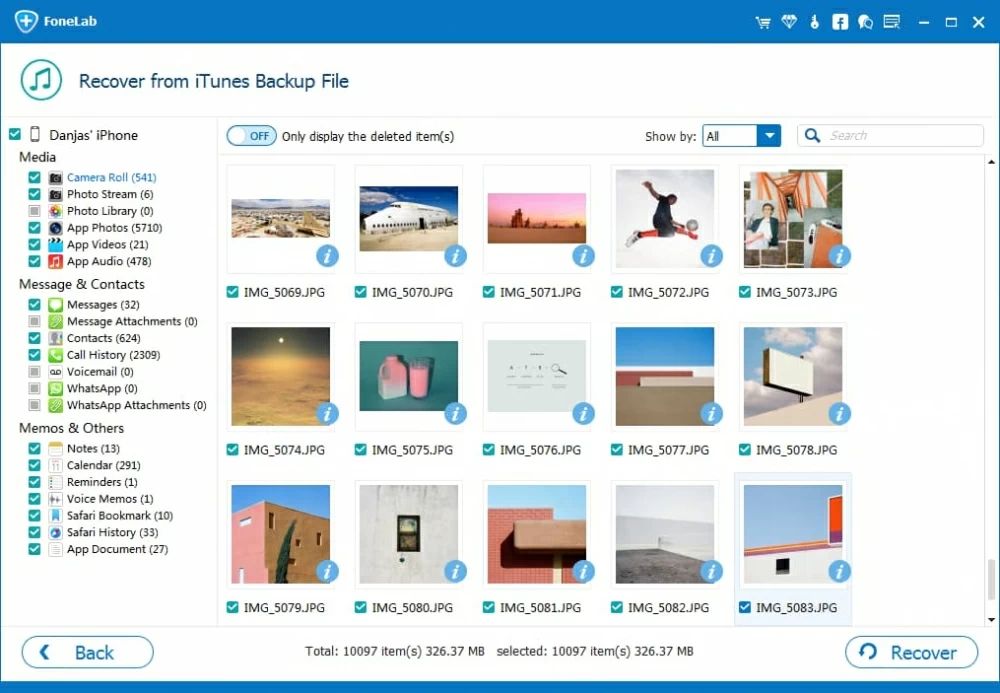
As you can see, the left sidebar lists the scan results - various data types are in categories. You can click any category to preview the data in details on the right pane of the window.
Next, select which file types you want to retrieve by checking the boxes next to each item.
Step 4: Start restoring data files for iPad
Last, press the Recover button, this will pop up a dialog box where you need to choose a path to save the output files.
Again, hit the Recover button. The selected files will be extracted from iTunes backup and saved to local hard drive soon.
When the process is finished, you now can check if the retrieved files are in the folder.
This way, you've get your lost iPad stuff back after iOS upgrade.
Step 1: Log in to iCloud account
choose "Recover from iCloud Backup File" mode and you will be prompted to enter Apple ID and password on the right pane to sign up to your iCloud account.
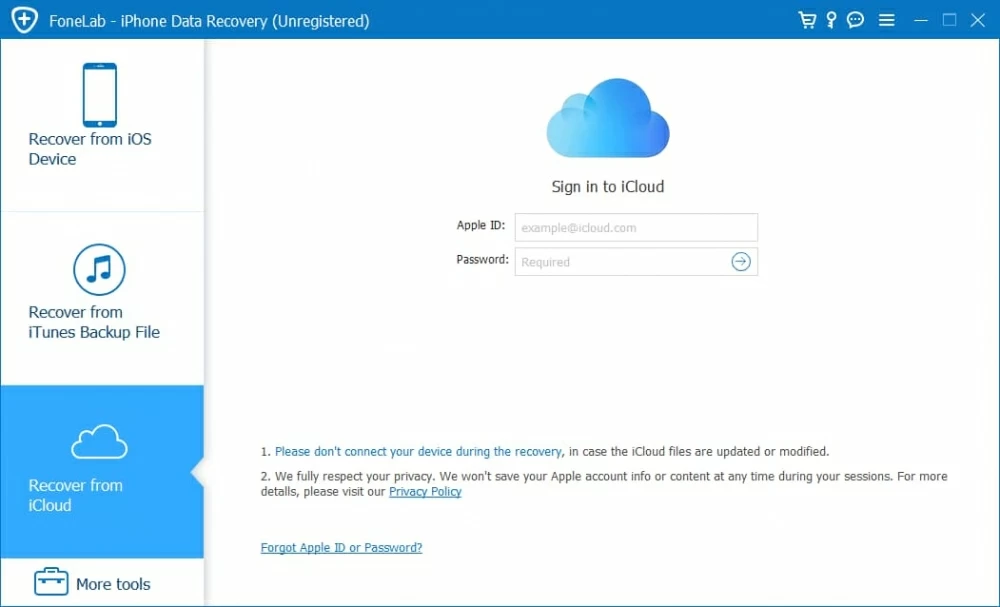
It's totally safe to sign in your iCloud account. This iPad data recovery program won't keep any record of your private information and data.
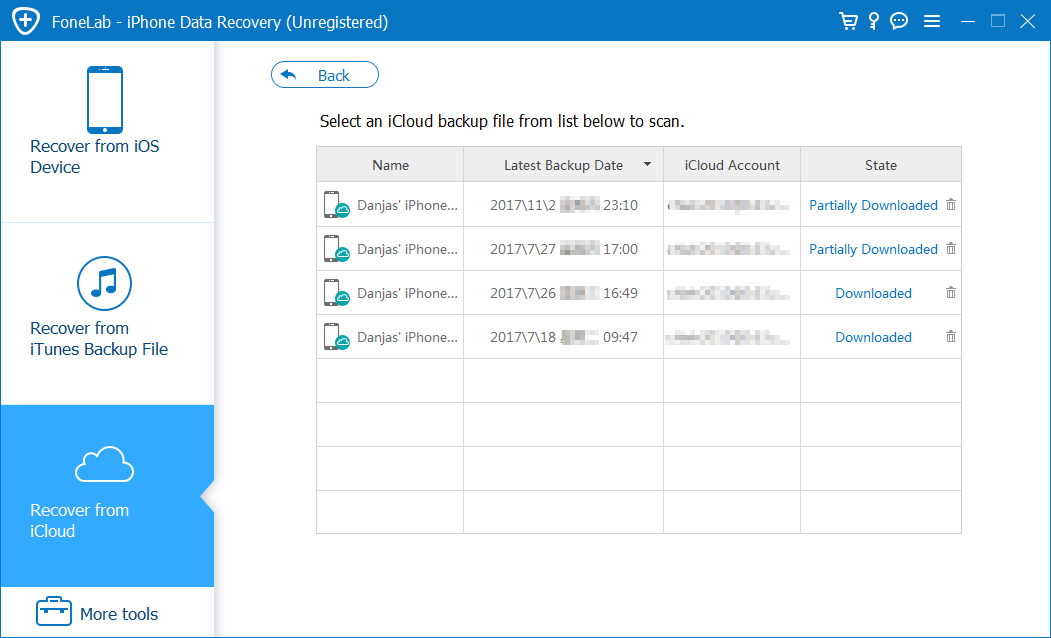
Step 2: Select an iCloud backup to download
Once logged in, all backups of iOS device(s) you've already created with this iCloud account will be displayed on the right pane of the interface.
Locate and select the backup file that you want to recover data from, and press the Download button.
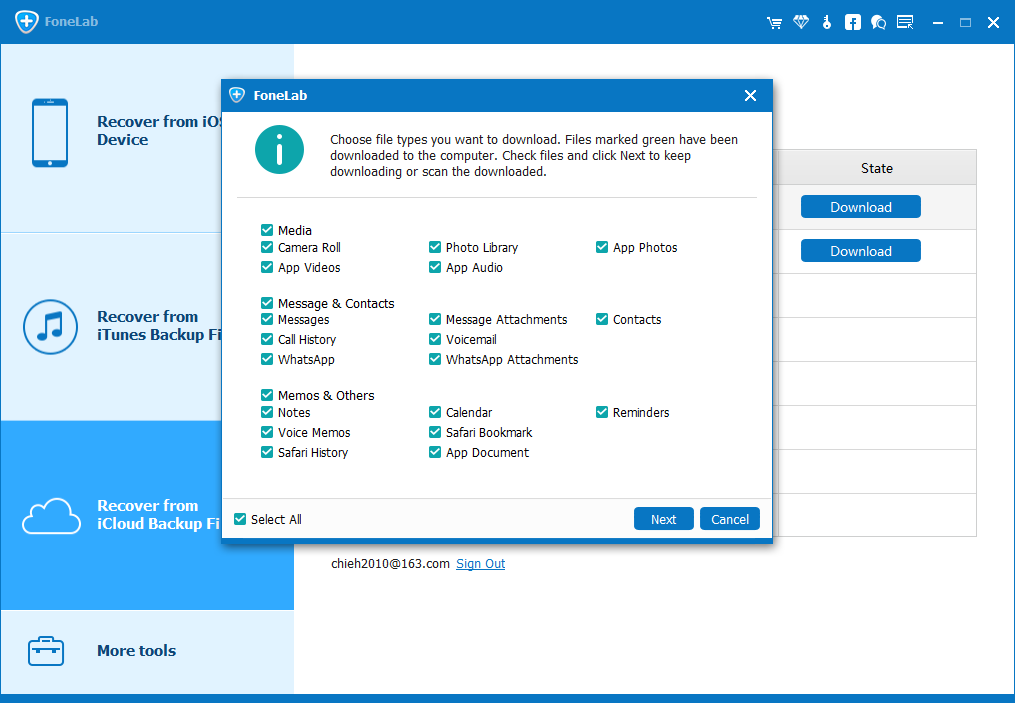
A window will pop up, from where you can manage which types of data you want to download.
Select what file type you need in the dialog, and then click the Next button to begin downloading.
Step 3: Select lost files to be retrieved
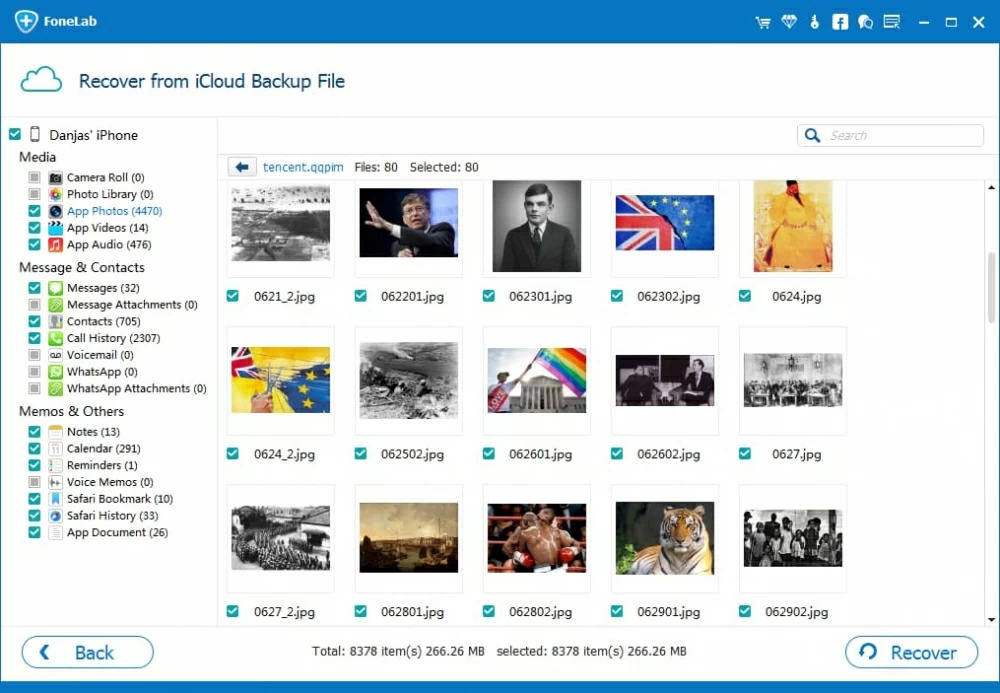
Once downloaded, you will get into a new window where all files are well categorized under different sections on the sidebar of the interface.
You can click the specific category to preview the full content, like Contacts, Call History, Messages, Camera Roll, Notes, etc.
Next, select the lost files you want to restore in this backup by checking the boxes near each item.
Step 4: Start iPad files restore process
When you've satisfied with your selection, press the Recover button at the lower-right side.
In the dialog box that pops up, select a destination path for storing the newly restored files.
Again, click the Recover button and this program will start extracting the selected data and save to the computer.
That's it!
[Also Read: How to Fix Keyboard Lag on iPad Since iPadOS 14 Update]