
Where Do AirDrop Files & Photos Go?

If you're looking for ways to transfer movies from iPhone to PC for storage or editing, this article provides multiple proven solutions to get your iPhone movies onto your PC.

The professional Appgeeker iPhone Data Transfer tool, designed specifically for handling heavy video workloads, lets you seamlessly transfer oversized movie files from iPhone to PC without quality compression.
![]()
Wired transfer of movies from iPhone to PC ensures maximum stability, while wireless methods offer greater convenience.
You may want to transfer high-fidelity films from your iPhone to your computer—not just to free up space, but to unleash your creative potential. Transferring movies from iPhone to PC should be simple, but it rarely is. Unlike standard clips, high-resolution cinematic files are typically massive, and their recording formats aren't always natively supported by Windows PC.
This article addresses the common pain points of movie transfer, outlining effective ways to move movies from your iPhone to your PC intact, allowing you to enjoy stunning visuals or engage in deep post-production on your desktop.
Whether you are a content creator with a 50GB feature film or a user preserving 4K HDR movie memories, the methods below ensure your cinematic-quality footage transfers from an iPhone to a Windows PC without losing a single pixel.
Table of Contents
For many users, the Windows Photos app is the first option they try when transferring movies from an iPhone to a PC. Built directly into the Windows OS, it requires no additional software and functions as a "camera importer" by reading iPhone media files directly.
Once the iPhone is plugged in, the Windows Photos app treats it as a digital camera and imports any videos it can recognize. However, this convenience comes with some drawbacks. Instead of copying your original files, the app requests a media stream from iOS. If the format is not fully supported, Windows may convert the video behind the scenes.
1. Unlock your iPhone and keep it on the Home screen.
2. Connect it to your PC using a stable USB cable.
3. When the pop-up appears on your iPhone, tap Trust or Allow and enter your passcode to build a trustworthy bridge for data exchange.
4. On your PC, open Photos from the Start menu.
5. Locate your iPhone under the External Devices section on the left sidebar. Alternatively, click the Import button in the top-right corner and select From a connected device.
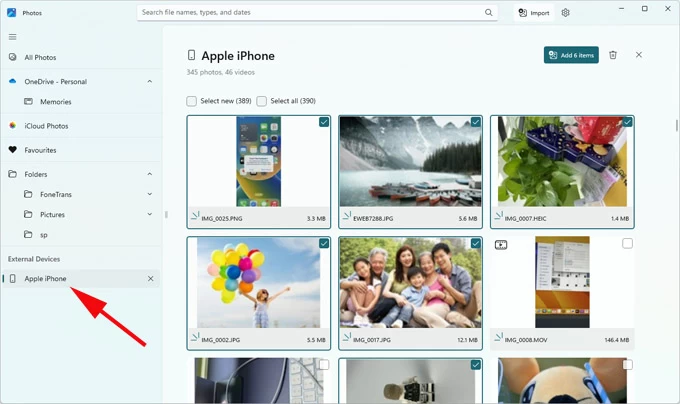
6. Wait for Windows PC to scan your iPhone and load the available videos and photos from the iPhone's Photos app.
7. Browse the thumbnails and check the boxes next to the movie clips you wish to transfer.
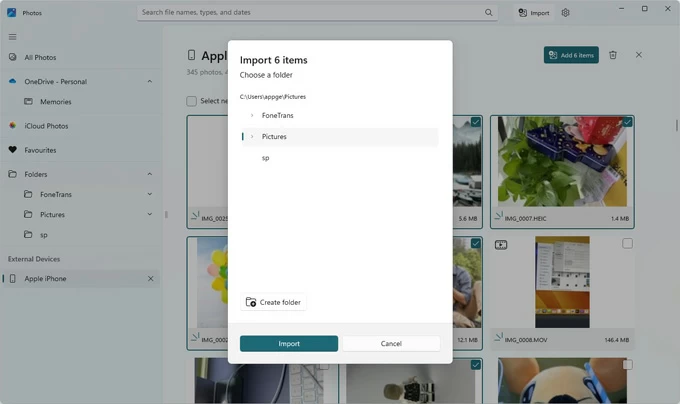
8. Click Add items and choose the destination folder where you want to save the movies.
9. Hit the Import button and wait for the progress bar to reach 100%. Ensure you only disconnect your iPhone once the process is fully complete.
Once finished, you can find the newly imported movies in the default Pictures folder or any custom redirect path you have set. This method is suitable for short clips, it may lag or crash when handling enormous, high-quality feature-length movie files.
Note:
For guidance on the reverse direction, you can refer to How to Transfer Videos from PC to iPhone.
For users transferring long movie videos, 4K recordings, or HDR footage from iPhone to your Windows PC while preserving the original codec and resolution, a dedicated Appgeeker iPhone Data Transfer is significantly more reliable. This software connects directly to the iOS media database. Rather than requesting a preview stream, it accesses the actual file structure, allowing you to export large-sized movie files without compression, quality loss, or metadata corruption.
This software is engineered to batch-process your movies at high speeds, eliminating the common fear of transfer failure due to oversized files. Besides, it supports multiple video formats, avoiding format incompatibility issues.
With efficient transfer rates and rock-solid stability in maintaining original file integrity, iPhone Data Transfer ensures a seamless, lossless experience for moving cinematic content between iPhone and Windows 10/11 PC.
1. Launch the program on your PC and connect your iPhone using an Apple-certified USB cable. If prompted, trust this computer.

2. In the left navigation pane, go to the Videos tab. To make browsing easier, the tool automatically categorizes your media into Movies, Music Videos, Home Videos, TV Shows, iTunes U, and Podcasts.
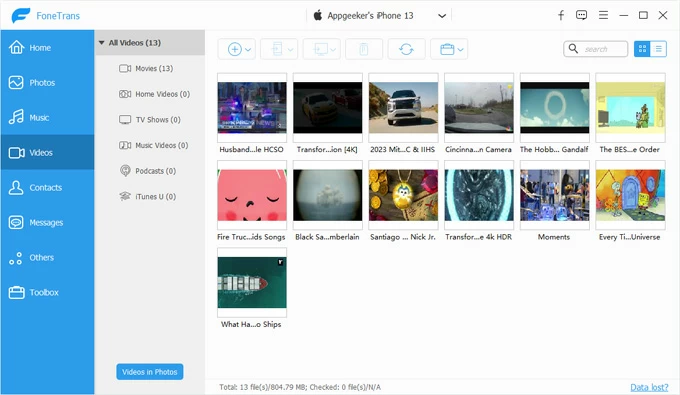
3. Under the Movies section, select the desired films, then click the computer icon at the top menu bar and choose Export to PC.

4. Select your preferred save location on the PC and confirm. Your movies will begin transferring to the computer. Once the transfer is complete, you can open the transferred movie files to play them and verify the quality.
Also see: How to transfer photos from iPhone to external hard drive
If your movies are stored in apps like VLC, Infuse, or KMPlayer, the Apple Devices app, developed by Apple specifically for managing iPhone and iPad on Windows PCs, provides a secure bridge. It utilizes Apple's official File Sharing system to transfer movie clips from the app on your iPhone to the PC.
1. If you don't have the Apple Devices app installed on your Windows PC yet, download it from the Microsoft Store first.
2. Plug your iPhone into the PC and unlock it.
3. Run the Apple Devices app and navigate to your iPhone.
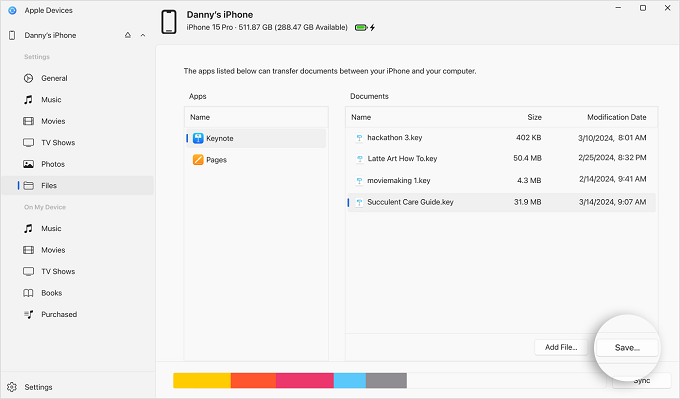
4. Click Files in the left sidebar. This will open a list displaying all the apps on your iPhone that have their own internal storage and support File Sharing.
5. Select the media player that holds your movies, then highlight the specific film files you need.
6. Click the Save button in the bottom-right corner and pick a target folder, then click Save again to start the transfer.
Read more: How to transfer music to iPhone without iTunes
If moving movies from iPhone to a PC with USB cable feels like a hassle, you can opt for cloud services or peer-to-peer methods to transfer your movies without cable.
As a cloud service deeply integrated with the iPhone, iCloud Drive can sync your movies in real-time across all your devices, including your PC. Once you upload your movies from your iPhone to iCloud and set up iCloud for Windows, the uploaded movies will automatically sync and become available for download on your PC.
However, iCloud only provides 5GB of free storage. If you have a large library of movie clips, you will need to upgrade your iCloud storage plan to accommodate the files. Additionally, ensure both your PC and iPhone have a stable internet connection, as the transfer speed is entirely dependent on your network signal.
1. Save your movies to iCloud Drive. Open the movie on your iPhone and tap the Share icon. Scroll down and select Save to Files. Choose an existing folder or create a new one within iCloud Drive as your destination.
2. Enable iCloud Drive on iPhone. Go to Settings, tap [your name] > iCloud > Drive, and turn on Sync this iPhone.
3. Set up iCloud for Windows on your PC.
After that, open File Explorer and locate the iCloud Drive folder in the Navigation pane. Here, you will be able to view and download your movies.
Related: How to access iPhone videos on PC
LocalSend is an agile, open-source application that establishes a direct Wi-Fi transmission channel between your iPhone and PC, enabling peer-to-peer transfer of movies from your iPhone to your PC. This method requires both your iPhone and Windows PC to be connected to the same Wi-Fi network.
1. Install LocalSend on your iPhone and your computer.
2. Make sure both devices are linked to the same Wi-Fi network.
3. On your iPhone, open LocalSend, tap Media, and add movies you'd like to send to your PC.
4. From the list of Nearby Devices, select the name of your PC.
5. A prompt will appear on your PC stating, "iPhone wants to send you a file." Click Accept to proceed.
The movie will transfer at the maximum speed allowed by your router. Once finished, the file is automatically saved to your Downloads folder on the PC.
Final thoughts
When it comes to transferring long 4K or HDR movies from iPhone to PC, the primary concerns are almost always speed and quality. Thanks to the methods outlined in this article, moving high-fidelity films no longer requires a compromise between the two.
Before selecting the most suitable method, you should first consider a few factors: the size of the files, the number of clips you need to move, whether you require the original lossless quality, and if you have the appropriate data cable on hand. Ultimately, simply choose the best solution based on your current environment.
Whether you opt for a high-speed wired connection or navigate via a local Wi-Fi network, your cinematic experience is now ready to be perfectly showcased on the big screen of your PC.
1. Why do my iPhone movies lose quality after transferring to a PC?
Many basic transfer methods do not copy the original file. Instead, they convert the movie into a more PC-friendly format. This process can reduce resolution, remove HDR color data, and change the codec. To avoid this, use a method that supports direct file export without re-encoding.
2. What is the safest way to transfer large 4K movies from iPhone to PC?
A dedicated Appgeeker iPhone Data Transfer tool is the most reliable option. It reads the iOS media database directly and exports your movies in their original format, which prevents compression, metadata loss, and transfer failure caused by file size limits.
3. Why can't I play some of the transferred movies on my Windows PC?
Playback failures on Windows are typically caused by missing codec support rather than a faulty transfer. Because iPhones utilize advanced formats such as Dolby Vision, ProRes, and HEVC, standard Windows configurations may fail to render the movie, resulting in stutters or errors.
To ensure compatibility, users should either install the HEVC codec from the Microsoft Store or utilize Appgeeker iPhone Data Transfer, which is intended to deal with these professional formats without compromising file integrity during the move.


