Messages Icon on iPhone Deleted

If iPad keeps your favorite songs taking up too much memory, don't worry, this post walks you through how to transfer music from iPad to computer for saving, editing and sharing.


You can transfer songs from iPad to Windows PC or Mac with/without iTunes.
To free up memory on your iPad or to create a playlist of music from your iPad on a new computer, or if you want to back up your favorite iPad songs to your computer, transferring music from iPad to computer will be a good idea.
If you are familiar with iTunes, using iTunes to move songs from iPad to computer is a breeze for you. But iTunes has limitations in transferring songs. You can try Appgeeker iPad Data Transfer to transfer music from iPad to a computer without iTunes. And this post will guide you on how to transfer music from iPad to Windows PC or Mac.
Table of Content
As one of the media that can transfer and manage multimedia files between computers and Apple devices, iTunes can not only transfer songs from computer to iPhone, but also copy music from iPad to Windows PC. But it should be noted that transferring iPad music to a computer with iTunes only supports songs purchased from iTunes Store.
Here's how to transfer music from iPad to PC:
1. Update iTunes to the latest version on the PC and run it.
2. Make sure your computer is authorized. Click "Account" on the top menu bar, and choose Authorizations > Authorize This computer, and then use your Apple ID and password to authorize.

3. Connect your iPhone to the computer using a USB-C or lightening cable, and then trust computer to give iTunes access to the iPad.
4. Go to File > Devices, and then select "Transfer Purchases from [your iPad]" to start the transfer.
![]()
After a while, your music on iPad will be transferred to iTunes library on the computer. If your iPad or iPhone won't sync with iTunes, you can move to the next way.
Due to iTunes limitations, you can't transfer non-iTunes purchased songs to your computer. To copy music from other sources on your iPad to computer, such as songs downloaded from the web or other third-party apps, you can take the help of Appgeeker iPad Data Transfer to move your complete music list from iPad to Windows PC or Mac, and vice versa.
With iOS Data Transfer, you can pick the target iPad music to transfer to computer without losing the original data. Besides, it also allows you to transfer photos, videos, text messages, contacts, etc. between computer and iPhone/iPad.
Follow the steps to put iPad music on computer without iTunes:
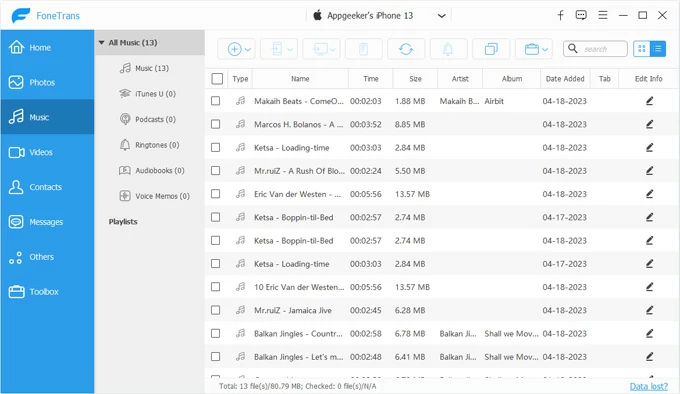
Step 1. Connect your iPad to PC. Launch iOS Data Transfer on your desktop and plug your iPad into the computer using a USB cable.

Step 2. Access the music library from your iPad. Navigate to the "Music" option on the left sidebar. All your track files and playlists will be displayed in the right panel and sorted into different tabs.
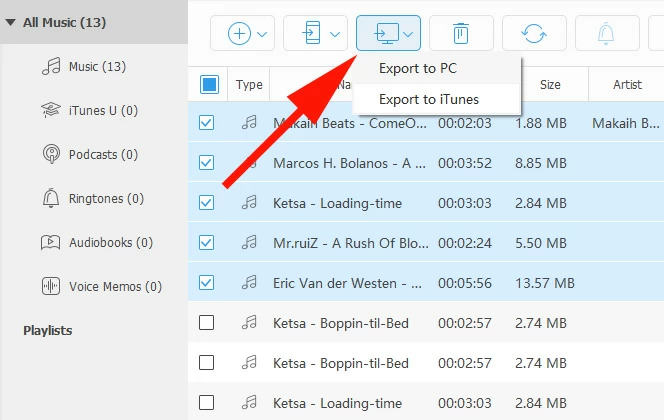
Step 3. Begin iPad to computer music transfer process. After checking the desired music, click the "computer icon" on the upper toolbar and choose "Export to PC" to transfer the music from iPad to PC for saving. If you choose "Export to iTunes", the transferred songs will be saved in your iTunes library.
Read more: How to transfer music to iPhone without syncing
iCloud Music Library is Apple's cloud-based music service that lets users upload their music library to the iCloud and sync it between all devices with the same Apple ID. But you have to subscribe to Apple Music or iTunes Match to use the iCloud Music Library feature. With iCloud Music Library available on your Apple account, you can sync music from your iPad to PC.
1. Turn on iCloud Music Library on your iPad. Head to Settings > Music and toggle on "Sync Library" / "iCloud Music Library."

2. Run iTunes on your compute and sign into iTunes with the same Apple ID that your iPad used.
3. Configure iCloud Music Library on your computer. On your iTunes, choose Edit > Preferences > General and check the "iCloud Music Library" option.
Wait for your iPad music stored in the cloud to download to your PC, and then you can find "\Libraries\Music\iTunes\iTunes Media\Music" folder on your computer to view your transferred songs.
Tip: Actually, if you have other cloud service apps on your iPad, such as Dropbox, Google Drive, OneDrive or others, you can also use them to transfer iPad music to your computer.
Related: How to transfer photos from iPhone to external hard drive
If you are using a Mac, you can utilize AirDrop, which comes with the Apple ecosystem, to wirelessly transfer files between Mac and iPad. Using AirDrop to send music from iPad to computer is more suitable for transferring a small number of songs. But first, you have to enable AirDrop and Bluetooth on Mac and iPad, and both devices should be connected to the same network.
Conclusion
Whether you have iTunes installed on your computer or not, this article provides you with several suitable methods to transfer music from your iPad to your computer. You can transfer a large number of songs from iPad to computer through iTunes, iCloud, AirDrop or third-party transfer software such as iOS Data Transfer, and then back up or edit the songs and share them with friends and family.