How to Transfer Audiobooks to iPhone

Want to move iPhone photos to SD card for storage? Read this post carefully to get the effective method to export iPhone photos to SD card whether you have a computer or not.

If you wish to transfer photos from iPhone to SD card without computer, try to use SD card reader on iPhone.
As the resolution of photos and videos captured by your iPhone increases, they take up more space on your device. To free up your iPhone's storage and permanently preserve precious memories, you can transfer photos from your iPhone to an external storage device, such as an SD card. However, transferring photos from an iPhone to an SD card isn't as intuitive as you might expect.
Don't worry, this post explores effective solutions on how to transfer photos from iPhone to an SD card, ranging from using adapters to third-party Appgeeker iPhone Data Transfer tool, making it easy to share and back up your photos.
Table of Contents
For a seamless photo transfer experience, you need to check and prepare some accessories:
Compatibility
Essential Tools
Preparation
For iPhone users, SD card reader is the most straightforward way to transfer photos from your iPhone to your SD card without computer. Designed by Apple, Lightning to SD Card Camera Reader and Apple USB-C to SD Card Reader ensure seamless compatibility with iOS devices, allowing high-resolution videos and photos to be transferred to your SD card at high speeds.
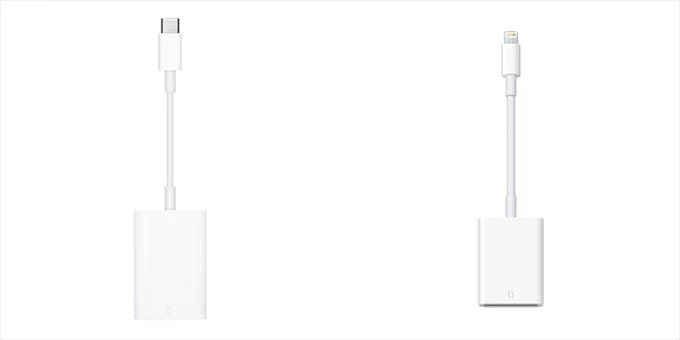
1. Prepare a suitable adapter according to your iPhone model, such as the original Lightning to SD Card Camera Reader and Apple USB-C to SD Card Reader.
2. Connect the SD card and iPhone. Plug the adapter into your iPhone charging port, insert the SD card into the reader's slot and make sure it is inserted.
3. Open the Photos App. Your iPhone will automatically prompt you to open the Photos app. If not, launch it manually.
4. Select the exported pictures. Tap Select and choose the photos you want to transfer, then tap the Share icon and select Export Unmodified Original.
5. Transfer the pictures to the SD card. Locate your SD card as the destination storage, tap Save to move the pictures from iPhone to the SD card directly.
6. Once the transfer is completed, eject the SD card and carefully pull it out of the adapter.
If you want to move a large number of photos and gain more flexibility and control over the process, using a third-party Appgeeker iPhone Data Transfer tool is the best choice. It allows you to preview and batch transfer photos from your iPhone's Photo Library and other apps to an SD card.
During the transfer, this software not only preserves your image original quality but can also convert iPhone's HEIC format photos into the more widely compatible JPEG format, making them easier to view on devices that don't support HEIC.
With iPhone Data Transfer, you can quickly transfer photos, videos, music, and other multimedia files between your iPhone and SD card without losing their quality. Here's how to use it to transfer all photos from your iPhone to the SD card.
1. Connect your iPhone to your computer using a compatible data cable, and insert your SD card into your computer's card reader or USB adapter.
2. Run iPhone Data Transfer on the desktop and locate the Photos tab on the left taskbar.

3. Select your desired photos. All the photos in your iPhone will be categorized into Camera Roll, Photo Library, Photo Shared or other sections. Preview your photo library and check the boxes next to the photos you want.

4. Move the photos to your SD card. After selecting, click the computer icon [Export to PC] above, then in the pop-up window, navigate to the folder on your SD card as the target storage location, click Open to start transferring the photos from your iPhone to your SD card.

If you want to perform the reverse transfer task, check out how to transfer photos from an SD card to an iPhone.
In the absence of a direct iPhone-to-SD-card adapter, using a computer as an intermediary is a reliable and effective method to transfer photo library from your iPhone to an SD card, especially when you need to transfer large-scale photo library data. This method taps into widely available tools—a USB cable and an SD card slot or reader—to facilitate the process, making it a practical choice for users with existing setups.
For Windows user:
1. Connect both iPhone and SD card to the computer using the right tool. When the iPhone prompts, tap Trust and enter the screen passcode to continue.
2. Open the File Explorer tool. You can find it in the Start menu or press Windows + E to launch it on your computer.
3. Click This PC from the left sidebar and locate your connected iPhone in the Devices and drives section.
4. Click on your Apple iPhone > Internal Storage > DCIM. You will see all the photos from your iPhone sorted by date into different DCIM subfolders.
5. Copy your photos. Pick the photos you need to transfer, right-click, and select Copy.

6. Paste your photos to the SD card. In File Explorer, locate your SD card directory, then right-click and choose Paste to move the pictures to your SD card storage.
For mac users:
1. Connect your iPhone and SD card to your Mac computer, and trust the computer if prompted.
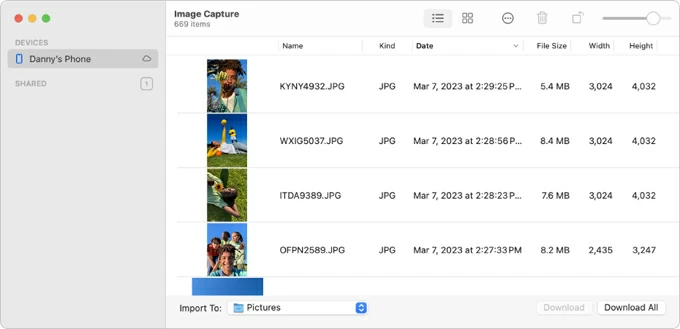
2. Open Image Capture app in Launchpad.
3. Click on your iPhone under the DEVICES section.
4. Browse and select the photos you need.
5. In the Import to section, select your SD card folder as the destination, then click Download or Download All to get the photos from iPhone on your SD card.
Also read: How to transfer photos from PC to iPhone
If your iPhone photos cannot be transferred to SD card, this part will tell you the common reasons and solutions.
Learn more: What to do if you cannot transfer music to iphone
Conclusion
With this guide, you're now equipped to confidently transfer your photo library from an iPhone to an SD card, no matter which method you choose. Remember to choose the appropriate tools to facilitate a fast and smooth transfer process.