iPhone Keeps Flashing Apple Logo

Platforms
Developed for both Windows & Mac users

Got a video on your iPad and think it would be fun to watch on a bigger screen? You can always transfer it!

A lot of times, we watch movies on our iPads. In a way, their slightly larger screen than the iPhone gives us a better viewing experience. This is fine but it can be pretty annoying if you want to watch movies with friends only find that the iPad screen still isn't big enough. At times like this, you may think of transferring videos from iPad to your Windows PC.
However, due to the completely different ecosystems of Windows and Apple, transferring videos from iPad to Windows PC isn't an easy task. You can't rely on Airdrop or other Bluetooth-based methods as you usually do. The good news is that you don't have to limit yourself to this any longer. This post here is to introduce how to transfer videos from iPad to Windows PC.
![]()
Scroll down to see how to transfer videos from iPad to Windows PC.
The methods to transfer videos from iPad to Windows PC:
As an iPad user, you're probably familiar with iCloud. Once you enable it, the videos from your iPad can be synced with your PC as long as the video is saved to your photo gallery. Be aware that this method will share all the videos on iPad to your PC.
Follow these steps below to import videos from iPad to PC.
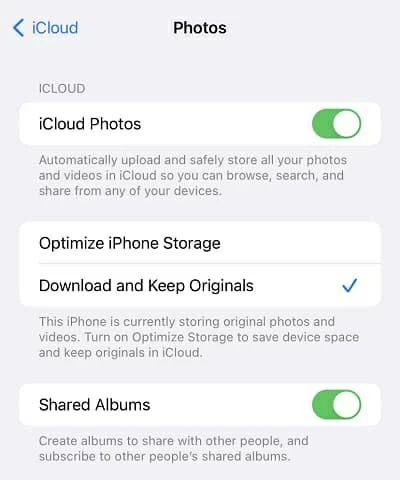
Enable iCloud Photos on your iPad:
Go to "Settings" > "your name". From the options, choose the "iCloud" button. Next, select "Photos" and enable "iCloud Photos."
Move to your computer:
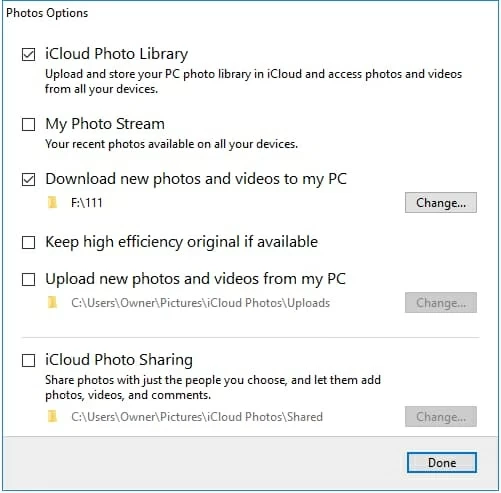
If you have already downloaded iCloud on your PC, follow these steps:
Sign in to your iCloud account. go to "Options" button next to the "Photos" tab. In the following pop-up window, check "iCloud Photo Library" and "Download new photos and videos to my PC." Next, click "Done" > "Apply", all your videos from iPad will begin syncing to your PC.
If you haven't downloaded iCloud on computer, you can still follow these steps:
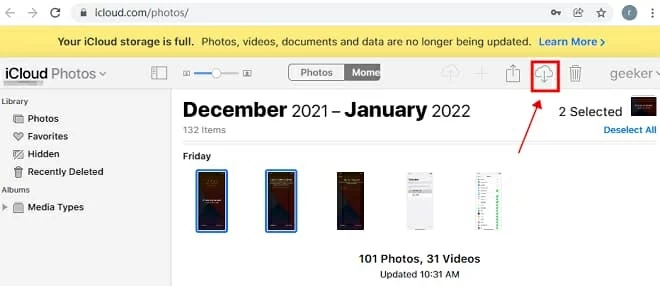
Go to the iCloud website and sign in by your Apple ID. Make sure that it is the same account that is logged into your iPad. Check the videos that you want to save on your computer. Now, click on the download button with a downward arrow to save the videos from your iPad to your PC.
Remember that you only have 5GB of free iCloud storage. Also, you can upgrade to iCloud+ with a paid subscription.
[Read: How Can You Get Videos Back Onto iPad]
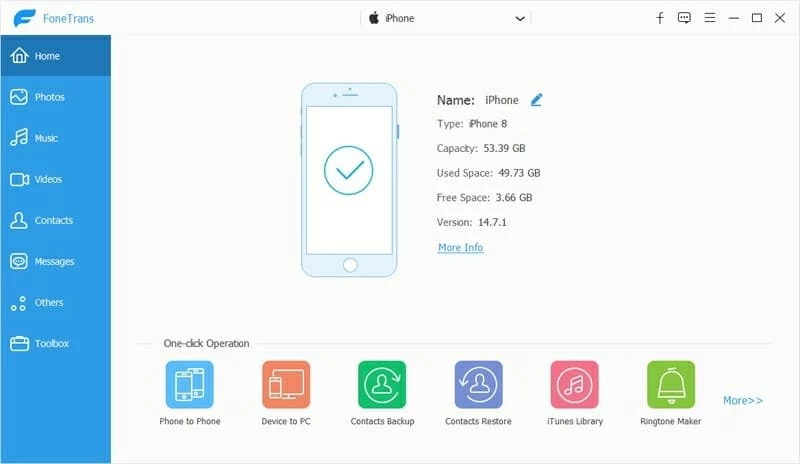
We have to admit that iCloud is a handy tool to transfer videos across devices. However, things aren't always perfect. With iCloud, you can't select which videos you want to transfer to your PC. Fortunately, AppGeeker developed an alternative—Appgeeker iPhone Data Transfer, with which, you can manually select which videos you want to transfer.
iPhone Data Transfer is a handy software you can use for almost any iOS device. With its user-friendly interface, you can move almost anything from iPad to iPad, iPad to Mac, and iPad to Windows. Moreover, there are no compatibility issues or video size limits.
You can easily save videos from iPad to computer by following these steps:
Download iPhone Data Transfer by clicking on the button above. After this, connect your iPad to your computer and trust it if necessary. You can see the details about your iPad in the interface of iPhone Data Transfer.
Next, from the tab on the left, select "Videos". This column will lead to your video lists. All these videos are sorted into categories, which will help you quickly find which videos you want to transfer. Check the videos you like from the list to transfer to your PC.
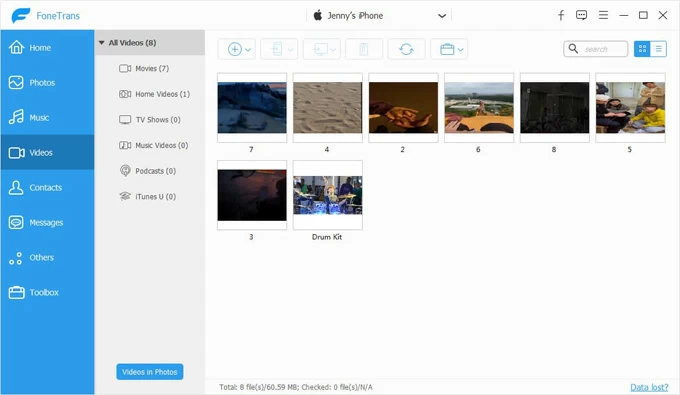
To copy these videos to your PC, click the "To Computer" icon at the top center. Then, click on "Export to PC." This will open a window where you will specify the location on your PC where you wish to transfer the videos. Now sit back and iPhone Data Transfer will do the rest. Within a few minutes, or even seconds, you can save videos from iPad to computer.

A quicker method is to click the "Device to PC" button and then select videos to transfer videos from iPad to computer in one click.

You might be looking for an easy fix that doesn't require you to download or install anything. Perhaps it's because you don't have access to the Internet and want to transfer something instantly. Everyone's PC has File Explorer, which can also transfer movies from your iPad to your computer.
First, connect your iPad to your PC using your charger cable. Click on This PC and navigate to Apple iPad. Here, you will see an icon labeled "Internal Storage."
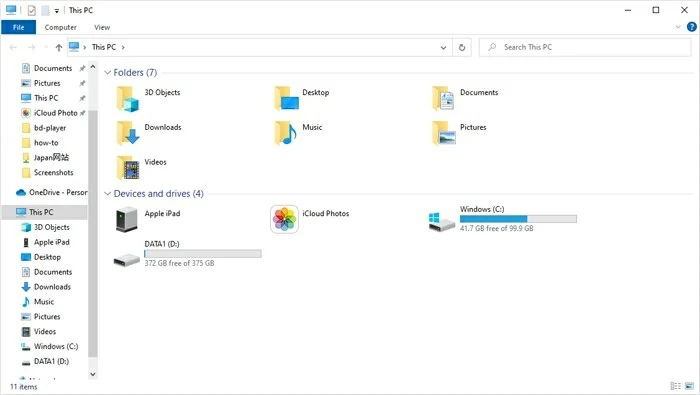
Clicking on it will lead you to a folder called "DCIM." Make sure you have allowed your PC to access your data from both your iPad and PC, or you won't find this folder. Scroll through the folder and select the video that you wish to transfer.

Right-click on the video that you want to transfer and select "Copy." Then, go to the folder you wish to save this video in, right-click, and select "Paste." You can also perform this by the shortcuts "ctrl+c" and "ctrl+v" respectively.
After it is pasted, you can access the videos even if your iPad is not connected to your PC.
[Don't Miss: How to Recover Permanently Deleted Photos on iPhone]
From Windows 8, the Photos app was introduced in all Windows PCs. This is an out-of-box method that allows you to transfer videos over a USB cable. If you encounter any other problems with other methods, you will always rely on it to transfer videos from iPad to your computer.
You will first have to connect your iPad to your PC as usual. When your iPad prompts you, select "trust". Your PC may request permission as well. Then, the Photos App will launch itself automatically. If not, open it from the start menu.
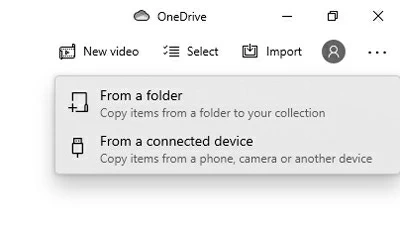
On the top right corner, select "Import" and then from the drop-down menu, "From a connected device."
The Photos app will then look for your iPad and begin displaying the photos and videos in it. Select the videos you want to save and click "Import X of X items" to begin transferring.

You may find there is no such thing as a Photos app on your computer because the version of your PC is older than Windows 8. No worries, Microsoft also offers a built-in service—AutoPlay, which is often used to display the data in devices that are connected to the PC, including your iPad. We can make full use of this feature to import videos from iPad to computer.
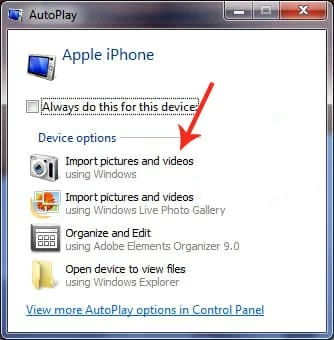
Like the Photos app, when you connect your iPad to your PC, AutoPlay usually pops up on its own. If it does not, try these steps to reset:
Open the control panel by using the shortcut "Windows key+s" to search Control Panel. Then, select "AutoPlay" from the list. Click "Reset all defaults." Now reconnect your iPad, and it will pop up.

Here's how to import videos from iPad to PC with AutoPlay:
Connect your iPad to the computer, select the Trust option on both devices if needed. When the AutoPlay window pops up,choose the "Import Pictures and Videos" option that says "Using Windows" beneath it. As soon as you click it, the process will begin, and the videos will be copied from iPad to computer.