How to Transfer Videos from iPhone to Mac


Platforms
Developed for both Windows & Mac users

Figuring out how to transfer your photos from an iPad to an iPhone? In this guide, we'll break down some practical ways in sharing your pictures from your iPad to iPhone.

To transfer photos to iPhone from an iPad, wireless options such as iCloud, Photo Stream, and AirDrop should be on your radar. The first two methods require you to log into the same Apple ID account on both iOS devices for the transfer, while the last one doesn't.
Plus, for flawless and selective bulk iPad photo transfer to iPhone, you can try the efficient software, Appgeeker iPhone Data Transfer. It can quickly send your photos from an iPad to iPhone or in the opposite direction with just several steps.
You can move your photos from iPad to iPhone with ease even if the Apple ID accounts are different on the devices.
Odds are that you may need to share your photos on your iPad with your friends or family, and many of them could be iPhone users. In this case, you'll need to know how to transfer your photos from iPad to iPhone. Here we'll outline 4 different ways for you to easily transfer your iPad photos to an iPhone, no matter if the iDevices use the same Apple ID account.
Tip: If you want to transfer photos from an old iPhone to a new one not using iCloud, we've written a tutorial on how to transfer photos between iPhones without iCloud that'll help.
To send photos from your iPad to an iPhone when they're not on the same Apple ID, you can opt for using AirDrop, or iPhone Data Transfer.
Using AirDrop can help you transfer your images from your iPad to iPhone wirelessly with ease. Just select the photos you want to transfer and then share through the AirDrop option, the selected photos will later be sent to your iPhone. Here're the detailed steps.
Step 1. Turn on AirDrop on both your iPad and iPhone. Go to Settings > General > AirDrop, and select Everyone.
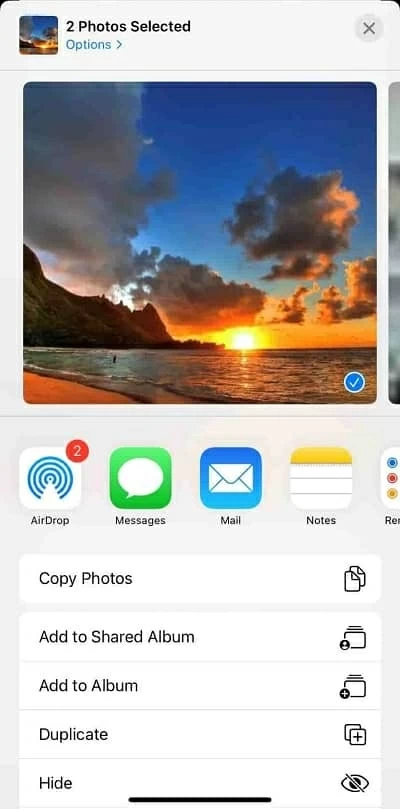
Step 2. Select the photos for transfer. Open the Photos app on your iPad, then tap the Select option in the upper right corner and start picking your iPad photos for the transfer to iPhone.
Step 3. Choose the iPhone AirDrop user to share the photos. After selection, tap the Share button in the bottom left corner and select AirDrop. Then tap the AirDrop user you want to send the photos. You can share it with just one person or several people.
Step 4. Receive the photos on the iPhone. When a message shows up on the iPhone asking if you want to receive the iPad photos, tap Accept to start the transfer.
Upon completion of the transfer process, your iPhone will automatically direct you to the Photos window and display the newly transferred pictures. However, be aware that the time-based organization of the photos may lead to difficulty in locating shared pictures, as these photos may get inserted among your existing ones instead of being put after them.
Additionally, when transferring a significant number of iPad photos to your iPhone with AirDrop, it's best to avoid sending them all in one go. Attempting to do so may result in a failed transfer, so it's wise to send them in smaller batches.
Want to transfer a bulk of photos stably fast from iPad to iPhone or vice versa? You can't miss Appgeeker iPhone Data Transfer. Unlike using AirDrop, it enables you to efficiently import plenty of photos once at a time at high speed. Plus, with this program, you can well organize your transferred photos in crystal-clear album structure. Moreover, it can transfer photos or other data across different platforms and devices besides iPad and iPhone, which include PC and Mac.
Key features:
Here we'll find out how to get pictures from your iPad to iPhone using iPhone Data Transfer.
Step 1: Download and install the software on your computer, then launch it on the desktop.
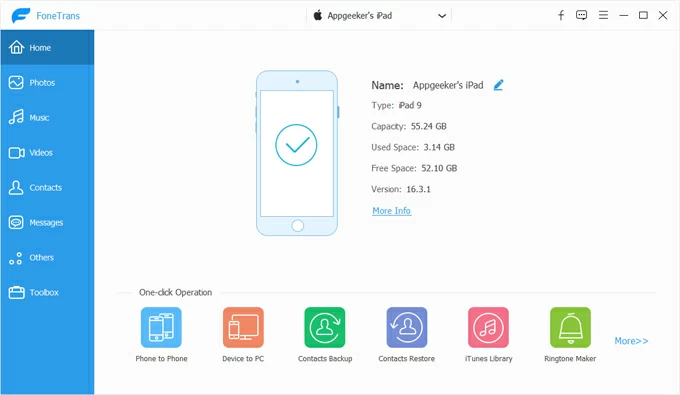
Step 2: Use cables to connect both your iPad and iPhone with your computer. Then unlock the iDevices and tap Trust on their screens to allow the computer to access them.
On the software home page, you need to make sure the information onscreen is about your iPad. If not, click the down arrow at the top and select your iPad.
Step 3: Select the photos you want to transfer. Click Photos on the left side and you can see all the photos and albums stored on your iPad. Here choose the desired photos for transfer by clicking the thumbnails directly.
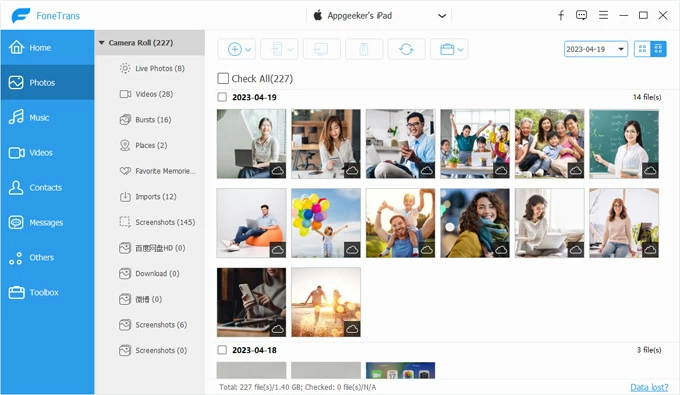
Step 4: Start the photos transfer. Once you finish the selection, click the phone icon at the top and select your iPhone. The selected photos will start to transfer immediately.

Later you can view the transferred photos on your iPhone's Photos app directly. Or click the down arrow to change to your iPhone in the tool, then go to the Photos section again, and locate the Photo Library album that's beneath your other albums.
Tip: If you want to delete the transferred photos from your iPhone, you need to do it in the software by selecting them and clicking the trash can icon at the top.
We also have an article about how to transfer videos from PC to iPhone here.
If you have logged in with the same Apple ID and password on both your iPad and iPhone, you can transfer your photos between the devices wirelessly and automatically by iCloud or Photo Stream. However, with these methods, you'll have to sync all the photos at a time, rather than selecting the photos you want.
[Further reading: How to transfer videos from iPad to PC]
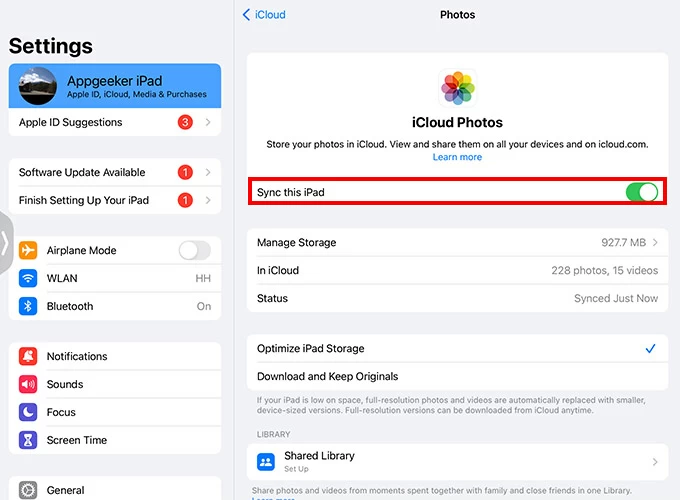
iCloud is Apple's cloud-based storage service that allows you to access your files and data from multiple devices, including photos and videos. One of its main features is the ability to sync your photos and videos across all your Apple devices, keeping them up-to-date and organized.
But iCloud only provides 5GB of free storage, which can quickly be used up if you have a large photo or video library. This means you may need to upgrade to a paid storage plan in order to store all your photos and videos in the cloud.
Below, you'll learn how to use iCloud to copy pictures from your iPad to iPhone. Make sure you take the following steps on your both devices.
Wait for a while before the photo transfer is finished. It may take quite a long time if you need to upload an abundant amount of photos. Once done, you can check the photos in the Photos app.
Unveiling another avenue to import captivating pictures from your iPad to iPhone, Photo Stream emerges as a viable option. However, it only stores 1000 photos at most that you took within the last 30 days, after which they are automatically removed.
Go to Settings iCloud > Photos on your iPad, and turn on My Photo Stream. After some time, open Photos on your iPhone and tap the Albums option at the bottom. Here you can see an album named My Photo Stream, where your synced photos are saved.
You may also find this article helpful: How to transfer photos to new iPhone
1. How to transfer a large amount of photos selectively from iPad to iPhone at high speed?
If you're looking to transfer a large amount of photos selectively from your iPad to your iPhone quickly, iPhone Data Transfer is the optimal choice. Not only does it allow you to choose large quantities of photos you want to transfer, but it also offers a clear album structure for easy management of your transferred photos. With iPhone Data Transfer, you can transfer your photos in bulk, ensuring a smooth and efficient transfer process.
2. How to upgrade iCloud for more cloud storage space to save more photos?
3. Will the photos and videos in Photo Stream take up iCloud storage?
Photos and videos in Photo Stream don't count towards your iCloud storage limit, but will take up storage on your iOS device. Besides, notice that photos and videos in Photo Stream will only be stored for up to 30 days. After that, they'll be automatically removed from Photo Stream.

