How to Erase an iPhone

Looking to save music from your Windows PC or Mac to your iPhone 17? This article will show you exactly how to transfer music from your computer to an iPhone 17.

With Appgeeker iPhone Data Transfer, you can easily transfer music from your PC or Mac to your iPhone 17 without any loss in audio quality or worries about format compatibility.
Here are multiple methods to transfer music from a computer to an iPhone 17, whether you're on Windows PC or Mac.
While streaming services make music accessible, they don't give you full control over your library. That's why many users still need to transfer music from their computers to the iPhone 17, especially for personal collections like rare tracks or self-made audio, ensuring they're always available for on-the-go listening.
This article offers a complete guide on how to transfer music from computer to iPhone 17, with tailored instructions for both Windows PC and Mac users. Optimize your audio experience and enjoy true offline playback with no restrictions.
Table of Contents
Whether you want to move music from a PC to an iPhone 17 or export songs from a Mac to an iPhone 17, third-party transfer tools and cloud-based services serve as universal solutions.
If you want complete control over your music library without being limited by Apple's syncing restrictions, this method stands out. Unlike traditional "sync and replace" tools, Appgeeker iPhone Data Transfer acts as a direct bridge, allowing you to transfer music from your computer to your iPhone 17 without syncing.
Capable of handling massive music libraries, it can quickly transfer large volumes of music from a Windows PC or Mac to your iPhone 17 in one go, all while preserving the original file quality. Even better, the software supports a wide range of formats, including MP3, AAC, ALAC, and WAV. During the transfer process, it automatically converts any incompatible music files into formats that are perfectly suited to your device.
No iTunes required, and no risk of deleting any of your existing songs, this powerful tool makes it easy to get your favorite songs or full albums off your computer onto your iPhone 17.
1. Run the program on your Windows PC or Mac, and connect your iPhone 17 to the computer using a suitable USB cable.

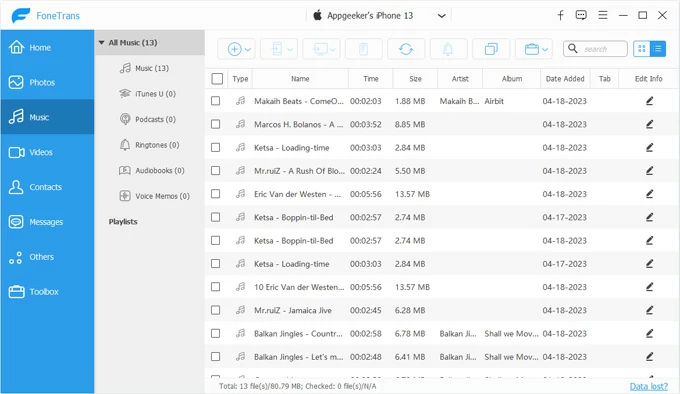
2. Navigate to the Music tab on the left sidebar. Here, you will see all the music files on your iPhone 17 organized into different categories.
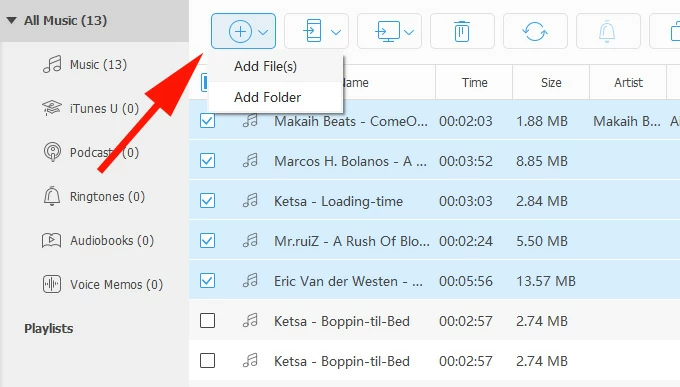
3. Click the + (plus) icon in the top toolbar and select Add File (s) or Add Folder. Browse through your folders to find your desired songs or entire albums, then click Open to add them to your iPhone 17.
4. Alternatively, you can simply drag and drop the songs directly into the software to import them.
That's it, your music has been successfully transferred from your computer to your iPhone 17 without needing iTunes. Open Apple Music on your iPhone 17, and you'll find the new tracks ready for your listening pleasure. This software also can help you transfer photos from iPhone to PC.
Cloud-based methods shift the process from "transfer" to access anywhere. Instead of directly moving files, you upload them once, and they become available on your iPhone 17 whenever needed. You can wirelessly download music from a computer to the iPhone 17 using popular cloud services like iCloud Drive, Google Drive, OneDrive, or Dropbox.
Here is how to do it using Dropbox as an example:
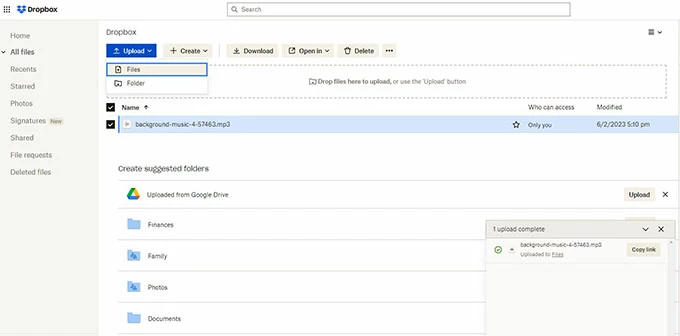
1. Access the Dropbox official website on your computer and log in to your account.
2. Create a new folder or open an existing one where you want to save your songs.
3. Click the Upload button and select Files or Folders to upload the music you wish to transfer.
4. Install and launch Dropbox on your iPhone 17, then sign in with the same account.
5. Locate your target folder and download the songs to your local storage.
Export these songs to other apps (such as a music player) to enjoy them offline.
Read more: How to transfer videos from iPhone to computer
On modern Windows systems, especially Windows 11, the Apple Devices ap—the official mainstream tool released by Apple for managing and backing up devices on Windows— allows you to manually transfer your PC's music library to your iPhone 17. However, this method must be used in conjunction with the Apple Music app.
1. Download the Apple Devices app and Apple Music app from the Microsoft Store if they're not already installed on your computer.
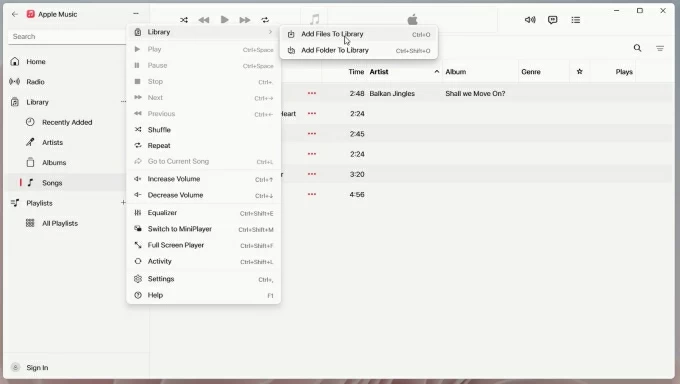
2. Launch the Apple Music app and navigate to Library > Songs on the left sidebar.
3. Alternatively, click the three dots (...) in the top-left corner, select Library, locate your music files or folders, and click Open to add them to your library.
4. Open the Apple Devices app and plug your iPhone 17 into your PC via USB cable. If prompted, tap Trust or Allow on your iPhone and enter your passcode.
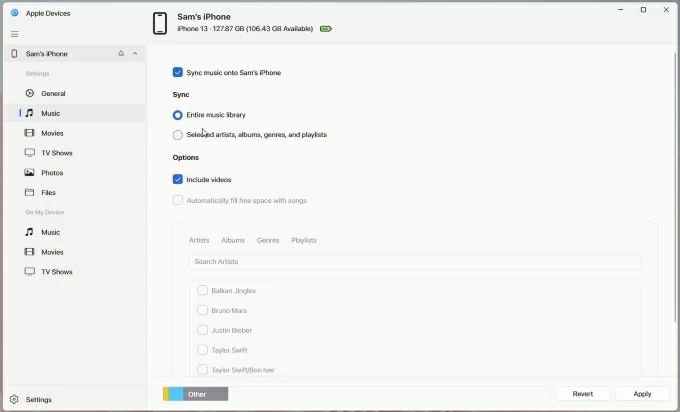
5. In the Apple Devices app, click on your iPhone in the sidebar, then go to the Music tab.
6. Check the box for Sync music onto [Your Name]'s iPhone.
7. Select Entire music library to sync everything, or choose Selected artists, albums, genres, and playlists to pick specific items.
8. Once everything is set, click Apply or Sync to transfer the music from computer to iPhone 17.
Things to note when using the Apple Devices App (as well as iTunes)
Although its interface feels a bit dated, iTunes remains a practical fallback option for users familiar with it. It provides the classic way to sync playlists, albums, or your entire music library from your Windows computer to an iPhone 17.
1. Open the latest version of iTunes on your desktop. If needed, update iTunes to the most recent version first.
2. Link your iPhone 17 to your Windows PC and grant the necessary permissions if required.
3. Ensure the top-left tab is set to Music, then click Songs to access your iTunes library.
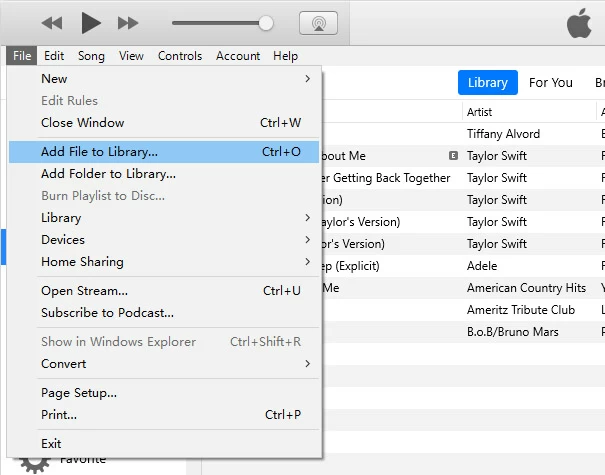
4. Click File in the upper-left corner and select Add File to Library or Add Folder to Library to add the songs to your library.
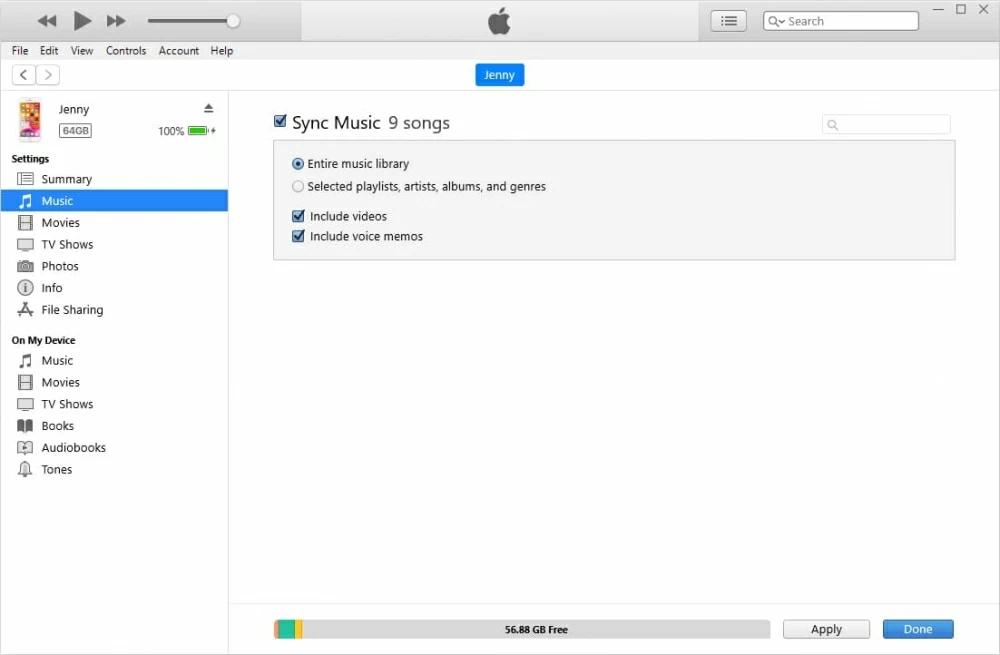
5. Hit the Device icon near the top-left and select Music under the Settings section.
6. Enable the Sync Music option. If a popup appears, read it and click Remove and Sync.
Tip: If the Sync Music option can't be selected, go to the Summary tab and check "Manually manage music and videos."
7. Choose either Entire music library or Selected artists, albums, genres, and playlists based on your needs.
8. Click Apply in the bottom-right corner. The progress bar at the top will show the transfer status. Do not disconnect until the "Syncing..." message disappears.
Once finished, you will see the transferred songs in your iPhone's Music app.
See more details: How to transfer music from iTunes to iPhone
Starting with macOS Catalina (10.15), Mac has featured the built-in Finder to manage and transfer your music. By utilizing this tool, you can move music from Mac to an iPhone 17 via a wired connection without the need for any additional software.
1. First, you need to add your songs to Apple Music on your Mac.
Open the Music app, then locate your music files on your computer and drag and drop them into the Songs section.
2. Unlock your iPhone 17 and hook up it to your computer with a certified USB cable.
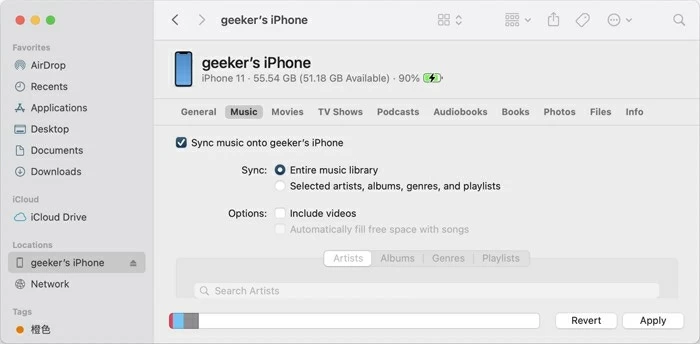
3. Run Finder and locate your iPhone under Locations.
4. Head to the Music tab, then check Sync music onto iPhone.
5. You can choose Entire music library or filter your selection by choosing Selected artists, albums, genres, and playlists.
6. Click the Sync button in the bottom-right corner to start syncing the tracks to the Music app on your iPhone 17.
If you only want to share a few songs from Mac to iPhone 17, AirDrop is the best option. As a feature fully integrated into the Apple ecosystem, AirDrop can establish a peer-to-peer connection between your macOS computer and iPhone via Bluetooth and Wi-Fi, letting you transfer music from a Mac to an iPhone without syncing.
1. Turn on Wi-Fi and Bluetooth on both your Mac and iPhone 17.
2. On your iPhone 17, swipe down from the top-right corner to open Control Center, and make sure AirDrop is set to Contacts Only or Everyone for 10 minutes.
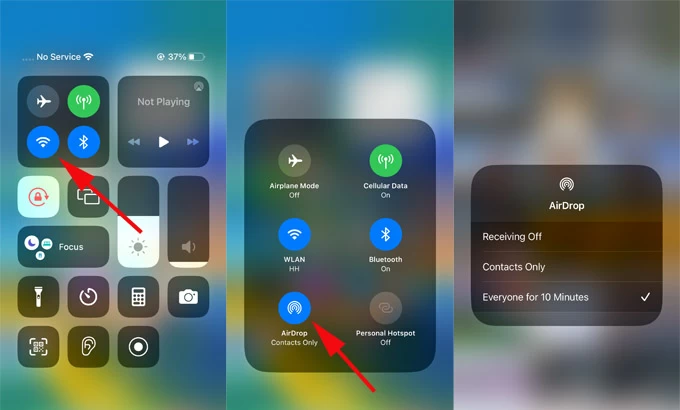
3. On your Mac, click the Control Center icon in the top-right menu bar and highlight the AirDrop icon.

4. Locate your audio files on your computer (on the desktop or in a folder), right-click it, and select Share > AirDrop.
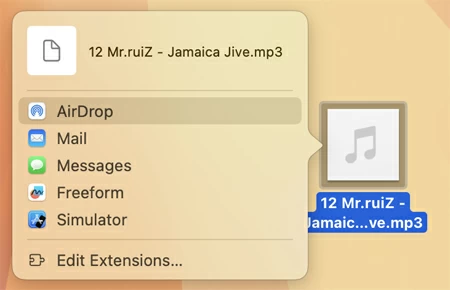
5. A window will pop up showing nearby compatible devices, then select your iPhone 17 as the recipient.
6. Tap Accept when prompted on the iPhone 17, and choose the app where you want to open or save the received files.
For users subscribed to Apple Music, there's no need for cables or manual steps. Your music can be seamlessly downloaded from your computer to your iPhone 17, as your library automatically syncs across devices using the same Apple account as long as Sync Library is enabled.
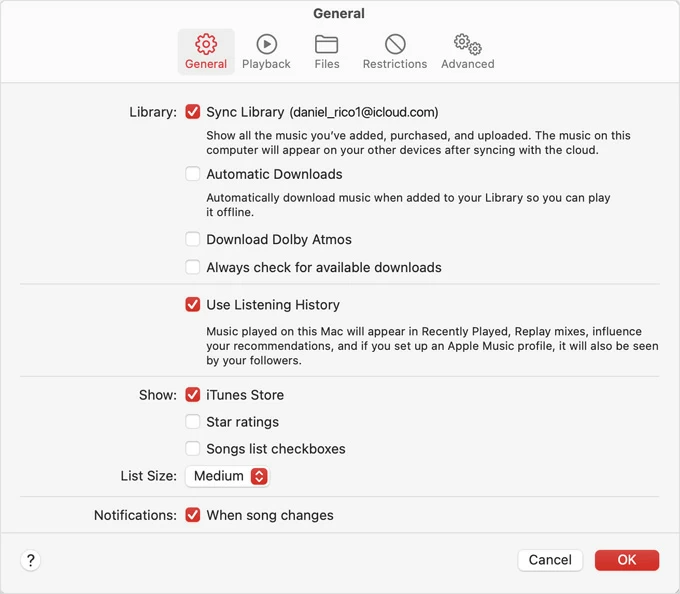
Open the Music app on your Mac. From the top menu bar, go to Music > Settings > General, and make sure the Sync Library checkbox is enabled.
On your iPhone 17, head to Settings > Apps > Music, and ensure the Sync Library toggle is turned on.

Once both devices are using the same Apple account, any songs or playlists added to your music library on your Mac will be uploaded to iCloud, making them available in the Music app on the iPhone 17. Simply tap the Download icon next to a song to save it permanently on your iPhone 17.
Related: How to transfer photos from Mac to iPhone
If you are having trouble transferring music from the computer to the iPhone 17, try the following troubleshooting tips to fix the issue:
Songs appear grayed out:
Cause: This usually happens when a sync is interrupted or the file is DRM-protected.
Solution: Delete the grayed-out songs from your iPhone, restart the device, and use AppGeeker iPhone Data Transfer tool to retransmit them, forcing the file index to rebuild.
Windows doesn't recognize the iPhone 17:
Cause: The device hasn't trusted the computer, or you're using a power-only USB-C cable.
Solution: Make sure you're using a compatible USB-C 3.2 cable or an Apple-certified cable. When connecting, confirm the Trust This Computer prompt on your iPhone 17 to grant full access.
Sync Library conflicts:
Cause: Manual drag-and-drop won't work if iCloud Music Library is active.
Solution: If you prefer manual transfers, go to Settings > Apps > Music and turn off Sync Library. Note that this will remove offline Apple Music tracks.
Format compatibility issues:
Cause: Unsupported or uncommon file formats may not play or even appear on your iPhone.
Solution: Convert your files to MP3, AAC, or ALAC formats before transferring.