How to Access iPhone Photos on PC


Discover 5 fastest and safest methods to transfer photos from an iPhone 12 to a Mac at their original, full-resolution quality. Move a few or thousands of pictures easily!

Appgeeker iPhone Data Transfer is a dedicated tool and offers flexible two-way transfer route to quickly move photos, videos and other data from iPhone and Mac (or PC), and vice versa. It uses a direct cable connection, ensuring a seamless transfer of large photo library without internet or extra iCloud storage.
This article will show you the best way to get your photos from the iPhone 12 to Mac wirelessly, or using a cable.
When it comes time to transfer photos from iPhone 12 to a Mac——whether to free up your device storage, edit photos on a larger screen, or create a backup secure secondary—you might wonder which method is simplest for moving those memories onto your desktop.
Apple offers several native tools to bridge iOS and macOS, making the iPhone 12 to Mac photo transfer as smooth as possible, while keeping your original files untouched.
Below is a complete guide on how to transfer photos from your iPhone 12 to your Mac (iMac, MacBook series), covering both wireless and wired solutions for importing just a handful of recent pictures or a larger library of thousands of high-resolution images at once.
Table of Contents
If you only need to move a couple of photos or a small batch of images (HEIC, JPG, PNG) from your iPhone 12 (Pro, Pro Max) to your Mac machine, AirDrop is probably the quickest way. It does not require a cable, iCloud storage, or additional software.
Once AirDrop is enabled on the Mac and placed close to your iPhone 12, you can share the photos to your computer rapidly without losing quality. The transferred photos will be saved into Mac's Downloads folder.
How to send photos from iPhone 12 to Mac wirelessly via AirDrop:
1. Turn on AirDrop on Mac.
2. Select photos in iPhone 12 camera roll to transfer over to Mac.
3. Instantly send iPhone 12 photos to Mac without a cable.
4. Confirm the photo transfer on Mac screen.
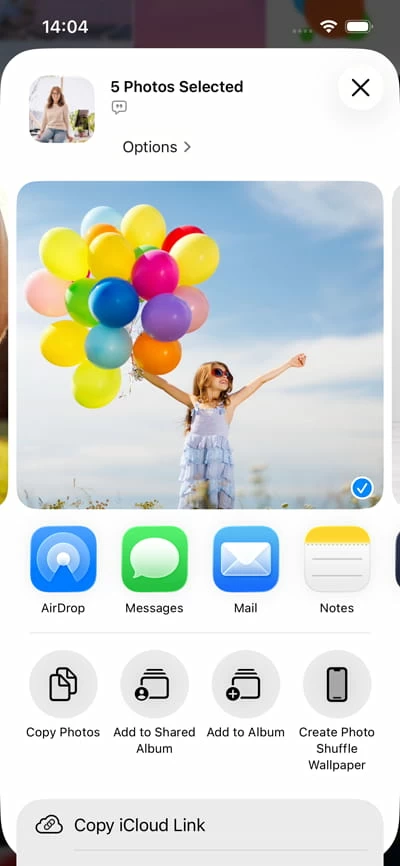
While AirDrop is convenient, it is not built for massive data transfers. If you try to send 1,000 photos or 20 GB of high-quality at a time, the transfer can stall, time out, or silently fail halfway through without giving you an explicit error log. For bulk transfers, switch to a wired connection or iCloud sync.
Related: How to transfer music from computer to iPhone
If you prefer a hands-off transferring approach where every picture captured on your iPhone 12 automatically appears on your Mac desktop without plugging in a cable, Apple's iCloud Photos is the built-in cloud solution.
Instead of manually copying individual photos from your iPhone to Mac, iCloud Photos keeps the entire photo library synchronized across Apple devices that are sharing the same Apple Account. It's an automatic process of uploading all Phone 12 pictures and videos to iCloud and downloading them to Mac Photos Library.
Step 1: Enable iCloud Photos on iPhone 12
Open Settings, tap [your name], select iCloud. Tap Photos, and then turn on Sync this iPhone.
Step 2: Enable iCloud Photos on Mac for syncing entire library
Open the Settings app. Click [your name]. Select the iCloud tab. Tap Photos under Saved to iCloud heading, and then toggle on Sync this Mac to activate iCloud Photos. Your photos on iPhone 12 will begin syncing to Mac via Wi-Fi network.
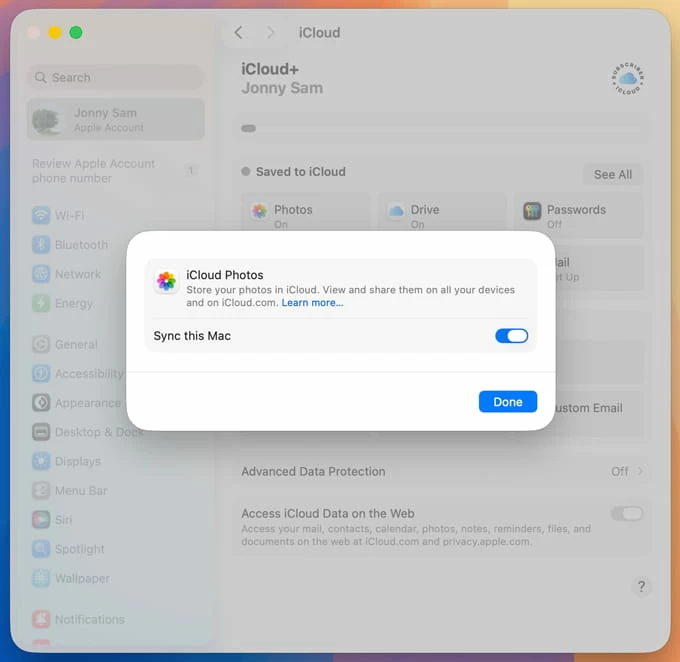
Step 3: Download original photos to your Mac
By default, your Mac may use optimized storage to save space. If you want full-resolution copies, then navigate to Photos app, and choose Photos > Settings > iCloud > Download Originals to this Mac. Your Mac will download the complete photo files.
Every Apple ID includes only 5GB of free iCloud storage. If thousands of high-resolution photos and 4K videos needs to be imported from your iPhone 12 to Mac, you may require an iCloud+ subscription plan. Plus, in case you delete a photo from your iPhone 12 to free up space while iCloud Photos is active, that photo will automatically be deleted from your Mac and cloud storage as well.
When you have thousands of photos on your iPhone 12 and need to offload them quickly to a Mac without relying on cloud subscriptions, native sync restrictions, or iTunes/Finder backup structures, dedicated desktop software offers the most control.
The Appgeeker iPhone Data Transfer utility is tailored specifically for direct, two-way file transfers between iOS device and Mac & PC over a direct USB cable connection, making it easy to copy photos from iPhone 12 to your Mac in minutes. It allows you to preview, organize, filter, and selectively export high-volume image library, albums or photos directly to any local folder on your Mac or external drive.
The software also supports the wired transfer of videos, movies, music, messages, contacts and more between iOS and macOS & Windows computer.
Here's how to transfer camera roll photos from an iPhone 12 to a Mac smoothly using Appgeeker iPhone Data Transfer program, in an effort to save the images locally for backing up or editing.
1. Run the software after download and installation.
2. Connect your iPhone 12 to your Mac through a lightning cable.
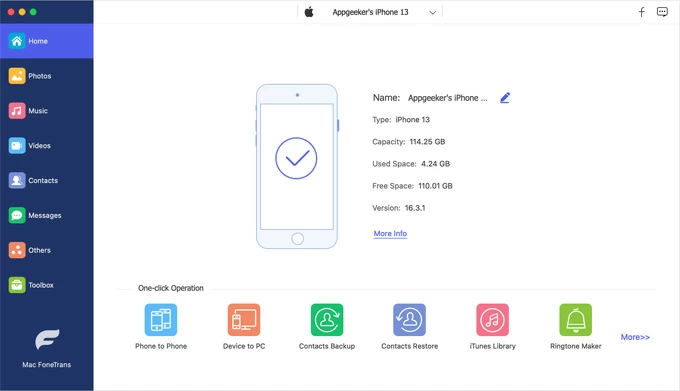
2. On the left sidebar, click on Photos tab. The software will access your iPhone 12 photo library and display its same view of the album: Live Photos, Screenshots, Videos, etc.
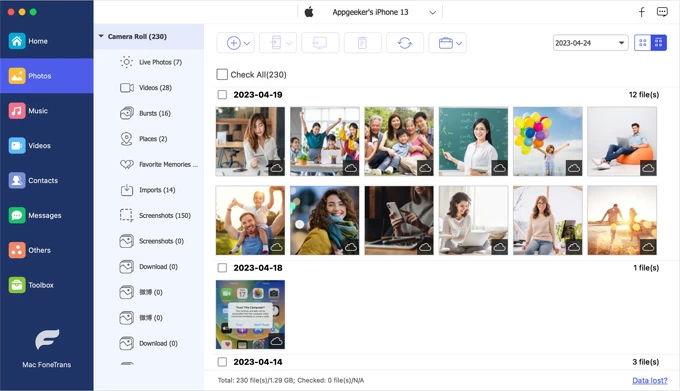
3. Select the pictures or albums you'd like to move onto Mac.
4. After selections, click Export to Mac/PC button on the top toolbar menu.
5. A Mac Finder prompt will open. Select your desired target destination—such as a specific folder on your Mac's internal storage drive or an attached external SSD—and click Open/Save.
The software will begin transferring the selected photos directly to your Mac from the iPhone 12 Camera Roll while maintaining original EXIF metadata, photo resolution, and timestamps.

Also: How to restore messages on iPhone from iCloud backup
The Photos app on Mac is Apple's default solution for importing pictures from an iOS device. If you're looking for a physical, wired USB cable transfer of hundreds or thousands of photos from iPhone 12 to Mac without installing any extra software, this is usually the simplest option.
Unlike Appgeeker iPhone Data Transfer software mentioned above, the Photos app imports copies of your pictures to macOS's native library database, rather than a normal folder.
To use it for transferring iPhone 12 photos straight to Mac Photos app, do the following:
1- Connect your iPhone 12 to your Mac using a USB-C to Lightning cable.
2- Turn on your iPhone screen and enter your passcode to grant read access to your media files. If prompted with "Trust This Computer?", tap Trust.
3- On your Mac, launch the Photos app, and click on your iPhone under Devices section at the left navigation sidebar.
4- At the top of the window, click the Album dropdown menu to select whether imported photos should go into your main Library or a specific pre-existing album.
5- Click on the individual photos in the grid to highlight them, then click the Import [Number] Selected button in the top-right corner. You can also import all recent images by click on the Import All New Photos button.
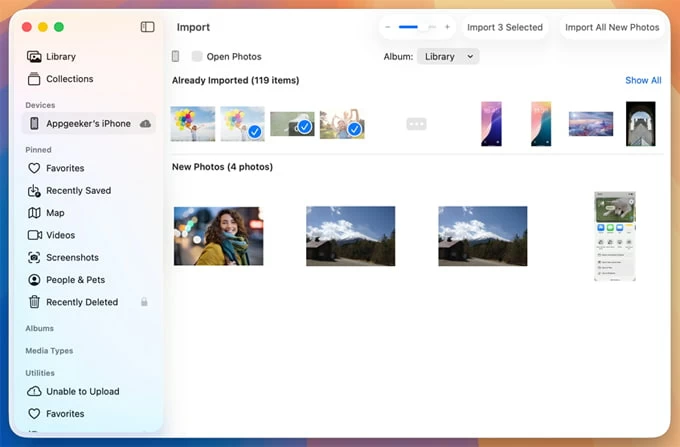
After the iPhone 12 to Mac photo import completes, a dialog box may ask if you want to Delete items after import. If you are trying to free up local storage space on your iPhone 12, click Delete to remove transferred photos. Otherwise, select Keep Items.
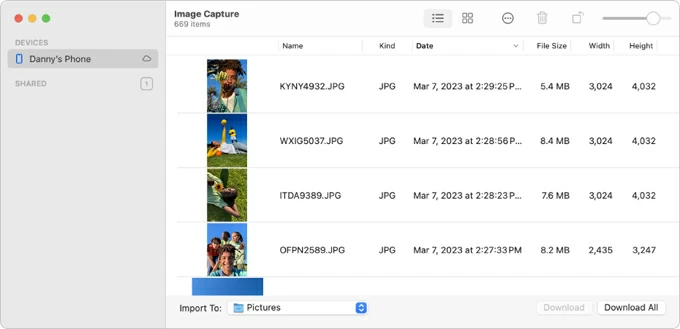
Image Capture is another Apple-supported way of moving large collections of photos from iPhone 12 to the Mac, iMac or MacBook, and gives you more control over where your image files reside on your storage drive: Desktop, a custom folder or external hard drive. It works with a cable connection and great for large imports.
When you need to transfer your photos to Mac from your iPhone 12 (Pro, Pro Max) without going through AirDrop or iCloud, try the Image Capture with flexible for file management.
1. Plug your iPhone 12 into your Mac via USB and unlock your phone screen.
2. Launch Image Capture app.
3. Click your iPhone 12 under the DEVICES heading in the left sidebar menu. Image Capture will display a flat, chronological list of every photo and video stored on your device.
4. Choose a destination directory—such as Desktop, Pictures, Downloads, or select Other... by clicking the Import To: drop-down menu.
5. Execute the iPhone 12 photos transfer to Mac without quality loss.
Although Image Capture is a good choice for downloading photos from iPhone 12 to Mac's folder, it cannot transfer a photo album at once due to its lack of photo organization feature.