
How to remove Apple ID from iPhone without password


Want to transfer your iPhone 12 photos to a PC? Here's how to use a USB cable and sync with cloud services to quickly export your photos, as well as organize your video files.


There are third-party tools, Windows native apps, and Apple's path you can use to transfer pictures from iPhone 12 to PC.
Transferring photos from an iPhone 12 to a Windows PC should theoretically be a simple plug-and-play task, yet operating system differences between iOS and Windows frequently create friction. Whether you are attempting to clear up storage on your iPhone 12, or back up your images locally for saving on a local hard drive, choosing the right transfer strategy saves considerable time and prevents file corruption errors.
In this article, we will break down the primary strategies for moving photos from iPhone 12 to PC, covering everything from native Windows tools and cloud sync options to specialized third-party management utilities like Appgeeker iPhone Data Transfer, weighing the trade-offs, step-by-step workflows, and format considerations for each.
If you prefer direct file control without installing software, using Windows File Explorer over a standard Lightning-to-USB cable is the most direct route. This method allows you to directly drag and drop the pictures from your iPhone 12 onto the PC.
How to do it:
1. Configure transfer settings on iPhone 12.
Open Settings > Photos, scroll to the bottom, and locate the Transfer to Mac or PC section. Select "Keep Originals" if you want raw HEIC image files and uncompressed video. Select "Automatic" if you want iOS to convert photos to JPEG on the fly during transfer.
2. Plug your iPhone 12 into your PC using a Lightning-to-USB-A cable.
3. When a prompt appears asking, "Trust This Computer?" Tap Trust and enter your device passcode to unlock it.
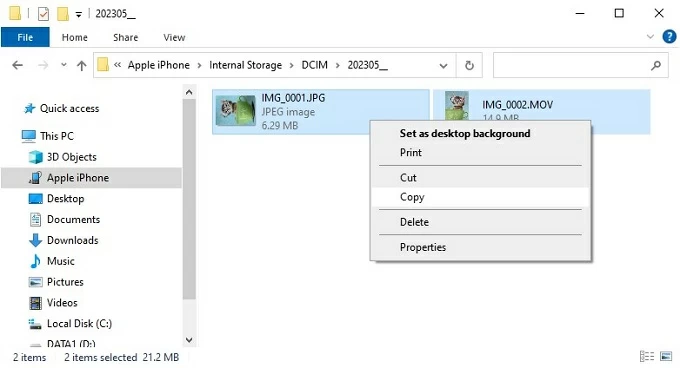
4. Open File Explorer on Windows and click This PC in the side navigation panel.
5. Double-click Apple iPhone, then Internal Storage, and finally open the DCIM folder.
6. Select the desired photo or video files, right-click to Copy, and Paste them into a designated directory on your PC drive.
Pros & Cons:
Related: How to bypass iPhone passcode
For a slightly more structured approach that automatically scans, sorts, and import your iPhone 12 photos by date, Microsoft's built-in Photos app is a dependable native option.
Here's how to transfer iPhone 12 Photos to PC:
1. Plug your iPhone 12 into your PC machine.
2. Open the Start menu, search for Photos, and launch the application.
3. Click the Import button in the top-right corner of the window and choose From a USB device.

4. The Photos app will scan your iPhone 12 storage for media.
5. You can import all items, filter out previously imported items, or manually select specific photos.
6. Click Import to start the batch transfer.
Pros & Cons:
While Windows built-in tools handle basic iPhone 12 photos to PC transfers well, they often struggle with specialized media—such as retaining Live Photo video clips, preserving raw metadata, or managing large 4K video exports without connection drops—and lacks flexibility. Appgeeker iPhone Data Transfer is a standalone device management utility designed specifically to solve these iOS-to-Windows limitations and give you more control over the transfer.
Key capabilities of Appgeeker iPhone Data Transfer:
How to transfer iPhone 12 photos to PC:
1. Download the PC version of the application on your computer, launch it. Then, link your device via a Lightning cable. Tap Trust on your iPhone 12 screen if prompted.
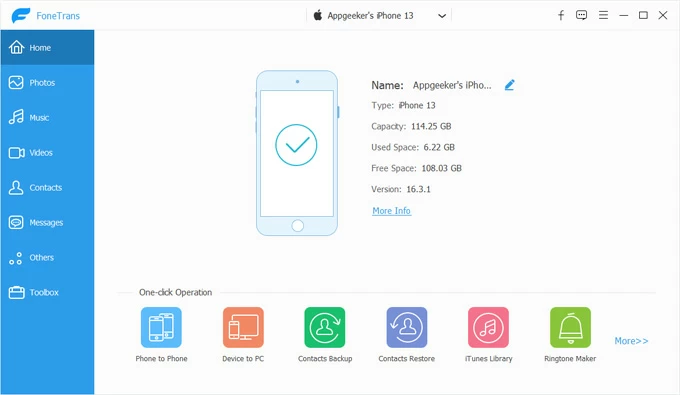
2. In the left sidebar, click the Photos icon. It will index your photo library, showing organized sections for Media Types (Live Photos, Portraits, Screenshots, Bursts), custom albums, and folders.
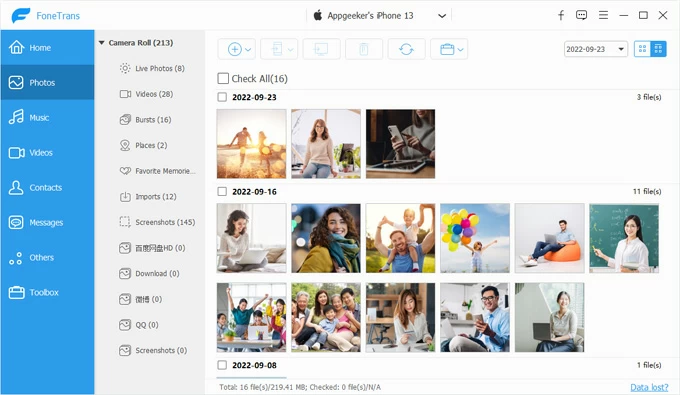
3. Select individual photos or entire album. Click the Export to PC button in the top toolbar.
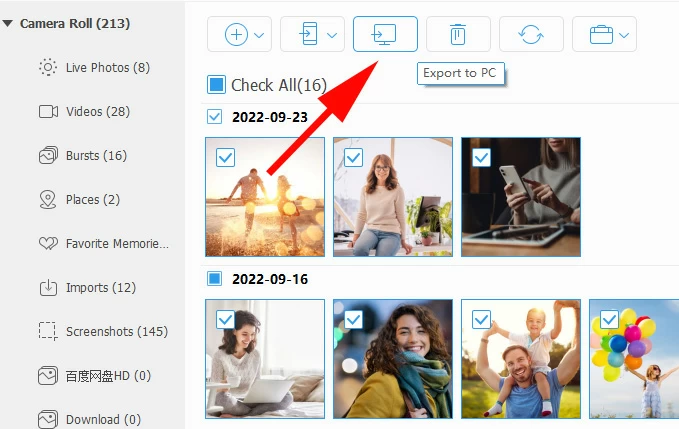
Alternatively, right click on a specific album, from its context menu, select Export to PC.

When a dialog opens, select a destination on your PC, then click OK.
It will begin the transfer. The tool displays a real-time progress bar with detailed file queue metrics.
Related: How to recover iMessages from iPhone
If you prefer a way to move your pictures from iPhone 12 to PC without relying on a cable, iCloud for Windows integrates your iPhone 12 photo library straight into Windows File Explorer.
To sync photos on iPhone 12 with PC:
1. Go to Settings > [Your Name] > iCloud > Photos, and turn on Sync this iPhone to enable iCloud Photos feature.
2. Download iCloud for Windows from the Microsoft Store or Apple's website.
3. Launch the app, sign in with your Apple ID, click the Photos option, and then toggle iCloud Photos to ON position.
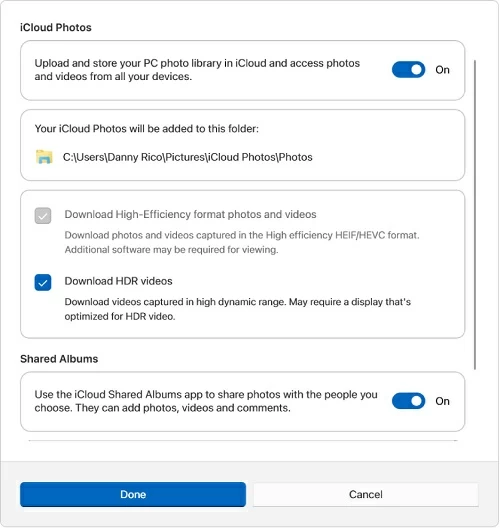
4. Open File Explorer. You will notice a dedicated iCloud Photos entry in the sidebar.
5. Photos appearing in this folder are cloud thumbnails by default.
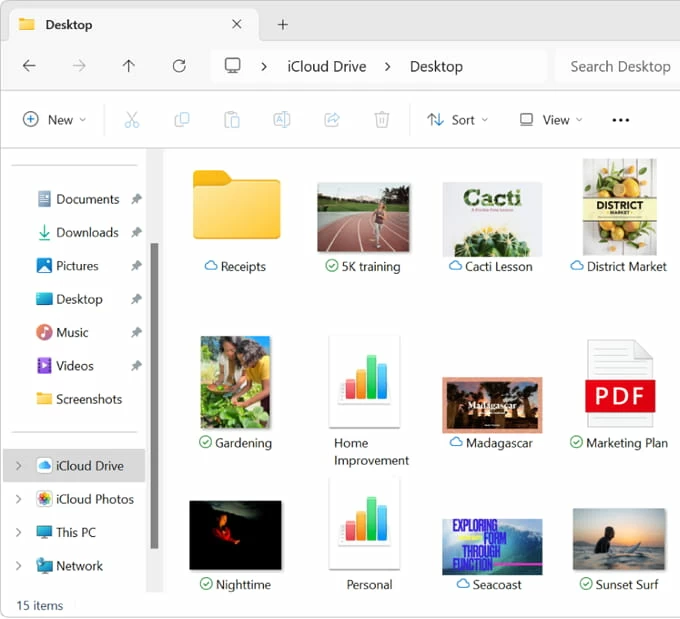
To save permanent copies locally, select the photos, right-click, and choose Always keep on this device.
Pros & Cons:
Related: How to access iPhone videos on PC
Here are the detailed steps to import photos from your iPhone 12 to your Windows PC using a third-party cloud service like Dropbox. You can set this up to upload photos automatically or upload them manually.
1. Download and install the Dropbox app from the App Store on your iPhone 12 if you haven't already.
2. Open the Dropbox app and log into your account.
3. Tap the Account icon (person icon or profile picture) in the bottom right corner.
4. Tap Camera Uploads.
5. Toggle Camera Uploads to ON.
6. Select whether you want to upload using Wi-Fi Only or Wi-Fi + Cellular Data (Wi-Fi is recommended to avoid using mobile data).
7. Choose if you want to include videos.
8. Grant Dropbox access to your photos when prompted (select Allow Full Access).
Once your photos are uploaded to Dropbox from your iPhone, you can access them on your PC in two ways:
9. Install the Dropbox for Windows app on your PC from dropbox.com/install.
10. Sign in with the same Dropbox account used on your iPhone.
11. Open File Explorer on your PC.
12. Click on Dropbox in the left sidebar.
13. Open the Camera Uploads folder (or the folder where you manually uploaded the photos) to view and move your photos directly into your local PC folders.