How to unlock iPhone 17 without passcode [SOLVED]

This complete guide can help you transfer all or selected photos from an iPhone 17 to a Windows PC with wired and wireless methods for a smooth, hassle-free experience.

This guide discovers both wired and wireless ways to import photos from an iPhone 17 to a PC on Windows 11 & 10.
Switching to an iPhone 17 and wondering how to transfer your photos to a PC? With the iPhone 17's powerful camera, it's easy to capture high-quality photos and videos that you may want to edit, back up, or manage on your computer. In this guide, we'll explore several different ways to help you transfer photos from iPhone 17 to PC for seamless, local access.
If you're moving a large number of pictures, the built-in options like Windows Photos and File Explorer offer a cable-based way to import photos from your iPhone 17 to PC directly.
For a more convenient experience, wireless methods such as iCloud Photos can automatically sync the entire Photos Library across platforms between iOS and Windows.
Alternatively, you can use a cross-platform tool like Appgeeker iPhone Data Transfer. It supports bidirectional photo transfers between iPhone 17 and PC, whether you're moving the entire library or just selected pictures and videos.
Table of Contents
The methods in this guide work for iPhone 17, iPhone 17 Pro, iPhone 17 Pro Max, and iPhone 17 Air, as well as Windows PCs from various brands.
When transferring photos from an iPhone 17 to a Windows PC, you can use built-in tools like the Photos app and File Explorer. Typically, these tools can recognize your iPhone as an external storage device when connected. If you have the USB-C charging cable that came with your iPhone 17, simply follow the methods below:
The built-in Photos app (or modern Microsoft Photos) on Windows 10 and 11 makes it easy to view and edit pictures on your computer. It also allows you to import photos from an iPhone 17 directly via a wired connection. It's free to use, and you can preview and select your iPhone photos before transferring them to your PC, with no limit on how many you can import.
1. Connect your iPhone 17 to PC using a suitable USB cable. If asked, tap Trust and enter your passcode to allow data access.
2. On your PC, press the Win key to open the Start menu.
3. Search and launch the Photos app from the task bar.
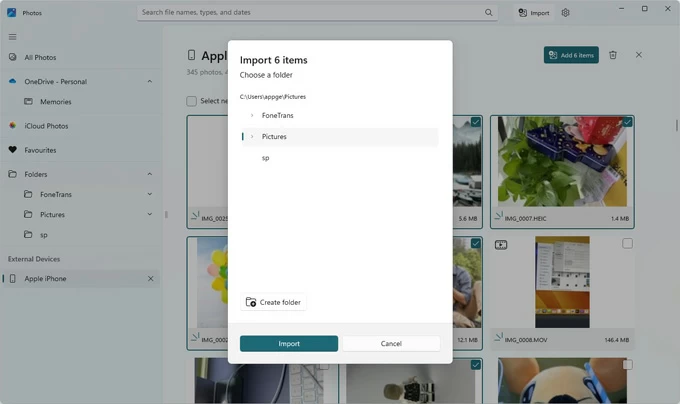
4. When Photos app opens, click the Import button in the top right and select Apple iPhone.

5. Allow it a short while to load and display all available photos and videos on your iPhone 17.
6. Select the iPhone photos you want to transfer, or simply choose Check All at the top.
Note: If the photos or videos are saved in iCloud Photos rather than your iPhone, make sure to download them on your device first.
7. Once ready, click Add [X] items button to import all selected photos.
8. In the prompted box, select a local folder on PC. If needed, you can also create a new one.
9. Click Import button to confirm.
After transferring the photos from iPhone 17 to computer, disconnect the device and you'll be able to access them at any time you want.
Another way for photo transfer from your iPhone 17 to a PC is by using File Explorer. This method works well for the pictures and videos saved in the Camera Roll. With a cable connection, you can access your iPhone 17's DCIM folder and manually copy photos to a local folder on your PC.
The process is relatively easy, but for the photos stored in other iPhone albums, this method might be less useful. Follow these steps to copy photos from iPhone 17 to PC:
1. Link your iPhone 17 to PC and unlock it. If the Trust This Computer prompt appear, tap Trust and verify your passcode.
2. Double-click This PC icon on your computer.
3. When the File Explorer window opens, select Apple iPhone under Devices and drives.

4. Navigate to Internal Storage > DCIM folder. From there, you'll find your iPhone photos and videos sorted by monthly subfolders. See what to do if your photos are not showing up in the iPhone Camera Roll.
5. Browse the folders to locate the photos you prefer to transfer from your iPhone 17 to PC. It may take some time if you don't remember when the pictures were taken.
6. Select the pictures and videos you want. You can press the Ctrl key and click on individual items, or use Ctrl + A to select them all.
6. After selection, right-click on the chosen photos and select Copy in the opening menu.
7. Go to a local folder on your Windows PC and then right-click > Paste. You may also drag and drop the pictures to a computer folder directly.

For an easier way to transfer photos from an iPhone 17 to a Windows PC, a cross-platform tool like Appgeeker iPhone Data Transfer can be an excellent choice.
It supports all iOS and Windows versions and features a user-friendly interface, allowing you to transfer photos between iPhone 17 and PC in both directions, whether you're moving the entire photo library, selected pictures, or high-resolution images and videos.
The best thing is that it displays the original album structure on iPhone, making it easy to browse and locate the specific photos you want. Additionally, its built-in HEIC converter lets you convert iPhone photos to standard JPEG or PNG formats for better compatibility with Windows apps.
Not limited to photos, it also supports transferring videos, music, contacts, messages, and other data between iOS and Windows in just a few clicks.
Here's how to transfer photos from iPhone 17 to Windows 11/10 PC, no network required:
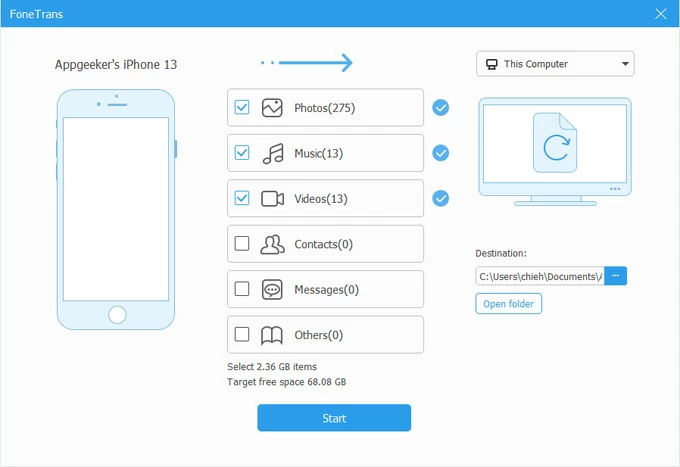
Step 1. Open Appgeeker iPhone Data Transfer on your Windows PC and attach the iPhone 17 via a cable. When prompted, tap Trust and enter your passcode as required.

Step 2. From the left sidebar, select Photos tab. This lets you preview everything in your current Photos Library, including the Camera Roll and other albums.

Step 3. Preview and select the photos you'd like to transfer from your iPhone 17 to PC. If you want to import all photos, select Check All at the top.
Step 4. Click Export to PC button and pick a local folder in the pop-up window. It's a computer icon in the top toolbar, letting you save iPhone photos on your PC directly.

Once the transfer is complete, open the destination folder on your PC to access all your photos.
If you want to transfer photos from your PC to your iPhone 17 instead, simply drag and drop the local files into this window.
Whether you plan to create a backup or free up device space, Appgeeker iPhone Data Transfer also provides a convenient way to move all photos from iPhone 17 to Windows PC in one click.

If you prefer a wireless transfer to move iPhone 17 photos to PC without a cable, the methods outlined below can be of help.
Without using a cable, Apple's iCloud Photos feature enables you to sync iPhone 17's Photo Library with a Windows PC wirelessly. This method relies on an internet connection.
Once iCloud Photos is enabled on both your iPhone 17 and PC with the same Apple Account, any photos you add or edit will automatically sync across devices in real time, making it easy to access, manage, and download them anytime.
TIP: This cloud-based method requires enough iCloud storage to proceed. Each Apple Account includes 5 GB of free storage, which may fill up quickly. If you have a large photo library to transfer, consider upgrading to iCloud+ for more available space.
Steps for photo transfer from iPhone 17 to Windows PC via iCloud Photos:
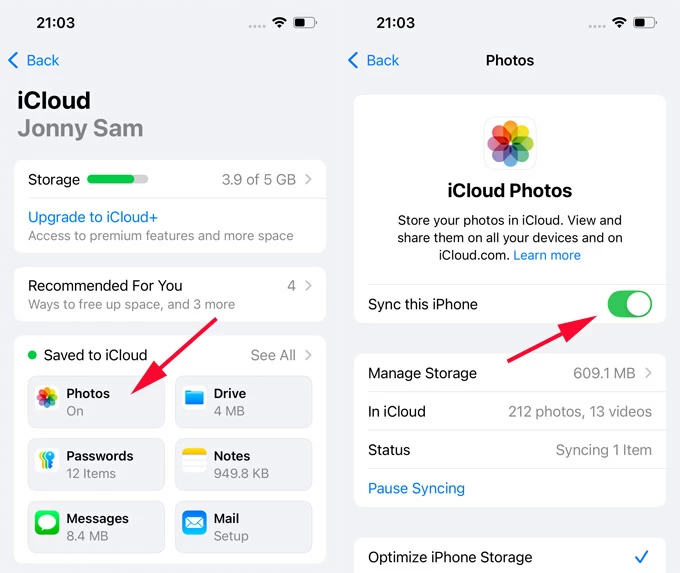
Step 1. Enable iCloud Photos on iPhone.
Keep your device connected to the network. It may take some time to upload all photos and videos from this iPhone 17 to iCloud storage.
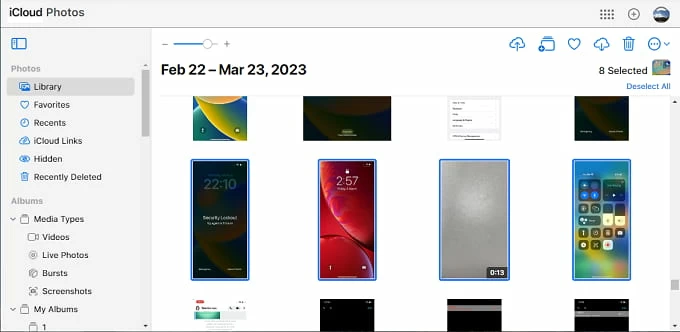
Step 2. Access iCloud Photos on Windows PC.
Step 3. Download iPhone 17 photos to your PC from iCloud.com.
Alternatively, you can click the three-dot More button > More Download Options. From there, you'll have the options for:
Feel free to select the download option depending on your preference.
If you're running out of iCloud storage, other cloud services like Google Photos, OneDrive, and Dropbox can also be used for wireless photo transfer from an iPhone 17 to PC.
One of the easiest ways to transfer photos from your iPhone 17 to a Windows PC wirelessly is by using email, especially when you're moving only a few images. Simply send the photos to yourself and then download them on your PC without iCloud. No additional steps are required.
To ensure a smooth iPhone-to-PC photo transfer, keep the following tips in mind:
Transferring photos using a wired connection ensures a more stable process, especially when moving large libraries or high-resolution photos and videos.
For convenience, wireless methods offer cable-free transfers by relying on the network or cloud storage. These options are ideal for quick and easy sharing.
When using a wired method, make sure your iPhone 17 is connected to your PC with a reliable USB-C cable, particularly the original one. An unstable connection may prevent Windows system from detecting the iOS device or loading media files properly.
The Windows PC cannot access your iPhone data if the device is locked or permission isn't granted. After connecting, unlock your iPhone 17 and tap Trust when the Trust This Computer prompt appears.
For wireless transfers using iCloud Photos or email, both your iPhone 17 and PC should be connected to a stable Wi-Fi network.
To use iCloud Photos, make sure it is enabled on your iPhone 17 and that you're signed in with the same Apple Account on the target PC.
Also, confirm you have enough iCloud storage by going to iPhone Settings > [your name] > iCloud. Insufficient storage can interrupt photo syncing.
Typically, Apple allows you to download iPhone photos from iCloud in most compatible formats such as JPEG for images and MP4 (H.264) for videos.
If needed, tools like Appgeeker iPhone Data Transfer include a built-in HEIC converter, allowing you to convert iPhone photos to common JPEG or PNG for broader compatibility.