
How to Transfer Photos from iPhone to USB

Upgrading to the iPhone 17 and want to transfer data from old phone to the new iPhone 17 after the setup? This guide provides everything you need with step-by-step guidance.

For transferring data from an old iPhone or iPad to a new set-up iPhone 17 without resetting, Appgeeker iPhone Data Transfer is the best choice, offering great flexibility and convenience.
In most cases, the official methods for transferring data to an iPhone 17 after setup require erasing your device.
The excitement of unboxing a brand-new iPhone 17 is unparalleled, many people can't wait to set it up and dive into the new experience. However, this excitement comes with a new question: Can I still transfer data to my new iPhone 17 after completing the setup?
While Quick Start is a great option during initial setup, it's not the best solution for users who have already configured their new iPhone 17. Don't worry, whether you're moving from an old iPhone, iPad, or even an Android device, this article will walk you through the multiple effective methods to transfer data to new iPhone 17 after setup, getting your photos, videos, apps, settings and other data onto your iPhone 17/Pro/Pro Max/Air without losing anything.
From wireless Quick Start and iCloud backup to wired computer backup and powerful third-party transfer tool, you can seamlessly transfer data to a new iPhone 17 post-reset.
Table of Contents
The reality is that you can still move everything to your new iPhone 17 after setup, but the method depends on whether you're willing to erase your device. Apple's most thorough migration methods are designed to run during setup, Therefore, if you want an exact copy of your old device, you'll first need to factory reset your new iPhone 17.
After erasing and restarting, options like Quick Start, iCloud Backup restore, and Finder/iTunes restore become available again. These tools rebuild your new iPhone 17's environment, just as it was on your old device.
If you don't want to reset your new iPhone 17 because new data has been created, Apple's iCloud Sync offers a partial solution, though it's limited. You'll need to manually enable syncing for specific data types like photos, contacts, and notes, and rely on your available iCloud storage. Not all data can be transferred to your new iPhone 17 via iCloud Sync.
Fortunately, modern data transfer tool fills this gap. To transfer data from an iPhone or iPad to an already set-up iPhone 17 while preserving existing data, reliable Appgeeker iPhone Data Transfer tool can make the process seamless and complete.
Even if you've set up and personalized your new iPhone 17, a dedicated Appgeeker iPhone Data Transfer tool allows you to transfer content from your previous device to the new iPhone 17 without a mandatory factory reset.
This software establishes a direct connection between your old device (iPhone or iPad) and your new iPhone 17, transferring photos, messages, videos, contacts, and more in one go, enabling a comprehensive migration from your old iPhone or iPad to the new iPhone 17.
It can fully transfer all data from your iPhone or iPad to your new iPhone 17 after it's been set up, or let you selectively move only the data you need to save space on your device. It can also handle large databases quickly, saving you a lot of time.
Here's how to transfer data from an old iPhone to a new iPhone 17 after setup without a reset:
1. Use two compatible USB cables to connect your new iPhone 17 and old iPhone to the computer, and remember to trust the computer.
2. Download and open the software on your computer, then click Phone to Phone under the One-Click Operation section at the bottom.

3. On the right side of the screen, select your iPhone 17 as the target device from the drop-down list to receive the transferred data.
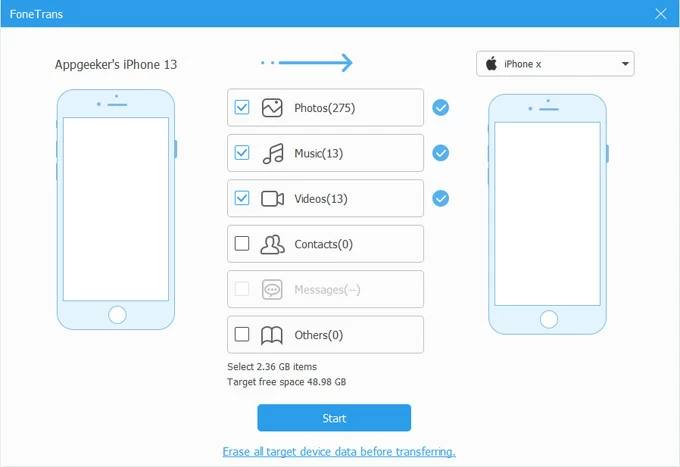
4. Check the content you want to transfer, including photos, music, videos, contacts, messages, and other files. You can see the total size of the selected items.
5. Click Start to begin transferring data from your old iPhone to your new iPhone 17. Keep the devices connected until the transfer is complete.
Once done, open the relevant apps on your iPhone 17 to view the transferred data, while the existing data on your device remains intact.
Apple provides several built-in migration tools to help you transfer data from an iPhone or iPad to a new iPhone 17. The downside is that these methods are designed for brand-new devices.
To use any official method to transfer data after your iPhone 17 has already been configured, you must first factory reset it and start over. You should also back up your iPhone 17 data to iCloud or a computer to avoid data loss.
Below are Apple's official methods, divided into wireless and wired/local transfers for clarity. The steps for each method are demonstrated using an iPhone-to-new-iPhone-17 data transfer, but they also apply to transferring data from an iPad to an iPhone 17.
Quick Start is Apple's most user-friendly method, perfect for those who want a near-identical copy of their old device without using a computer. It uses Bluetooth and Wi-Fi to authenticate your Apple ID and migrate data.
It requires placing the new and old iPhones side by side so they can communicate and transfer data directly, with both devices maintaining power and Wi-Fi connections.
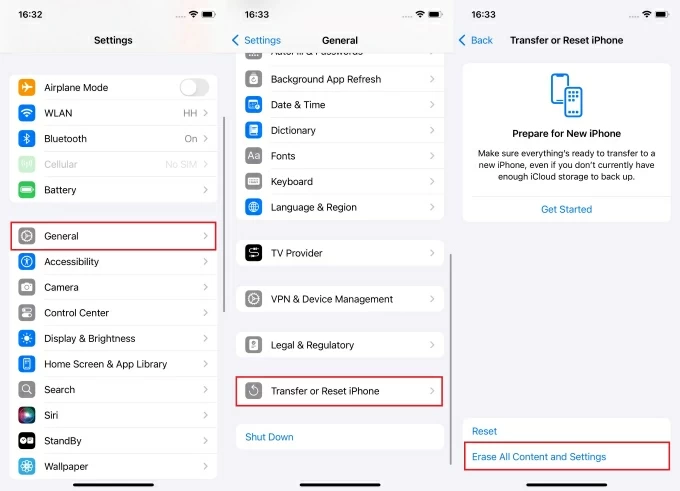
1. Factory reset the new iPhone 17: Go to Settings > General > Transfer or Reset iPhone > Erase All Content and Settings.
2. When your iPhone 17 restarts, follow the instructions to come to the "Quick Start" screen and place it next to the old iPhone.
3. A "Set Up New iPhone" screen will automatically pop up on your old device. Tap Continue to proceed.
4. An animation will appear on your new iPhone 17; scan it using your old iPhone.
5. Your old iPhone will prompt you to use your Apple account to set up the new iPhone 17, tap Set Up for Me.
6. Enter the lock screen passcode of your old device on your iPhone 17 for verification.
7. Once the connection is established, your new iPhone 17 will begin activation, while the old device remains on the "Finish on New iPhone" screen.
8. Set up Face ID on your new iPhone 17.
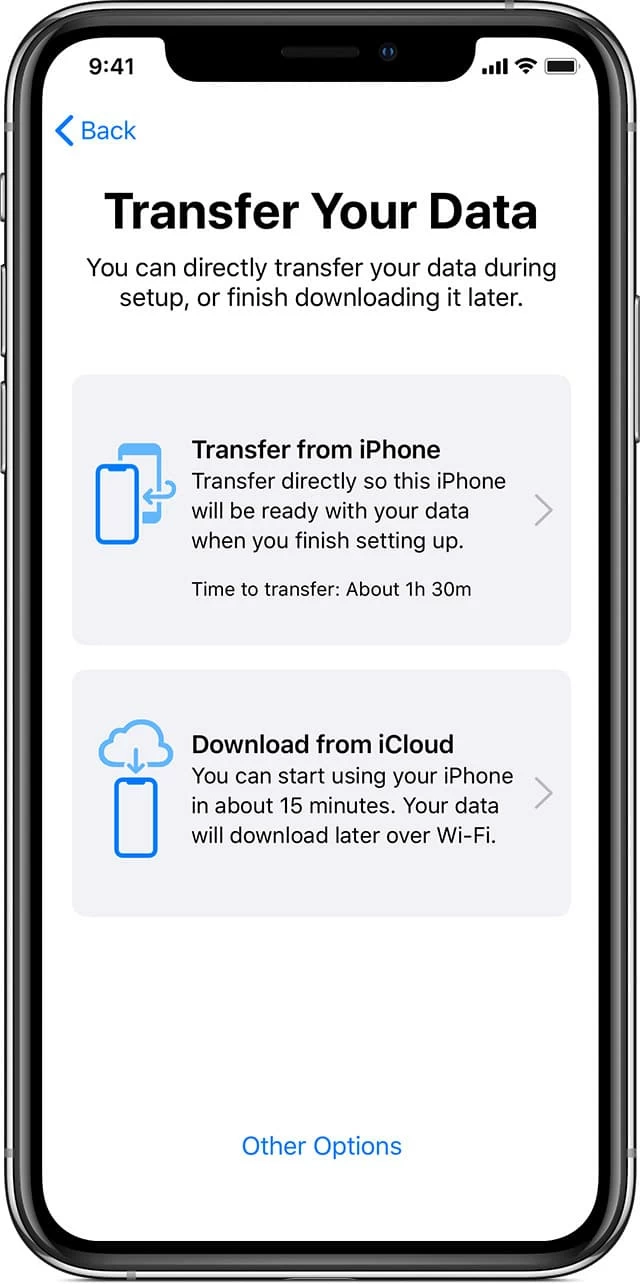
9. At the "Transfer Your Data" screen, select Transfer from iPhone for a complete data transfer.
10. Agree to the relevant terms and conditions and follow the prompts to configure.
11. When ready, both devices will show a "Transferring Data" message, along with an estimated time for the transfer to complete.
12. When you see "Transfer Complete", the data from your old iPhone has been successfully moved over, including your home screen layout and settings.
Afterward, you can choose to erase the data on your old iPhone and sign out of your Apple account.
If you forgot the passcode for your iPhone 17, you can see How to get into locked iPhone without passcode.
If you've backed up your old iPhone or iPad to iCloud, this method will wirelessly copy content to your new iPhone 17 from iCloud backup during the setup to restore everything.
Note:
1. Back up your old iPhone. Head to Settings > [Your Name] > iCloud > iCloud Backup and tap Back Up Now to create the latest backup.
2. Erase your new iPhone 17. Navigate to Settings > General > Transfer or Reset iPhone and choose Erase All Content and Settings.
3. After the phone reboots, you'll see the Hello screen. Follow the setup prompts until you reach the "Transfer Your Apps & Data" screen. Select From iCloud Backup.
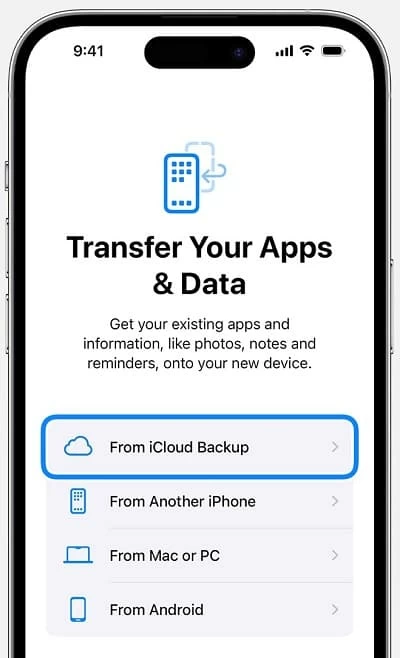
4. Sign in with your Apple account and choose the backup you just created. Then all your data from the old iPhone, including apps, photos, messages, and settings, will be downloaded on your new iPhone 17.
Read more: Transfer photos between iPhones without iCloud
For large data sets or unstable networks, a wired transfer with a computer is a great alternative. This approach creates a local snapshot of your old iPhone using iTunes or Finder, guaranteeing all data is saved. You then restore this backup to your new iPhone 17 to get all the information.
1. Create a full backup: Plug your old iPhone to your computer with the data cable. Open Finder or iTunes. Select your device and click Back Up Now. For a full, secure backup that includes passwords and Health data, be sure to select Encrypt local backup and create a password.
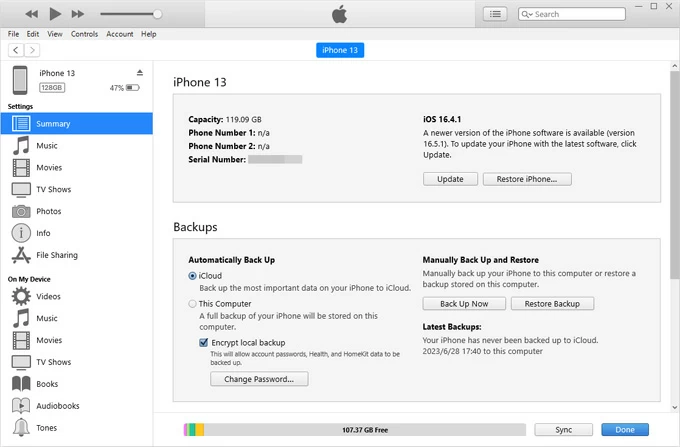
2. Link your new iPhone 17 to a Windows PC or Mac and run iTunes or Finder.
3. In the iTunes window, click the device icon in the top left corner to access the Summary tab; in Finder, locate your iPhone 17 in the sidebar and go to the General section.
4. Click Restore Backup and Select the most recent encrypted backup. Then wait for the restoration to complete.
For users switching from an Android device to iOS, Move to iOS is Apple's official bridge. Similarly, to transfer data from Android to your iPhone 17 that is set up, you must first restore your iPhone to its factory state. Additionally, you should download the latest version of Move to iOS from Google Play on your Android phone.
Note:
1. After resetting and restarting your iPhone 17, follow the on-screen tutorials until you reach the "Quick Start" screen, then tap Set Up Without Another Device to go on.
2. When you get to the "Transfer Your Apps & Data" step, select From Android, then tap Continue, and a ten-digit or six-digit code will appear.
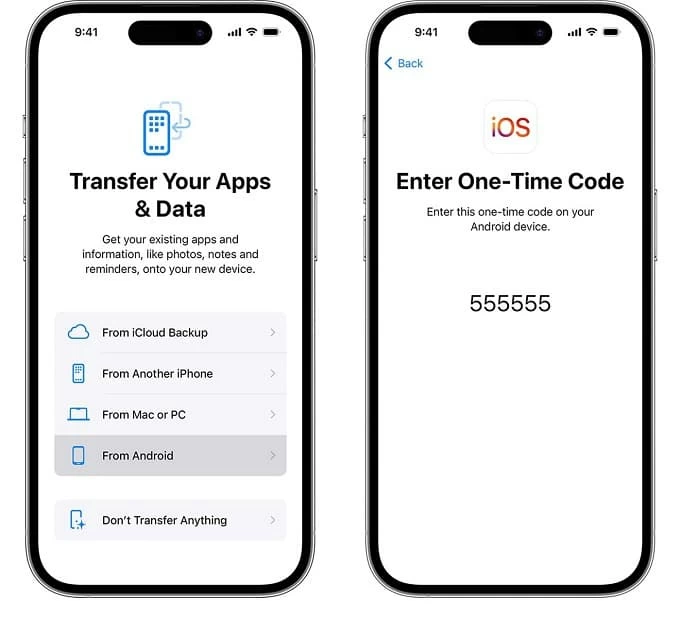
3. On your Android phone, open the Move to iOS app. Tap Continue and agree to the terms and conditions. Tap Continue again, then enter the one-time code from your iPhone 17 when prompted.
4. Once both devices are connected, your Android phone will show a list of transferable data, including messages, contacts, photo library, WhatsApp, calendar, display settings, and more.
5. Select the items you want to transfer to your iPhone 17, then tap Continue to begin the data migration. Keep both devices close together and wait for the loading bar to finish.
6. Once it's done, tap Continue on your iPhone and complete the remaining setup steps. You can then check your iPhone 17 to see the data you've transferred from your Android device.
Also see: How to transfer WhatsApp data from Android to iPhone
Related: How to transfer photos from iPhone 17 to computer
Conclusion
Choosing the right strategy to transfer data to your new iPhone 17 after setup is crucial. It's entirely feasible to move data from an old iPhone, an iPad, or an Android device to a new iPhone 17. While most official methods require you to reset your already-set-up iPhone 17, at least your data can be restored. Or, you can use AppGeeker iPhone Data Transfer for a quick, reset-free data transfer from one iPhone to another, or from an iPad to an iPhone post-initialization.
1. Can I transfer everything from my old iPhone to my configured iPhone 17 without erasing it?
Not entirely. iCloud sync can bring in key data like contacts and photos, and Appgeeker iPhone Data Transfer can migrate a wide range of content without a reset. But to fully replicate system settings, app data, and layouts, a factory reset followed by restoring a backup is necessary.
2. Can I transfer only selected content to my iPhone 17 after setup?
Yes. Appgeeker iPhone Data Transfer let you pick specific data types, while iCloud sync can selectively handle categories like Photos or Contacts.
3. Can I merge data from two different devices onto my iPhone 17?
Apple's tools don't merge backups. Instead, restore from one primary backup first, then manually transfer or sync secondary content (like photos or notes) from the other device.
4. How can I avoid losing data during transfer?
Verify backups before starting, keep devices charged or plugged in, use a stable Wi-Fi or wired connection, and avoid wiping your old device until you've confirmed everything is present on the new iPhone.


