
How to Transfer Ringtones from iPhone to iPhone

Need to transfer your favorite music from iPad to iPhone? We'll offer you step-by-step tutorials about how to move music on your iPad over to your iPhone.

Key Takeaway:
There are various ways to help you transfer music from iPad to iPhone with or without computer.
iPad, as a portable device, allows users to easily take their music collection on the go. And with large storage space, iPad can store a vast library of songs, making it a convenient music player for music lovers.
But what if you want to transfer your iPad's music to your iPhone? Just as it's easy to transfer music from iTunes to iPhone without syncing, you can perform this task of transferring music from iPad to iPhone even more simply. We'll show you a few ways to do it.
Table of Contents
If you are a subscriber of Apple Music, accessing the music library on your iPad from iPhone is actually quite simple. You just need to turn on "Sync Library" on both your iPhone and iPad, then any purchased music from Apple Music, as well as any changes that you make to your Library, will automatically sync across all of your devices.
However, you have to ensure that you sign in to both your iPad and iPhone using the same Apple ID, which is the one used with your Apple Music subscription. Here's how to transfer music from iPad to iPhone via Apple Music.
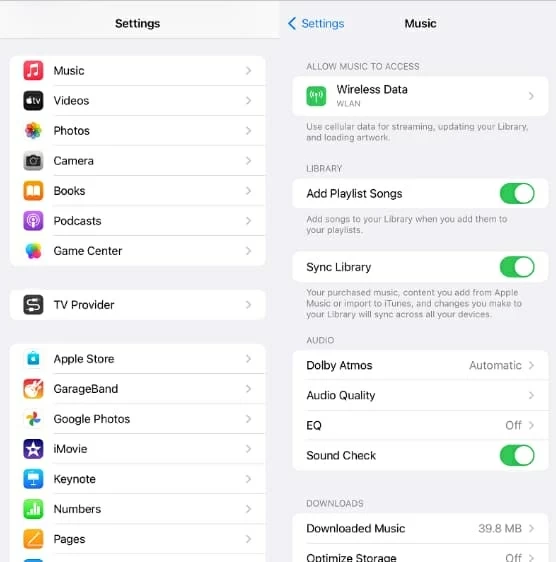
Step 1. Navigate to "Settings" application on iPhone.
Step 2. Scroll down to "Music" and tap it.
Step 3. Turn on "Sync Library" by tapping the toggle button next to it.
Step 4. Turn on "Sync Library" on your iPad the same way.
Note:
Also read: How to fix iPhone when it's unavailable
iTunes can be used to transfer songs from your iPad to your iPhone for free, but it only supports the transfer of purchased music from iTunes Store or Apple Music. The process of transferring songs from iPad to iPhone with iTunes requires you to first transfer the purchased music to your iTunes library, and then sync it to the target phone.
Transfer purchases from iPad to iTunes
1. Get the latest version of iTunes and install it on your computer.
2. Plug your iPad into your computer using a USB cable.
3. Click on "File > Devices > Transfer Purchases from [the name of your iPad]."
![]()
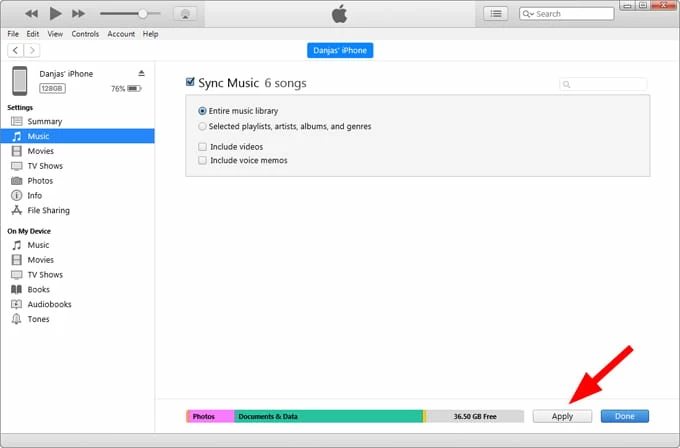
Sync music from iTunes library to iPhone
1. Disconnect your iPad, and connect your iPhone to PC using a USB cable instead.
2. Click on the tiny "iPhone icon" in the top left corner of the iTunes window.
![]()
3. Then click on the "Music" tab in the left sidebar.
4. Click on "Sync Music." And then choose whether you want to sync your entire music library or selected playlists. If you'd like to sync all songs, check the box next to "Entire music library."
5. Once chosen, click "Apply" to start the process.
Note:
The best and most reliable way to transfer music from iPad to iPhone without data erasing is by using the iTunes alternative - Appgeeker iPhone Data Transfer.
With this excellent music transfer tool, you can easily sync your favorite songs from iPad to iPhone with clicks. You'll also find it effortless to transfer free music downloaded online in single or batch transmission mode.
iPhone Data Transfer – iPad to iPhone Music Transfer
How to transfer music from iPad to iPhone without iTunes:
Step 1: Download the app and connect both iPad and iPhone to PC
Click the green button above to free download and install iPhone Data Transfer. Then, connect your iPad and target iPhone to computer with two USB cables. On each device, when prompted, tap "Trust This Computer" to establish a connection.
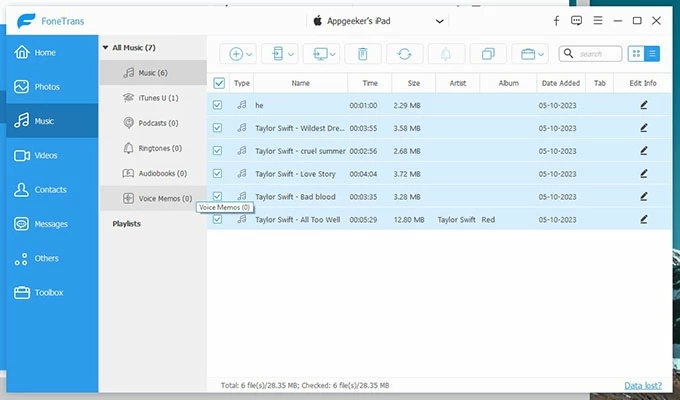
Step 2: Launch the app and click on the "Music" tab
Click the "Music" in the left sidebar, you'll see all music from your music library on iPad listed on the right pane. And by clicking on Type, Name, Collection, and Time from the top you can have music sorted in different ways.
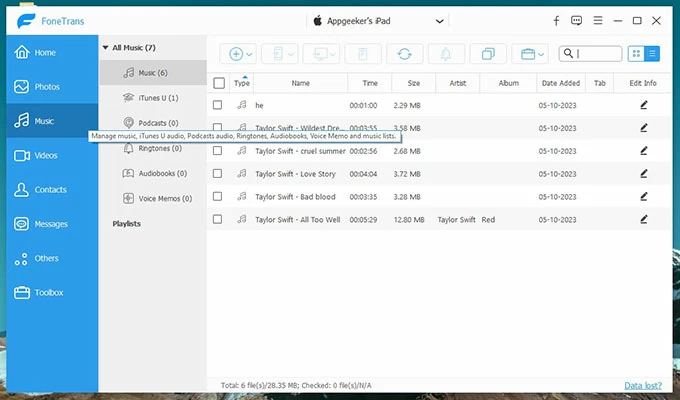
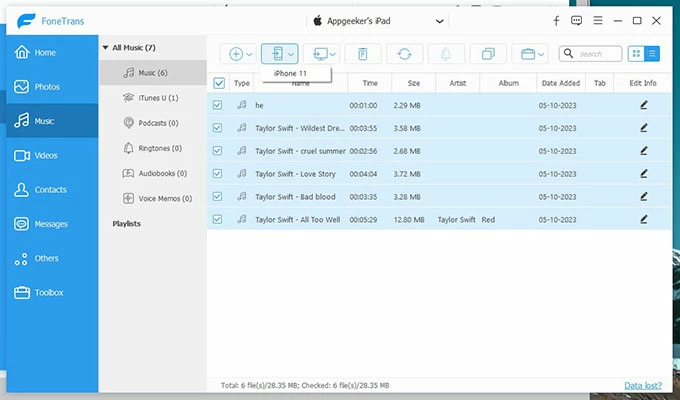
Step 3: Add music from iPad to target iPhone
Select the music files you want to transfer from your iPad to your iPhone. If you'd like to transfer all music, simply check the box next to "Type" from the top menu bar.
Then, click the phone icon at the top bar to export music from iPad to your iPhone.
Tip: To record the audio playing on your Mac or Windows PC, such as music or video's BGM, you may need AppGeeker Screen Recorder for capturing any sound you want. Read to know more from the article on how to record MP3 audio files in Windows 10 PC or laptop.
In the case of transferring music from an iPad to an iPhone, users can utilize AirDrop to transfer music files wirelessly, without the hassle of cables or the need for additional software.
While using AirDrop to move music from an iPad to an iPhone, users should be aware that it's time-consuming if you want to transfer an entire music library, since AirDrop can only transfer individual files. Besides, you can only share the link of the song, not the matadate associated with the music file.
How to transfer music from iPad to iPhone through AirDrop:
1. Swipe from the bottom or top of the screen to access the "Control Center."
2. Turn on "Wi-Fi" and "Bluetooth" on both iPad and iPhone. And then touch and hold the top-left group of controls, tap the "AirDrop" icon in the top-left corner of the "Control Center."
3. Select either "Contacts Only" or "Everyone". It depends on your preference for who can see your device during AirDrop transfers.
4. Open the Music app on your iPad and select the songs or playlists that you want to transfer.
5. Tap on the three-dot icon, then select "Share Songs" from the list of options that appear. Your iPad will now search for available AirDrop devices. When you see your iPhone listed, tap on it to select it.
6. On your iPhone, you'll get a notification showing [your iPad's name] would like to share an iTunes Store link, tap "View" to check the incoming music file.
See more: How to transfer music to iPhone without iTunes
In addition to take advantage of AirDrop for wireless music transfer from iPad to iPhone, it is also possible to share music files through the Mail application.
You can attach music files to an email message on iPad, and then send the email to yourself. After that, you can open the email and download the attachments on the target iPhone. Before following our tutorial, ensure that both devices are signed in to the same email account.
How to transfer music from iPad to iPhone wirelessly via Mail:
Note:


