
How to Transfer Music from iPhone to Mac

Looking to send ringtones from iPhone to iPhone? This post provides you with the simplest methods on how to transfer ringtones to another iPhone.

How to transfer ringtones from iPhone to iPhone with or without iTunes:

It's not difficult to send ringtones from your old iPhone to your new iPhone.
With the release of the Apple's flagship iPhone lineup, you may be eager to upgrade to a new iPhone. However, once you have obtained a new iPhone device, you may want to transfer your ringtone collection from your old iPhone to the new iPhone.
After all, your ringtone library may contain many unique, custom ringtones that are not accessible on a new iOS device. Here we'll show you how to transfer ringtones from iPhone to iPhone.
Table of Contents
To transfer ringtones from iPhone to iPhone successfully, what you need to know:
1. Download and install an older version of iTunes, such as version 12.6 or earlier, on your computer, as this version supports users to sync ringtones to your iPhone from iTunes library.
2. iTunes does not support users directly transferring ringtones from one iPhone to another; instead, you need to first transfer the ringtones from one iPhone to the iTunes library and then sync them from the iTunes library to the other iPhone.
3. Note that iTunes can only enable iOS users to transfer ringtones purchased from the iTunes Store to the iTunes library.
If you want to transfer custom ringtones or some free ringtones downloaded from the Internet, please refer to the second method we provide to transfer ringtones from old iPhone to new iPhone via iPhone Data Transfer.
Here's how to send ringtones from iPhone to iPhone with iTunes:
Step 1: Transfer purchased ringtones from the old iPhone to iTunes library
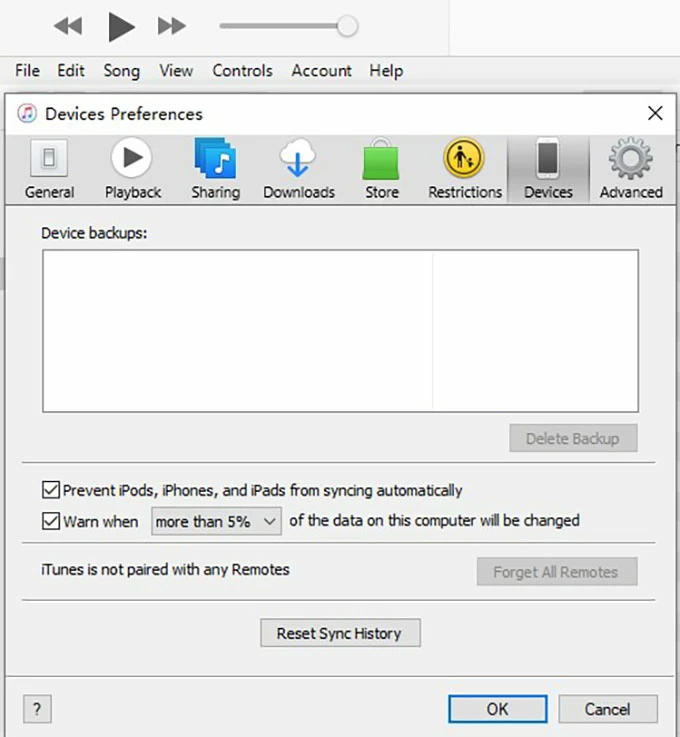
First ensure that the option "Prevent iPods, iPhones, and iPads from syncing automatically" is checked in iTunes by going to "Edit > Preferences > Devices> check Prevent iPods, iPhones, and iPads from syncing automatically."
Then, use a USB cable to connect your old iPhone to the computer and launch iTunes. Next, go to "File > Devices > Transfer Purchases from iPhone" to transfer the purchased ringtones to iTunes library. Finally, click on the "Sync" button to proceed. Once the sync process is over, disconnect your old iPhone from your PC.
![]()
Tips:
Also read: How to fix if you fail to transfer music to iPhone with iTunes
Step 2: Sync ringtones from iTunes to the other new iPhone
Connect the new target iPhone to your PC using a USB cable. Then, click on the tiny "iPhone icon" that appears in the upper-left corner of the iTunes window to access the device's "Settings."
![]()
Next, select the "Tones" option from the left sidebar and check the box next to "Sync Tones."
After that, choose the option for "All tones" to sync all of the ringtones in your iTunes library to iPhone. Finally, click on "Apply" to start the sync process. Once completed, the ringtones will be available for use on your new iPhone.
![]()
Note:
Transferring ringtones from iPhone to iPhone is an easy task with Appgeeker iPhone Data Transfer. This ringtones transfer tool allows you to send ringtones from your old iPhone to your new iPhone easily and transfer the ringtones individually or in bulk. All it takes is a few clicks and the ringtones are transferred to your new iPhone in no time!
iPhone Data Transfer also supports other transfers like photos transfer, music transfer, videos transfer, and contacts transfer, allowing you to preview all the files in the app's window before transferring. With iPhone Data Transfer, transferring ringtones from one iPhone to another iPhone couldn't be simpler.
If you wonder how to transfer videos to iPhone, see our article on how to transfer videos from PC to iPhone with or without iTunes.
Key Features
Step 1. Open the software and then plug both your old and new iPhone into the computer using USB cables. Once connected, your iPhone's information will be displayed on the main app screen.

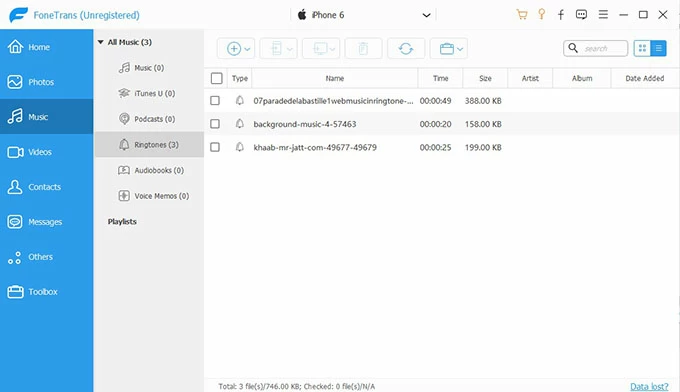
Step 2. Navigate to the top of the iPhone image, and select the source iPhone you'd like to transfer ringtones from in the drop-down list.

Step 3. Click on "Music" in the left sidebar > Choose "Ringtones" from your music library. All the ringtones that are included in Ringtones category will be listed on the right pane.
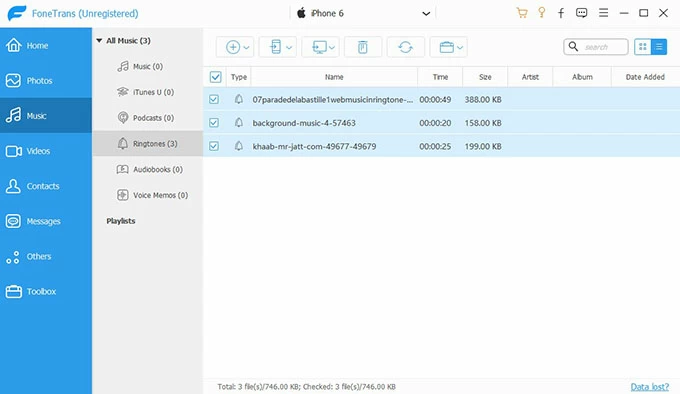
Step 4. Check the boxes next to ringtones you want to transfer to new iPhone. To transfer all tones, the easiest way is to tick the check box next to Type at the top, next to Name.
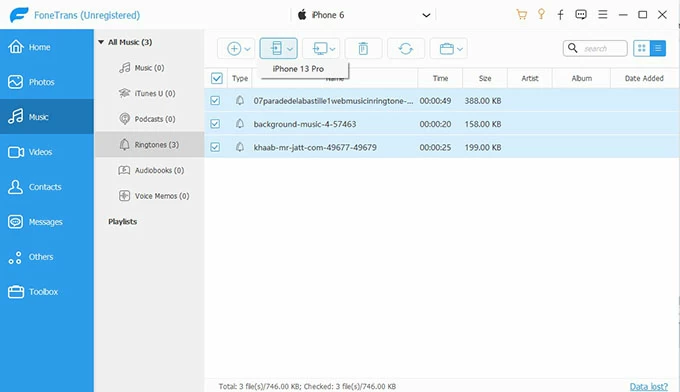
Step 5. From the top menu bar, click on the "iPhone icon", and then choose the target new iPhone to transfer ringtones to from the drop-down list.
Tip - How to set custom ringtones on iPhone?
Also: What to do when the iPhone is in Security Lockout
iPhone Data Transfer not only supports transferring ringtones between iPhone devices but also helps in creating personalized ringtones, which can be imported onto your iPhone for use. In the following, we'll show you how to turn your favorite music into customized ringtones. First, make sure you have downloaded iPhone Data Transfer on your PC and connected your iPhone to computer via a USB cable.
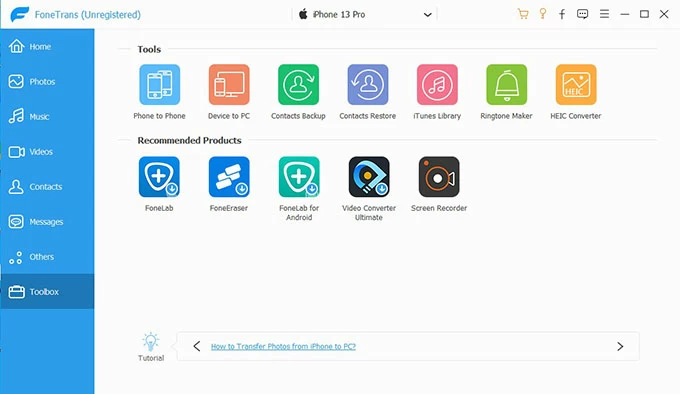
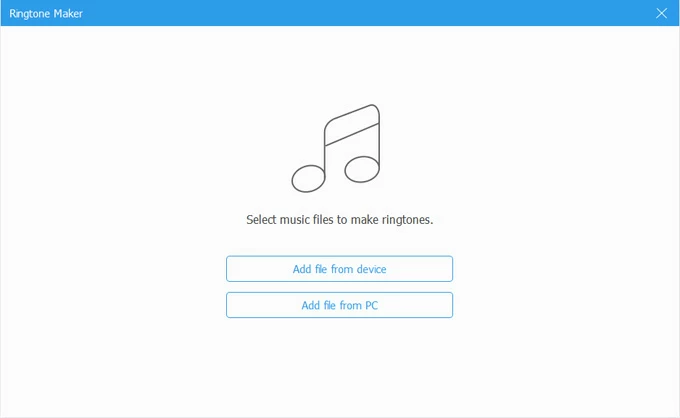
Step 1. Open iPhone Data Transfer > Click on "Toolbox" from the left-side pane> Choose "Ringtone Maker" > Select music files that you want to make ringtones from device or PC.
Provided that you want to make a custom ringtone with a music file downloaded online on your PC, you should click "Add file from PC", and then select and open the music file in the destination folder on your computer.
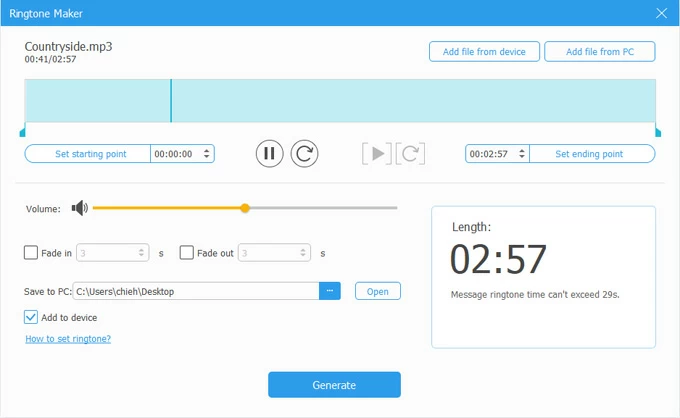
Step 2. Drag the slider to set starting and ending points in the pop-up window. Meanwhile, you can adjust the volume of your ringtone, add Fade in or Fade out effect.
Step 3. Choose the location to save the custom ringtone. To export it to your iPhone, check the box next to "Add to device."
Step 4. Click "Generate" button to proceed. You'll be accessible to the custom ringtone on iPhone.
Tip: If you want to record online ringtones to your iPhone and listen to them offline, take advantage of one of the best audio recorders - AppGeeker Screen Recorder. You can find out more from our dedicated article on how to record MP3 audio files in Windows 10 PC or laptop.
If you don't want to transfer your ringtones from iPhone to iPhone by using cables, it is possible to transfer ringtones wirelessly from one iPhone to another via Bluetooth using AirDrop. As Apple's file transfer feature, it allows users to share files between Apple devices that are near to each other instantly. Here we'll introduce how to use AirDrop to send ringtones from iPhone to iPhone.
1. Swipe down from the top of the screen to access "Control Center" on both iPhones > Tap the icon for "Wi-Fi", "Bluetooth", and "AirDrop."
2. Select "Contacts Only" or "Everyone". Depend on who you want to be able to send ringtones to and receive ringtones from.
3. Navigate to the ringtones you'd like to transfer on the old iPhone and tap the "Share" button.
4. Tap "AirDrop" and select the new iPhone from the list of available devices nearby.
5. On the new iPhone, hit the "Accept" button to receive the ringtones via AirDrop.
Note: Only users of iPhone 5 or newer versions can use the built-in AirDrop feature, as Apple added this functionality along with the release of iOS 7.
For those people who just want to transfer a small number of ringtones and the file size of the ringtone is less than 50 MB, you can choose to transfer these ringtones from iPhone to iPhone using e-mail. However, note that if you want to send multiple ringtone files, you need to compress them into a ZIP file first.
To get started transferring a ringtone from iPhone to iPhone with e-mail, follow these steps:
Note:
The best way to share custom ringtones on your iPhone with friends instantly is to use AirDrop. First, open "Control Center" by swiping down from the top-right corner of the screen on your and your friend's iPhone.
Then, long-press the network settings card in the top-left corner of the Control Center and enable Wi-Fi, Bluetooth, and AirDrop, select "Contacts Only" or "Everyone." Go to the ringtone in Settings, tap the "Share" button, and choose AirDrop. Your friend will receive a notification to accept or decline the transfer.
Once the transfer is complete, the custom ringtone will be available on the recipient's iPhone, and they can use it as their default ringtone.
See more: How to do when iPhone text messages and iMessages disappeared
We provided you with some methods on how to send ringtones from iPhone to iPhone. Out of the multiple ways to transfer ringtones to iPhone, you can try what suits you best. If you just want to transfer purchased ringtones from iTunes Store, then iTunes serves you best. But, when you want to transfer ringtones from iPhone to iPhone directly and easily, you can pick iPhone Data Transfer for that matter. Hope you liked our efforts!


